Forked Tower: Magic
This page contains all raidplans, guides, maps, and other useful tools to help players easily progress through the Forked Tower: Magic (Extreme) on the NA datacenters.
This is meant to be a comprehensive repository of information so if you feel like something is missing please reach out in Field Op Enjoyers and let me know!
Other Guides
Section titled “Other Guides”Another well written guide by Rylin Kai can be found on his gitbook linked here: Critical Mechanics Guide
What is the Forked Tower: Magic (Extreme)?
Section titled “What is the Forked Tower: Magic (Extreme)?”Forked Tower: Magic (Extreme) is the second, and final, iteration of high-end large-scale raiding content for the Occult Crescent. Inside this half of the tower are dangerous foes, hidden traps, fiendish bosses, and most importantly… LOOT! This comes in two modes: an easier, more casual expreience that is puggable and soloable in the wider instances of North Horn. And the more challenging Extreme version that’s on queueable with a group of 12 or more from the Phantom Village.
The raid consistent of multiple encounters some of which are bosses, others are more puzzle-like, or require players to traverse dangerous pathways. In order of appearance the raid plays out as follows:
- Twin-Headed Aevis
- Split Hallways
- Sword Dancer
- Lockward Hallways
- Storm Generators
- Necrophobia
- Clockwards
- Index
Similar with Baldesian Aresenal in Eureka - being made to return out of Forked Tower while dead will force players to lose Knowledge XP and subsequently level down to 39. So be warned! This content is punishing! Though, re-leveling is more tedious than anything. Getting back to level 40 requires doing at least 1 CE or 3 FATEs. The biggest loss here is the time of waiting to re-enter Forked Tower.
Limited Raising and Lives
Section titled “Limited Raising and Lives”While in Forked Tower: Magic (Extreme) a Resurrection Restricted debuff will be placed on participants. This debuff starts at three stacks and act as your “lives” while inside the Forked Tower. After you die and then accept a raise, you will lose one stack of debuff (or “lifes/lives” here on). When reaching 1 life, dying, and accepting another raise - your Ressurection Restricted will turn into a Ressurection Denied.
From this point onwards, your next death is premanent. No method of raising can revive you and you are required to return out to Base Camp and causing you to level down. Don’t worry though, getting back to level 20 is just 1 CE away (or gold farming a little bit).
The methods in which you can be raised are limited. So far, there are only two methods in which you can be raised are
- Phantom Chemist with the Raise ability (unlocked at level 3)
- Phantom White Mage with the Occult Raise ability (unlocked at level 4)
- Healer Limit Break 3.
Both methods will consume 1 life and the healer limit break 3 does not circumvent the resurrection denied status.
Required/Suggested Phantom Jobs
Section titled “Required/Suggested Phantom Jobs”Required
Section titled “Required”- 1-2x Ranger for popping traps. Traps do pierce invulnerability skills in Forked Tower and there is one spot where you must pop a trap in the first halls.
- 1-2x Thief for finding traps, hidden chests for extra loot, a hidden portal for the puzzle, and unlocking doors for extra loot.
- At the very minimum you must have either one of each or some combination of the two to find traps in the hallway sections of the tower.
- 1x Bard for using Romeo’s Ballad to use Romeo’s Ballad to Arcane Stop the Black Tower Slime’s ‘The First Song’ cast during Storm Generators.
- These only appear on the top/middle platform.
- You can bring 1 bard per party to increase the overall DPS of the group and provide extra mits.
- 2+ Dancers for Mesmerize on raidwides. Elementary Chemistry in the Index fight hits for ~720-750k unmitigated. Also nice for other raidwides throughout the instance.
- Mesmerize/Enamoured have a LONG 1.8s application delay. To mitigate Elementary Chemistry correctly: press Mesmerize at the IS in Chemistry on the castbar.
Nice to Haves
Section titled “Nice to Haves”- A dispeller in the form of Time Mage or Necromancer to dispel the Barmuu’s ‘Magic Damage Up’ to have their on-death raidwide not do 200k+ damage.
- It is livable with enough mitigation or outranging the AoE (only doable on the final set)
- A form of mob crowd control in either Time Mage’s Occult Slowga or Black Mage’s Occult Toad.
- 4-6x White Mages and/or Chemists for raising KO’d players. Can be any combination of them.
- White Mage is strictly better in 99% cases due to it have a damaging button in the form of Occult Holy.
- Players with Freelancer mastered can leave the starting platform and give their party all 4 knowledge crystal buffs then swap to their actual phantom job if desired (The Adaptable trait allows this).
- Some groups may choose to run at least 1 or 2 Freelancers AT MOST to reup their knowledge crystal buffs before Necrophobia to have them last the entire instance.
- Please do not just waltz in and stay on Freelancer the whole time unless asked by the raidlead. Wisdom on the Winds is a subjectively awful button in 95% of cases.
Boss 1: Twin Snakes
Section titled “Boss 1: Twin Snakes”Weak to Fire (Blue) and Wind (Green)
Section titled “Weak to Fire (Blue) and Wind (Green)”{"Name":"Twin Snakes","MapID":1093,"One":{"X":-910.076,"Y":-980,"Z":690.86,"Active":true},"Two":{"X":-889.97,"Y":-980,"Z":690.2320000000001,"Active":true},"Three":{"X":-889.97,"Y":-980,"Z":708.9570000000001,"Active":true},"Four":{"X":-910.079,"Y":-980,"Z":709.149,"Active":true}}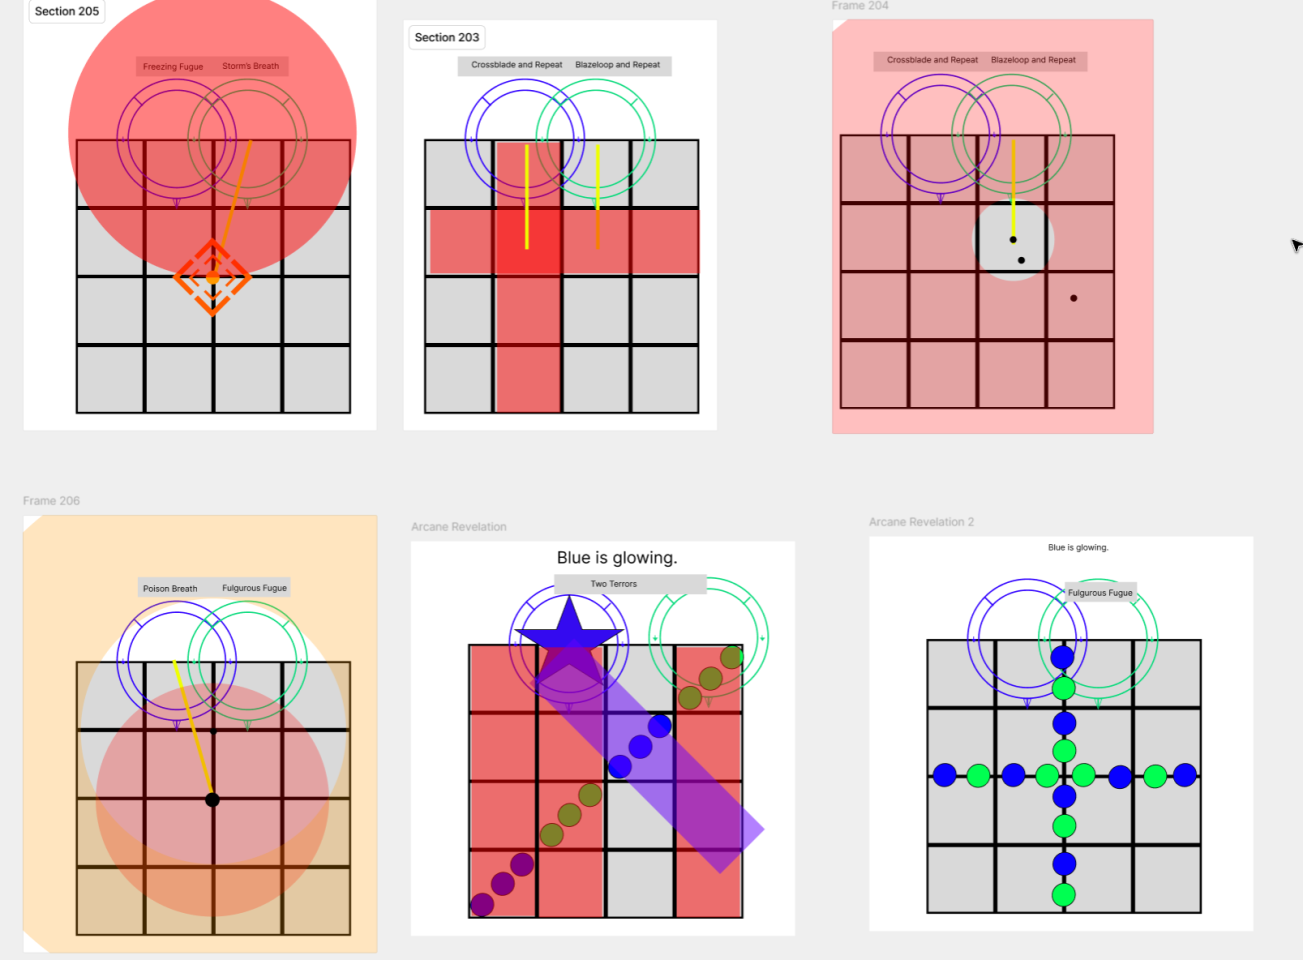
(Click to expand in new window)
Halls 1: The Split
Section titled “Halls 1: The Split”- Mob Resistances
- Lynn’s Ranger Guide
- Laser walls instantly kill, even through res invuln.
- Kill at least 4 adds ontop of Arcane Sigil to have them glow and progress the puzzle. This must be done on both sides.
- One (1) secret chest per side on one of the outside side paths.
- Watch thief in case they spawn the Tower Crusader (it one shots non-tanks)
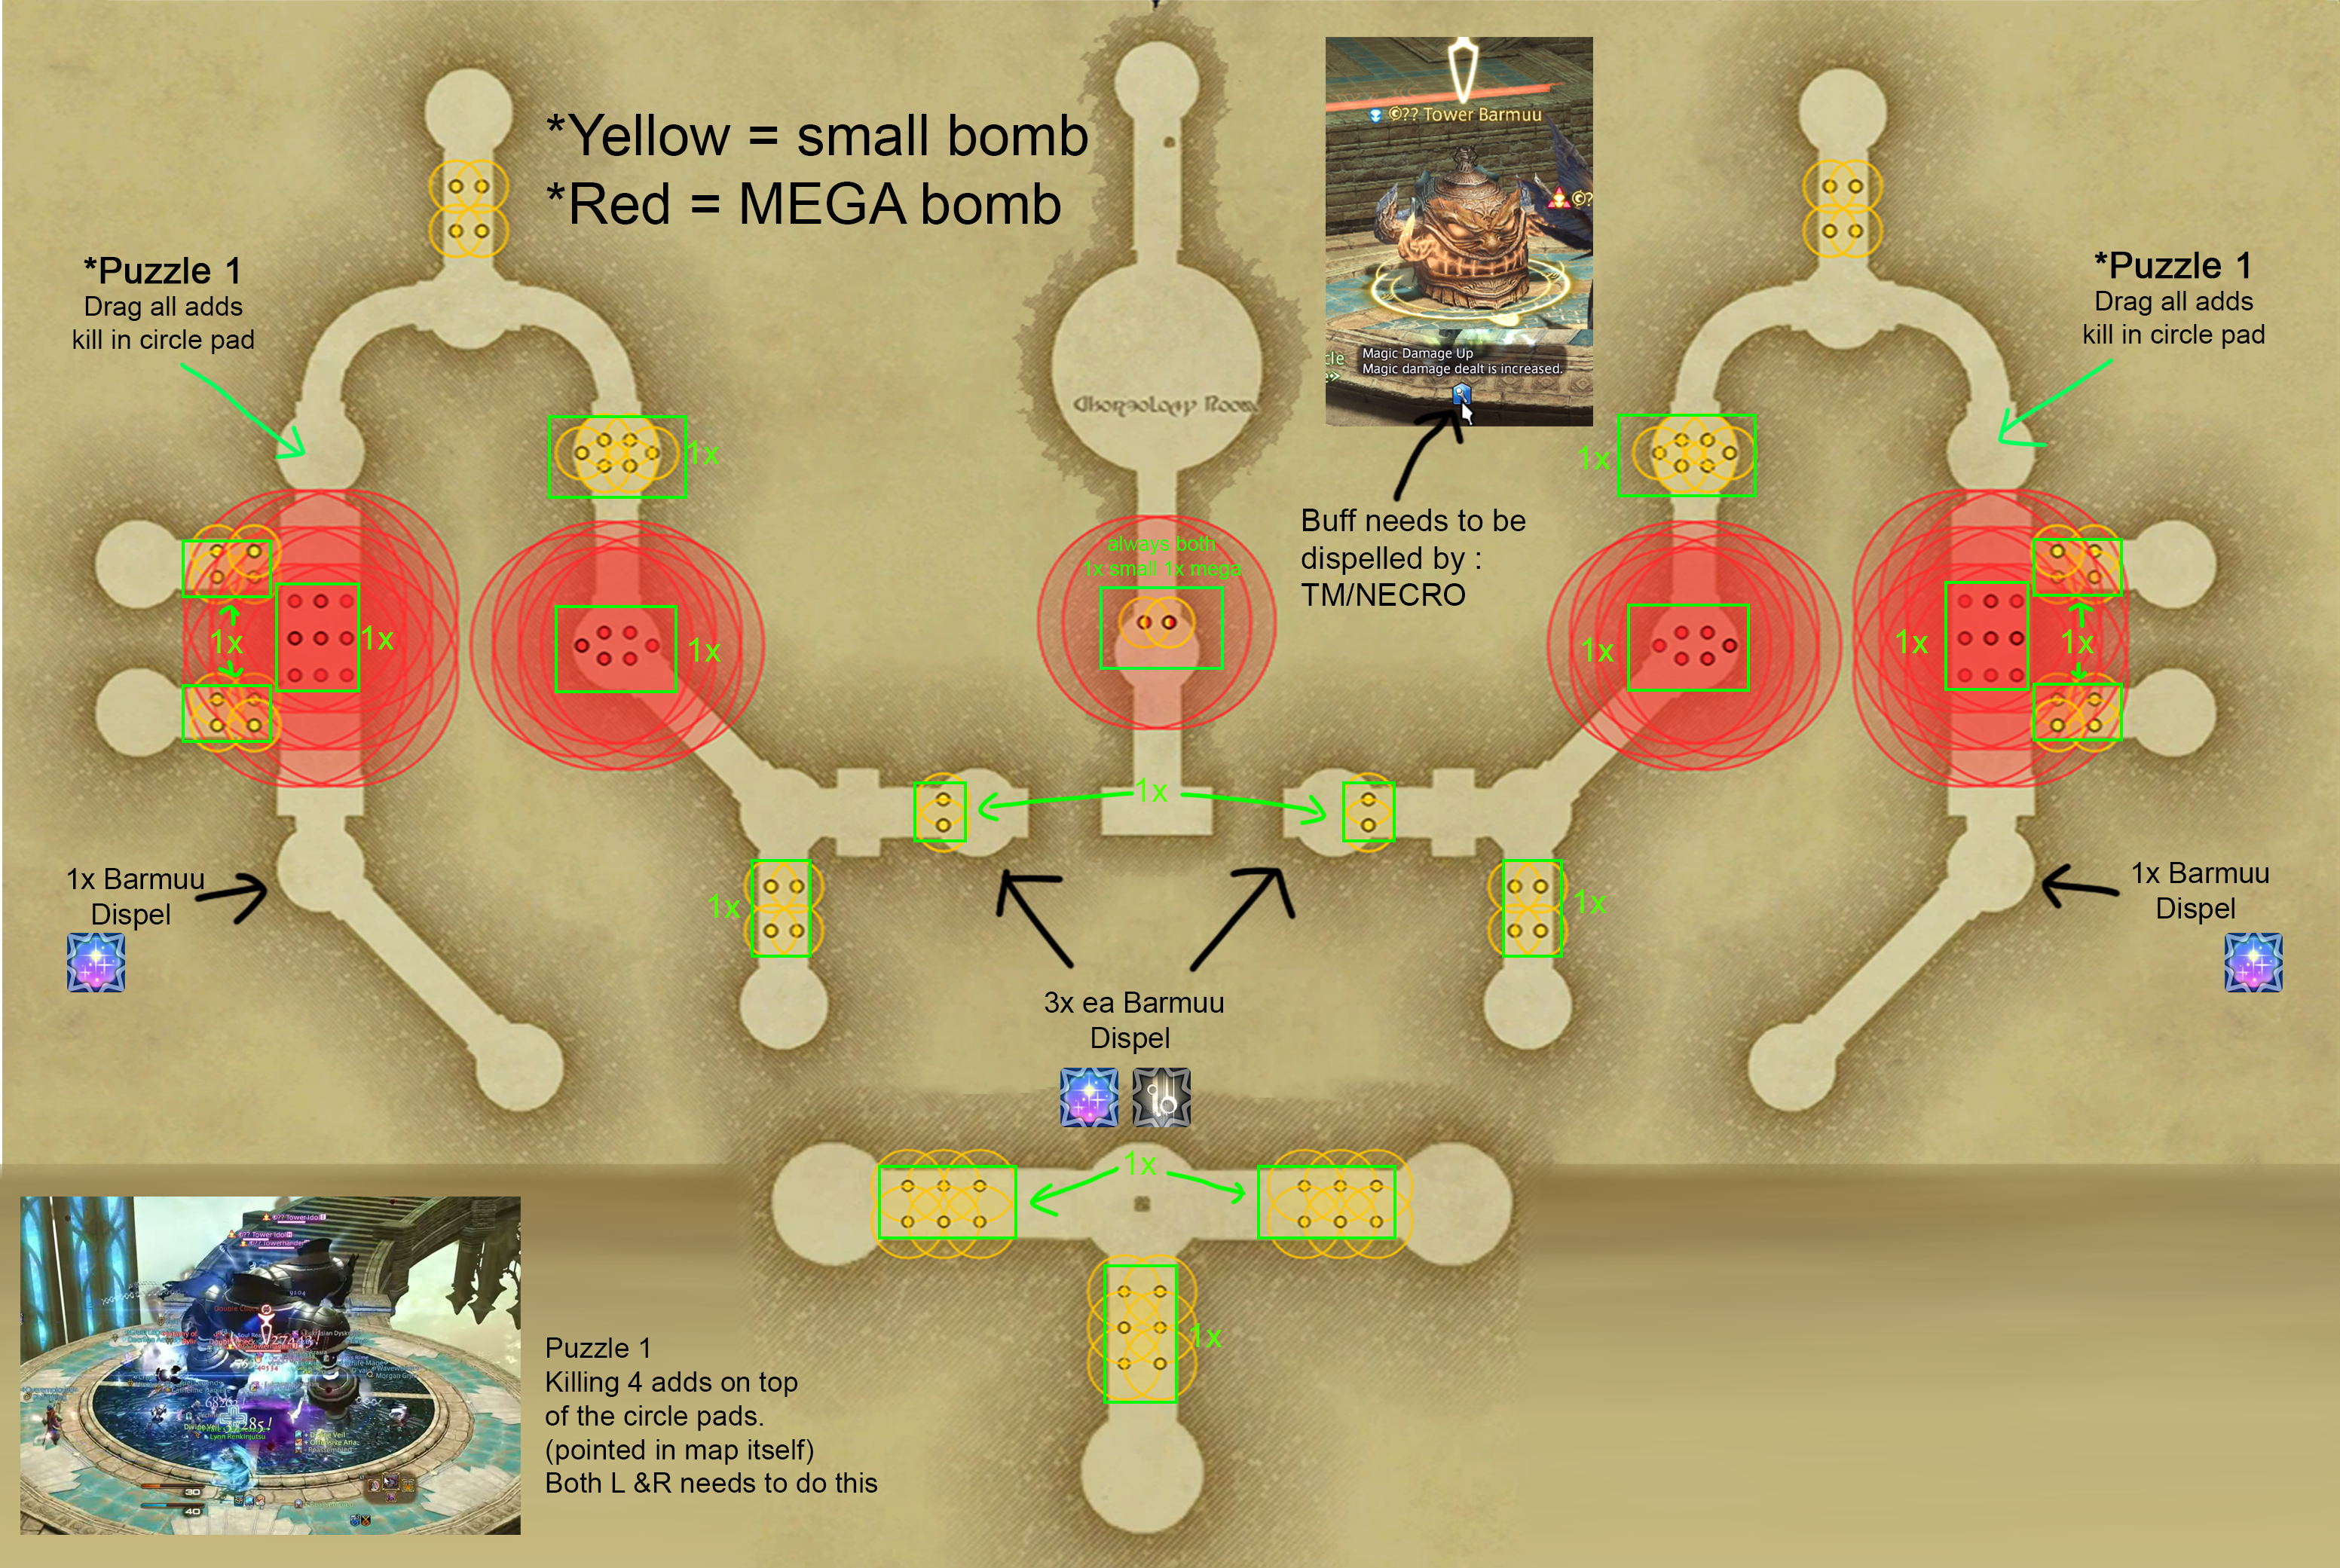
(Click to expand in new window)
Boss 2: Sword Dancer
Section titled “Boss 2: Sword Dancer”Weak to Lightning
Section titled “Weak to Lightning”{"Name":"Sword Dancer","MapID":1093,"A":{"X":600,"Y":-674,"Z":687.5,"Active":true},"B":{"X":611.667,"Y":-674,"Z":692.333,"Active":true},"C":{"X":616.5,"Y":-674,"Z":704,"Active":true},"D":{"X":611.667,"Y":-674,"Z":715.667,"Active":true},"One":{"X":600,"Y":-674,"Z":720.5,"Active":true},"Two":{"X":588.333,"Y":-674,"Z":715.667,"Active":true},"Three":{"X":583.5,"Y":-674,"Z":704,"Active":true},"Four":{"X":588.333,"Y":-674,"Z":692.333,"Active":true}}Halls 2: The Lockward
Section titled “Halls 2: The Lockward”- Mob Resistances
- Lynn’s Ranger Guide
- To progress complete the puzzle, the Lockward must complete the “Entrap” cast at least once. This will spawn the portal on one of the western bridges.
- This will respawn ALL traps in this area, including the two megas leading up to the Lockward. Make sure everyone is in a safe area before allowing the cast to finish.
- Kill at least 4 adds ontop of Arcane Sigil to have them glow and progress the puzzle.
- One (1) secret chest on one of the western side paths.
- Watch thief in case they spawn the Tower Crusader (it one shots non-tanks)
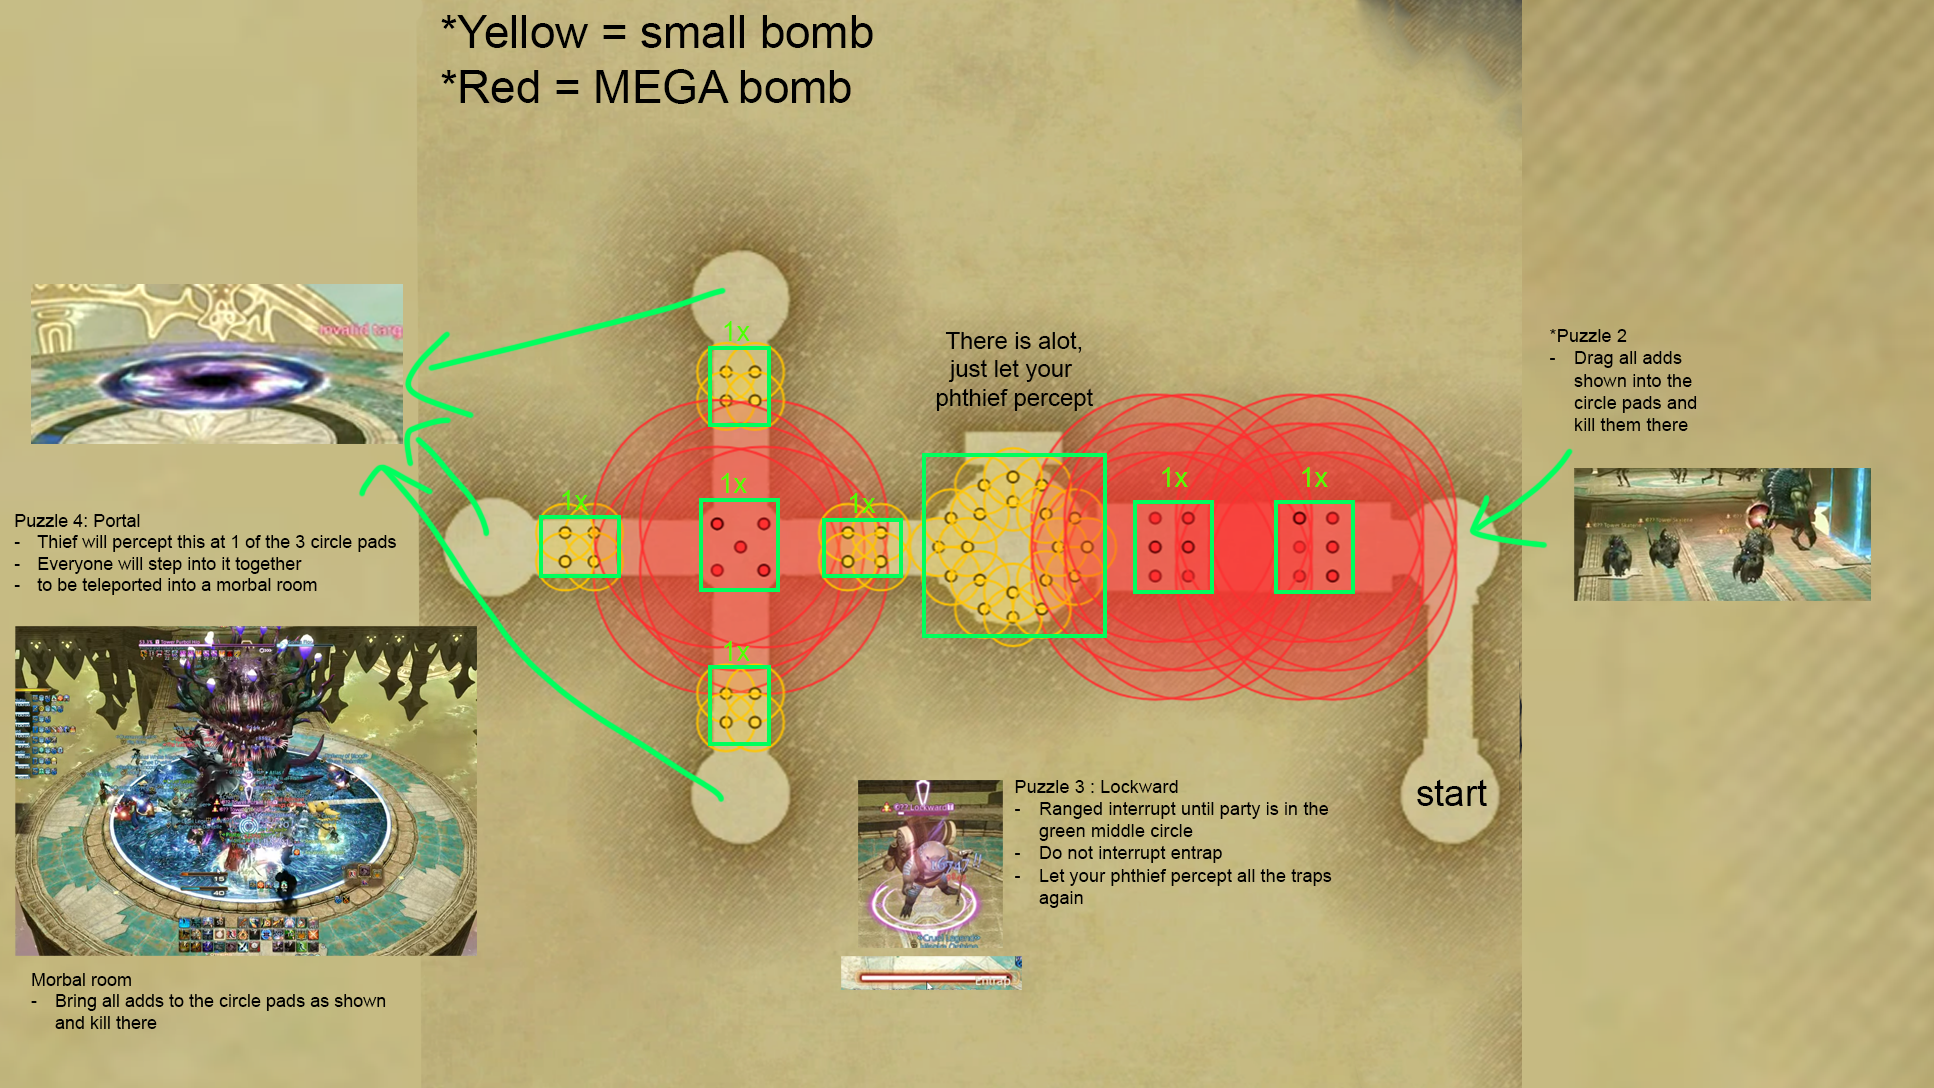
(Click to expand in new window)
Miniboss: Storm Generators
Section titled “Miniboss: Storm Generators”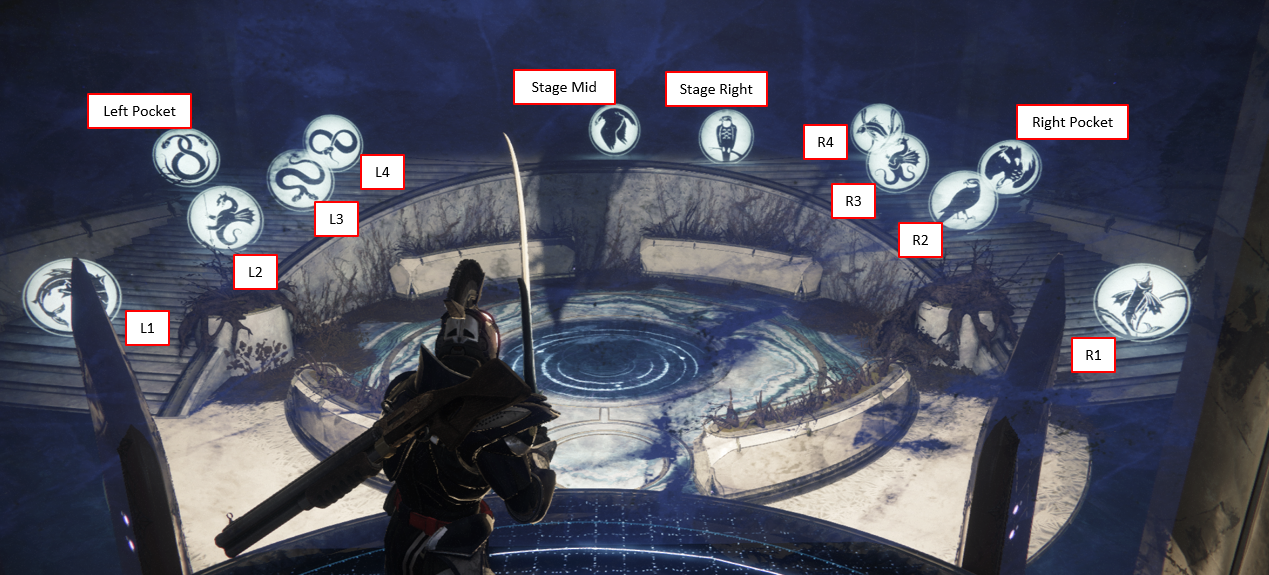
POV: Top Platform
Storm Nodes are weak to Lightning; Black Slimes Ice
Section titled “Storm Nodes are weak to Lightning; Black Slimes Ice”{"Name":"Orbs","MapID":1093,"A":{"X":572,"Y":-680,"Z":-59,"Active":true},"B":{"X":591,"Y":-680,"Z":-40,"Active":true},"C":{"X":628,"Y":-680,"Z":-59,"Active":true},"D":{"X":647,"Y":-680,"Z":-40,"Active":true},"One":{"X":572,"Y":-680,"Z":-21,"Active":true},"Two":{"X":553,"Y":-680,"Z":-40,"Active":true},"Three":{"X":628,"Y":-680,"Z":-21,"Active":true},"Four":{"X":609,"Y":-680,"Z":-40,"Active":true}}A1-B2-C3 for party platform splits
Nodes will have interruptible cast every so often called “Thunderclap Concerto” Nodes have to die at the same time else you wipe to an enrage
Top platform has to call cyclops for the bottom platforms to dodge (they spawn NS or EW, lower platforms have to go where they aren’t)
- Top also has black slimes that cast “The First Song” that must be Arcane Stopped or they kill you.
- Use Phantom Bard’s Romeo’s Ballad to Arcane Stop these easily.
Bottom platforms dodge cyclops AoEs based on call from up top. These are done per platform, please pay attention. it could be best to use yell chat for this. Ex. NS EW or NS NS (left plat - right plat) After dodges a set of red slimes appear, they just hurt a lot. Tank and spank on top of the node. Red slimes will enrage after a time if not killed.
Timeline
Section titled “Timeline”- Thunderclap Concerto
- Interrupt!!
- Cyclops 1
- Top groups calls NS or EW safe for each side individually.
- Bottom group dodges out at “Five seconds until fatal Onslaught”
- Thunderclap Concerto
- Interrupt!!
- Slimes 1
- Tanks grab mobs
- Top stops with Romeo’s Ballad (Arcane Stop), bottom tanks/spanks adds. Slimes hurt.
- Cyclops 2 (suggest holding bosses till AFTER this resolves)
- Top group calls safe spots for both sides
- Thunderclap Concerto Interrupts again before heading out!!
- Slimes 2
- Thunderclap Concerto interrupt during this set of adds, easy to get caught off guard here
- If someone has seen further than this please let me know.
Boss 3: Necrophobia
Section titled “Boss 3: Necrophobia”Weak to Ice
Section titled “Weak to Ice”{"Name":"Necro: Shroud 2","MapID":1093,"A":{"X":100,"Y":-724,"Z":785.333,"Active":true},"B":{"X":111,"Y":-724,"Z":800,"Active":true},"C":{"X":100,"Y":-724,"Z":814.667,"Active":true},"D":{"X":89,"Y":-724,"Z":800,"Active":true},"One":{"X":92.667,"Y":-724,"Z":789,"Active":true},"Two":{"X":107.333,"Y":-724,"Z":789,"Active":true},"Three":{"X":107.333,"Y":-724,"Z":811,"Active":true},"Four":{"X":92.667,"Y":-724,"Z":811,"Active":true}}Condensed Cheatsheet
Section titled “Condensed Cheatsheet”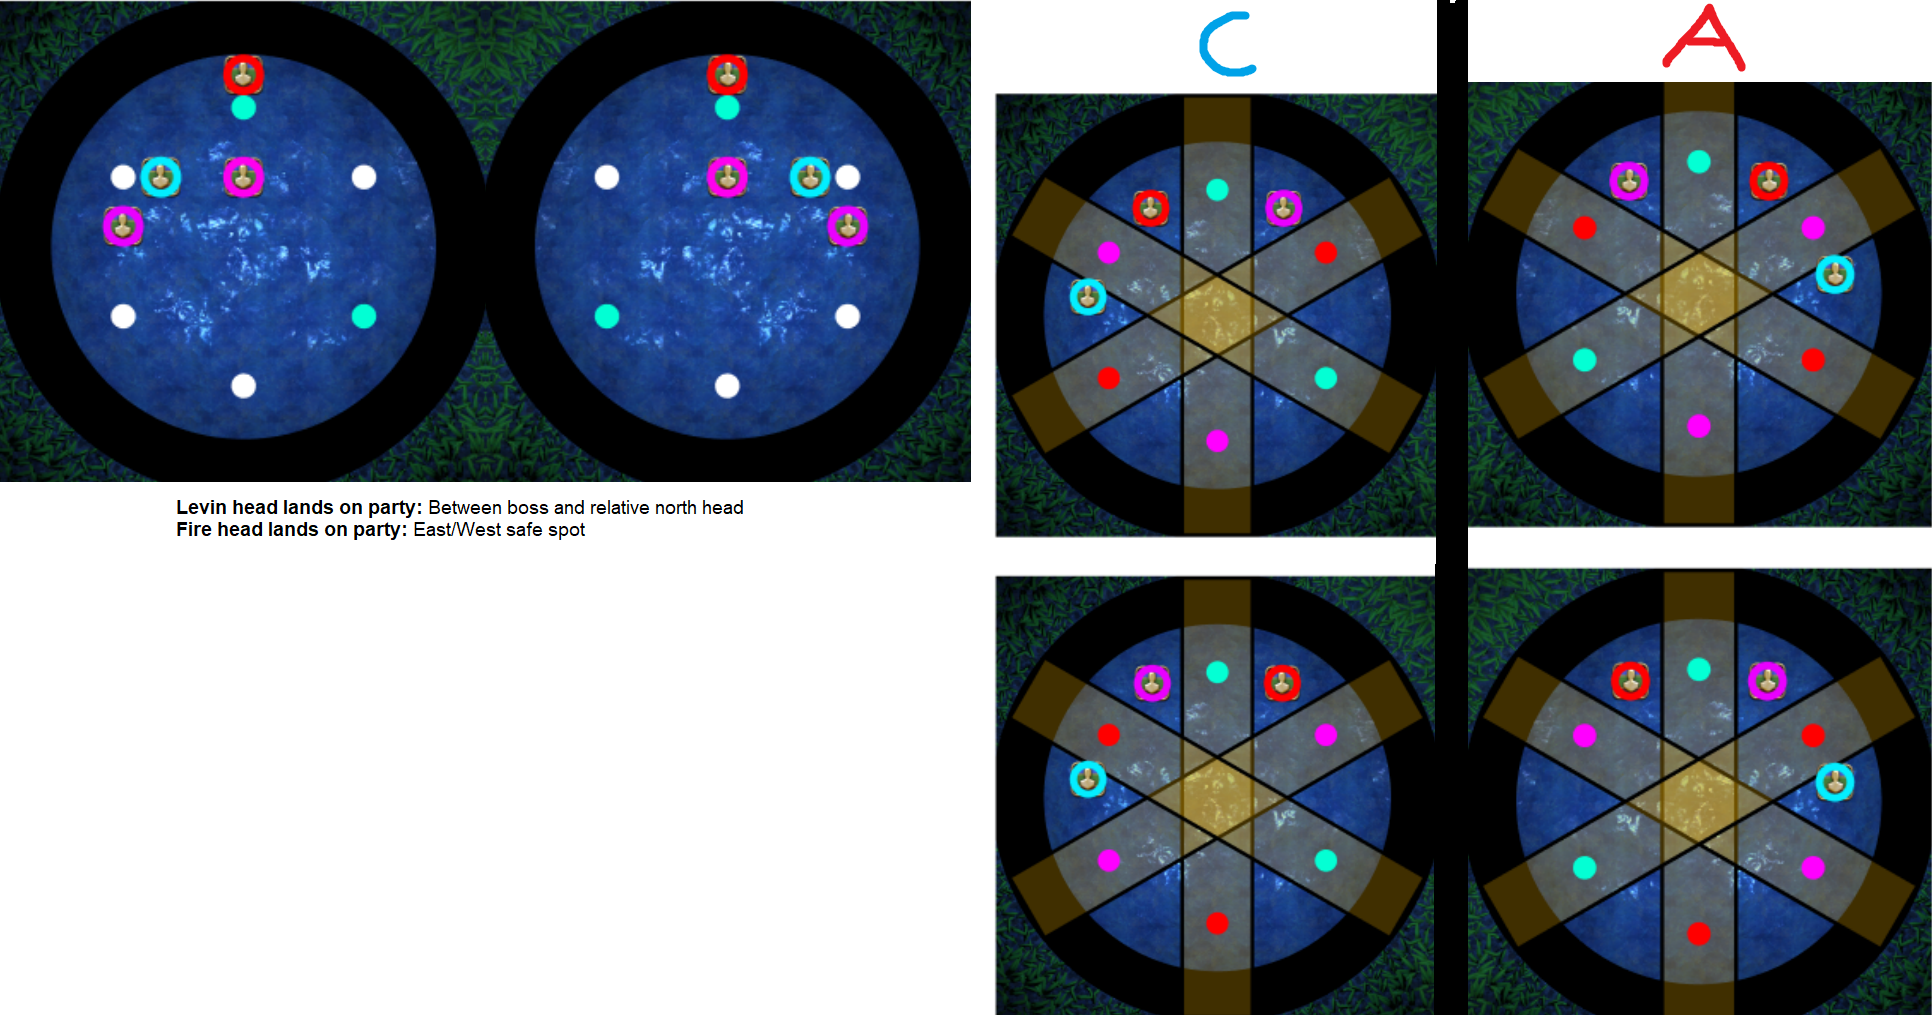
(Click to expand in new window)
Death Shroud 1
Section titled “Death Shroud 1”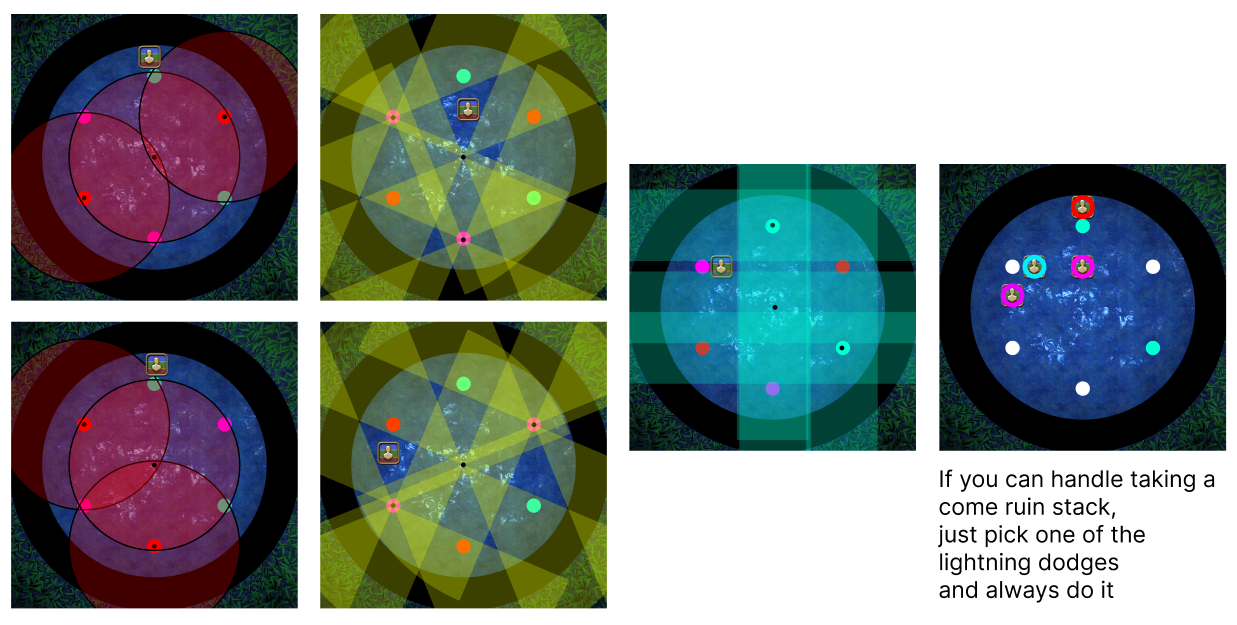
(Click to expand in new window)
Death Shroud 2
Section titled “Death Shroud 2”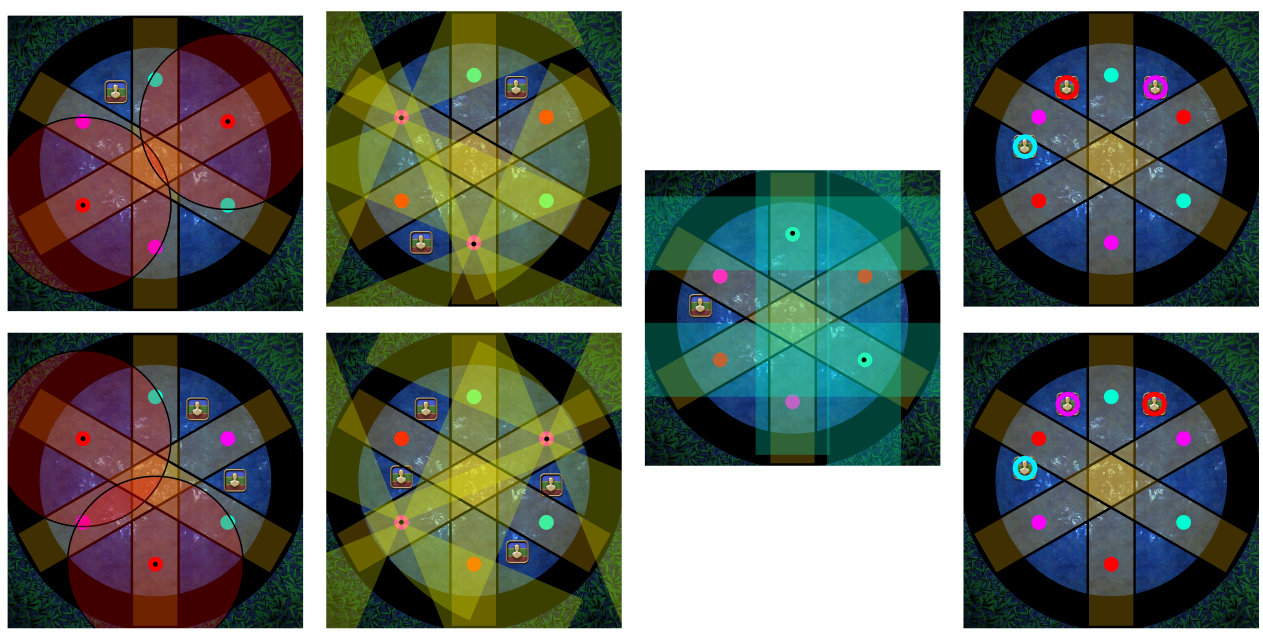
(Click to expand in new window)
Miniboss: Clockwards
Section titled “Miniboss: Clockwards”Curseclock adds are weak to Lightning
Section titled “Curseclock adds are weak to Lightning”Between Necrophobia and this encounter, you’ll be able to spawn the support mob and maybe get an extra life if you have enough people outside assuming you did the puzzle earlier.
The short version is that you have two clocks, one on the wall and another on the ground. You must make it so the ground clock matches the wall clock by killing the Tower Curseclock adds. Each add, when killed, adjusts the clock the following amounts:
- Large = 3 hours
- Medium = 1 hour
- Small = 15 minutes
- Tiny = 5 minutes.
These Curseclock adds, in varying sizes, will appear at the very edge of the room and do nothing until interacted with. You should assign a tank or two to grab the adds in a very controlled manner. Just single target these adds down individually until you match the appropriate time.
PLEASE WATCH ALL LARGE AOE SKILLS (Assize, Dances, Stars, etc…)! DO NOT RISK PULLING EXTRA MOBS FOR NO REASON!!
Section titled “PLEASE WATCH ALL LARGE AOE SKILLS (Assize, Dances, Stars, etc…)! DO NOT RISK PULLING EXTRA MOBS FOR NO REASON!!”There is also a Lockward that spawns, just tank it and leave it alive (ignore it too, its just absurdly bulky). It will do the occasional raidwide but it is not lethal.
Example
Section titled “Example”The clock shows 7:40. We must kill
- 2 Large Curseclocks (+6 hours)
- 1 Medium Curseclock (+1 hour)
- 2 Small Curseclocks (+30 minutes)
- 2 Tiny Curseclocks (+10 minutes) This will adjust the clock to say 7:40 and instantly end the encounter despawning all mobs.
If you take ~3 minutes(?) the tower will kick you out to the Pavillion back in North Horn.
Halls 3: A Reprieve
Section titled “Halls 3: A Reprieve”Just a short section. No adds, 2 sets of traps, a couple of locked doors with extra loot.
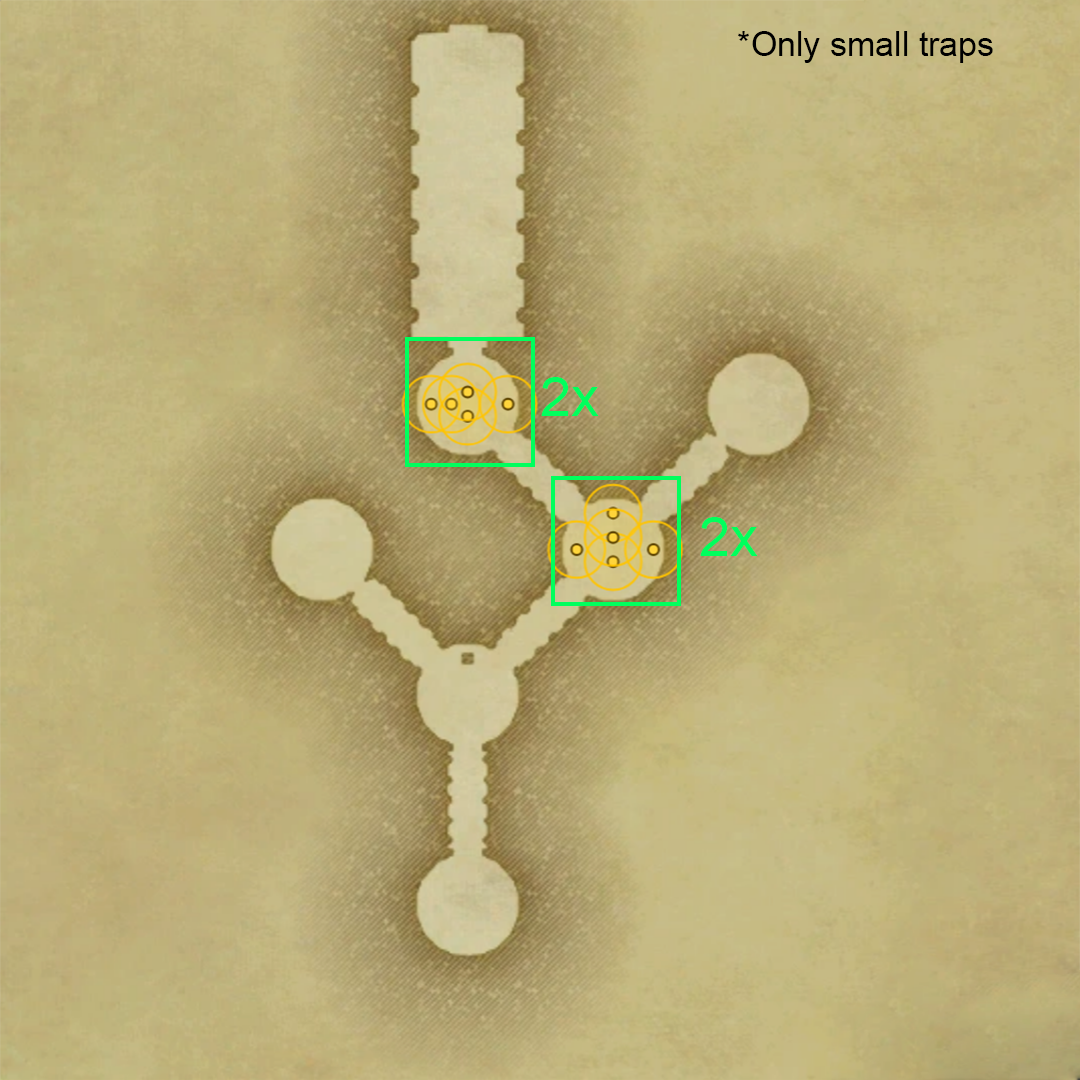
(Click to expand in new window)
Boss 4: Index
Section titled “Boss 4: Index”Weak to Fire/Wind (Bombs are Ice; Birds are Wind)
Section titled “Weak to Fire/Wind (Bombs are Ice; Birds are Wind)”- Raidplan
- Timeline
-
Mitigation Sheet
- Dualcasted Flare barely hurts with Rep/Addle/Feint/Dismantle/Mage Mash and some GCD shields.
- Omni-Elements raidwide hurts a bit more, definitely need some bulk.
- Elementary Chemistry is a 720k baseline raidwide. You NEED to make sure your mit is on point for it.
-
Waymark Studio Preset
- Parties should put the D marker on the back of the platform.
{"Name":"Index - Mid Plat","MapID":1093,"A":{"X":0,"Y":-684,"Z":-637,"Active":true},"B":{"X":-7.794,"Y":-684,"Z":-623.5,"Active":true},"C":{"X":7.794,"Y":-684,"Z":-623.5,"Active":true},"One":{"X":-17.754,"Y":-684,"Z":-638.25,"Active":true},"Two":{"X":0,"Y":-684,"Z":-607.5,"Active":true},"Three":{"X":17.754,"Y":-684,"Z":-638.25,"Active":true}}Weapons Cheatsheet
Section titled “Weapons Cheatsheet”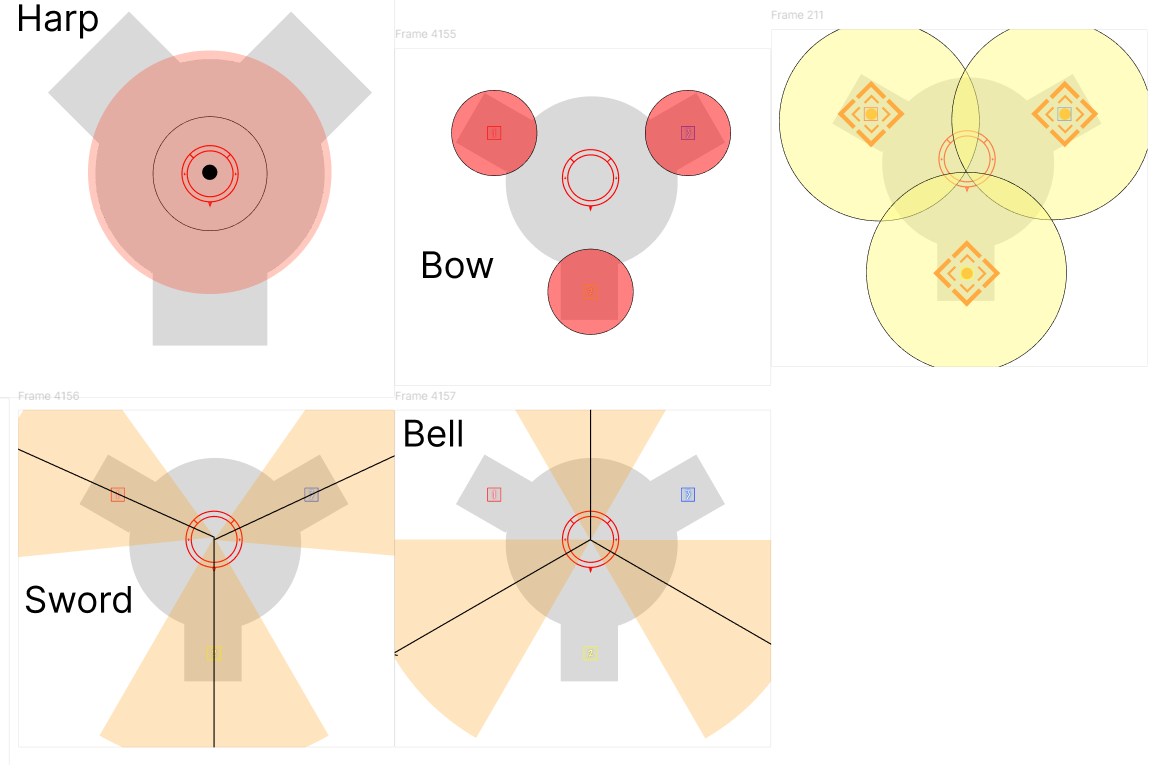
(Click to expand in new window)
Forked Tower: Magic (Extreme) Rewards
Section titled “Forked Tower: Magic (Extreme) Rewards”- Twin Snakes: 1 amulet
- Halls 1: 1 amulet
- Once you clear you can return back and visit the other side for the other chest and +1 amulet.
- Sword Dancer: 2 amulets
- Halls 2: 1 amulet
- Storm Nodes: 1 amulet
- Necrophobe: 2 amulets
- Puzzle Completion Chest: 3 amulets
- Spawns after Boss 3 if puzzle is done correctly.
- Clockwards: 1 amulet
- Final Halls: 2 + 2 amulets
- 2 chests to claim
- Index: 5 amulets
- 3 extra amulets if the Hermetic Recluse (support mob) dies before killing Index
Total: 25 amulets max
Section titled “Total: 25 amulets max”Extra Stuff
Section titled “Extra Stuff”- Each boss gives a field note
- Duck-billed Porter Whistles from the following
- Necrophobia
- Index
- Bonus Index chest (from the Hermetic Recluse being killed before Index dies)
- Hermetic Recluse chest (only for those outside when the Recluse dies)
- Chests have a random chance to reward a Final Final Fixative