Occult Crescent: North Horn
This is the second zone of the Occult Crescent released in patch 7.55; it contains many FATEs, Critical Encounter, and the Forked Tower: Magic (Normal and Extreme). This zone also serves as setting for the last half of the story.
Unlocking North Horn
Section titled “Unlocking North Horn”To unlock the North Horn you must have completed the South Horn story (finishing the “Mysteries Abide” quest). To continue the story and unlock North Horn you must begin the quest “Occult Reunion” in Tuliyollal at the Expedition Messanger.
Once progressed enough, you will gain the ability to enter the North Horn and explore onwards.
Area Map
Section titled “Area Map”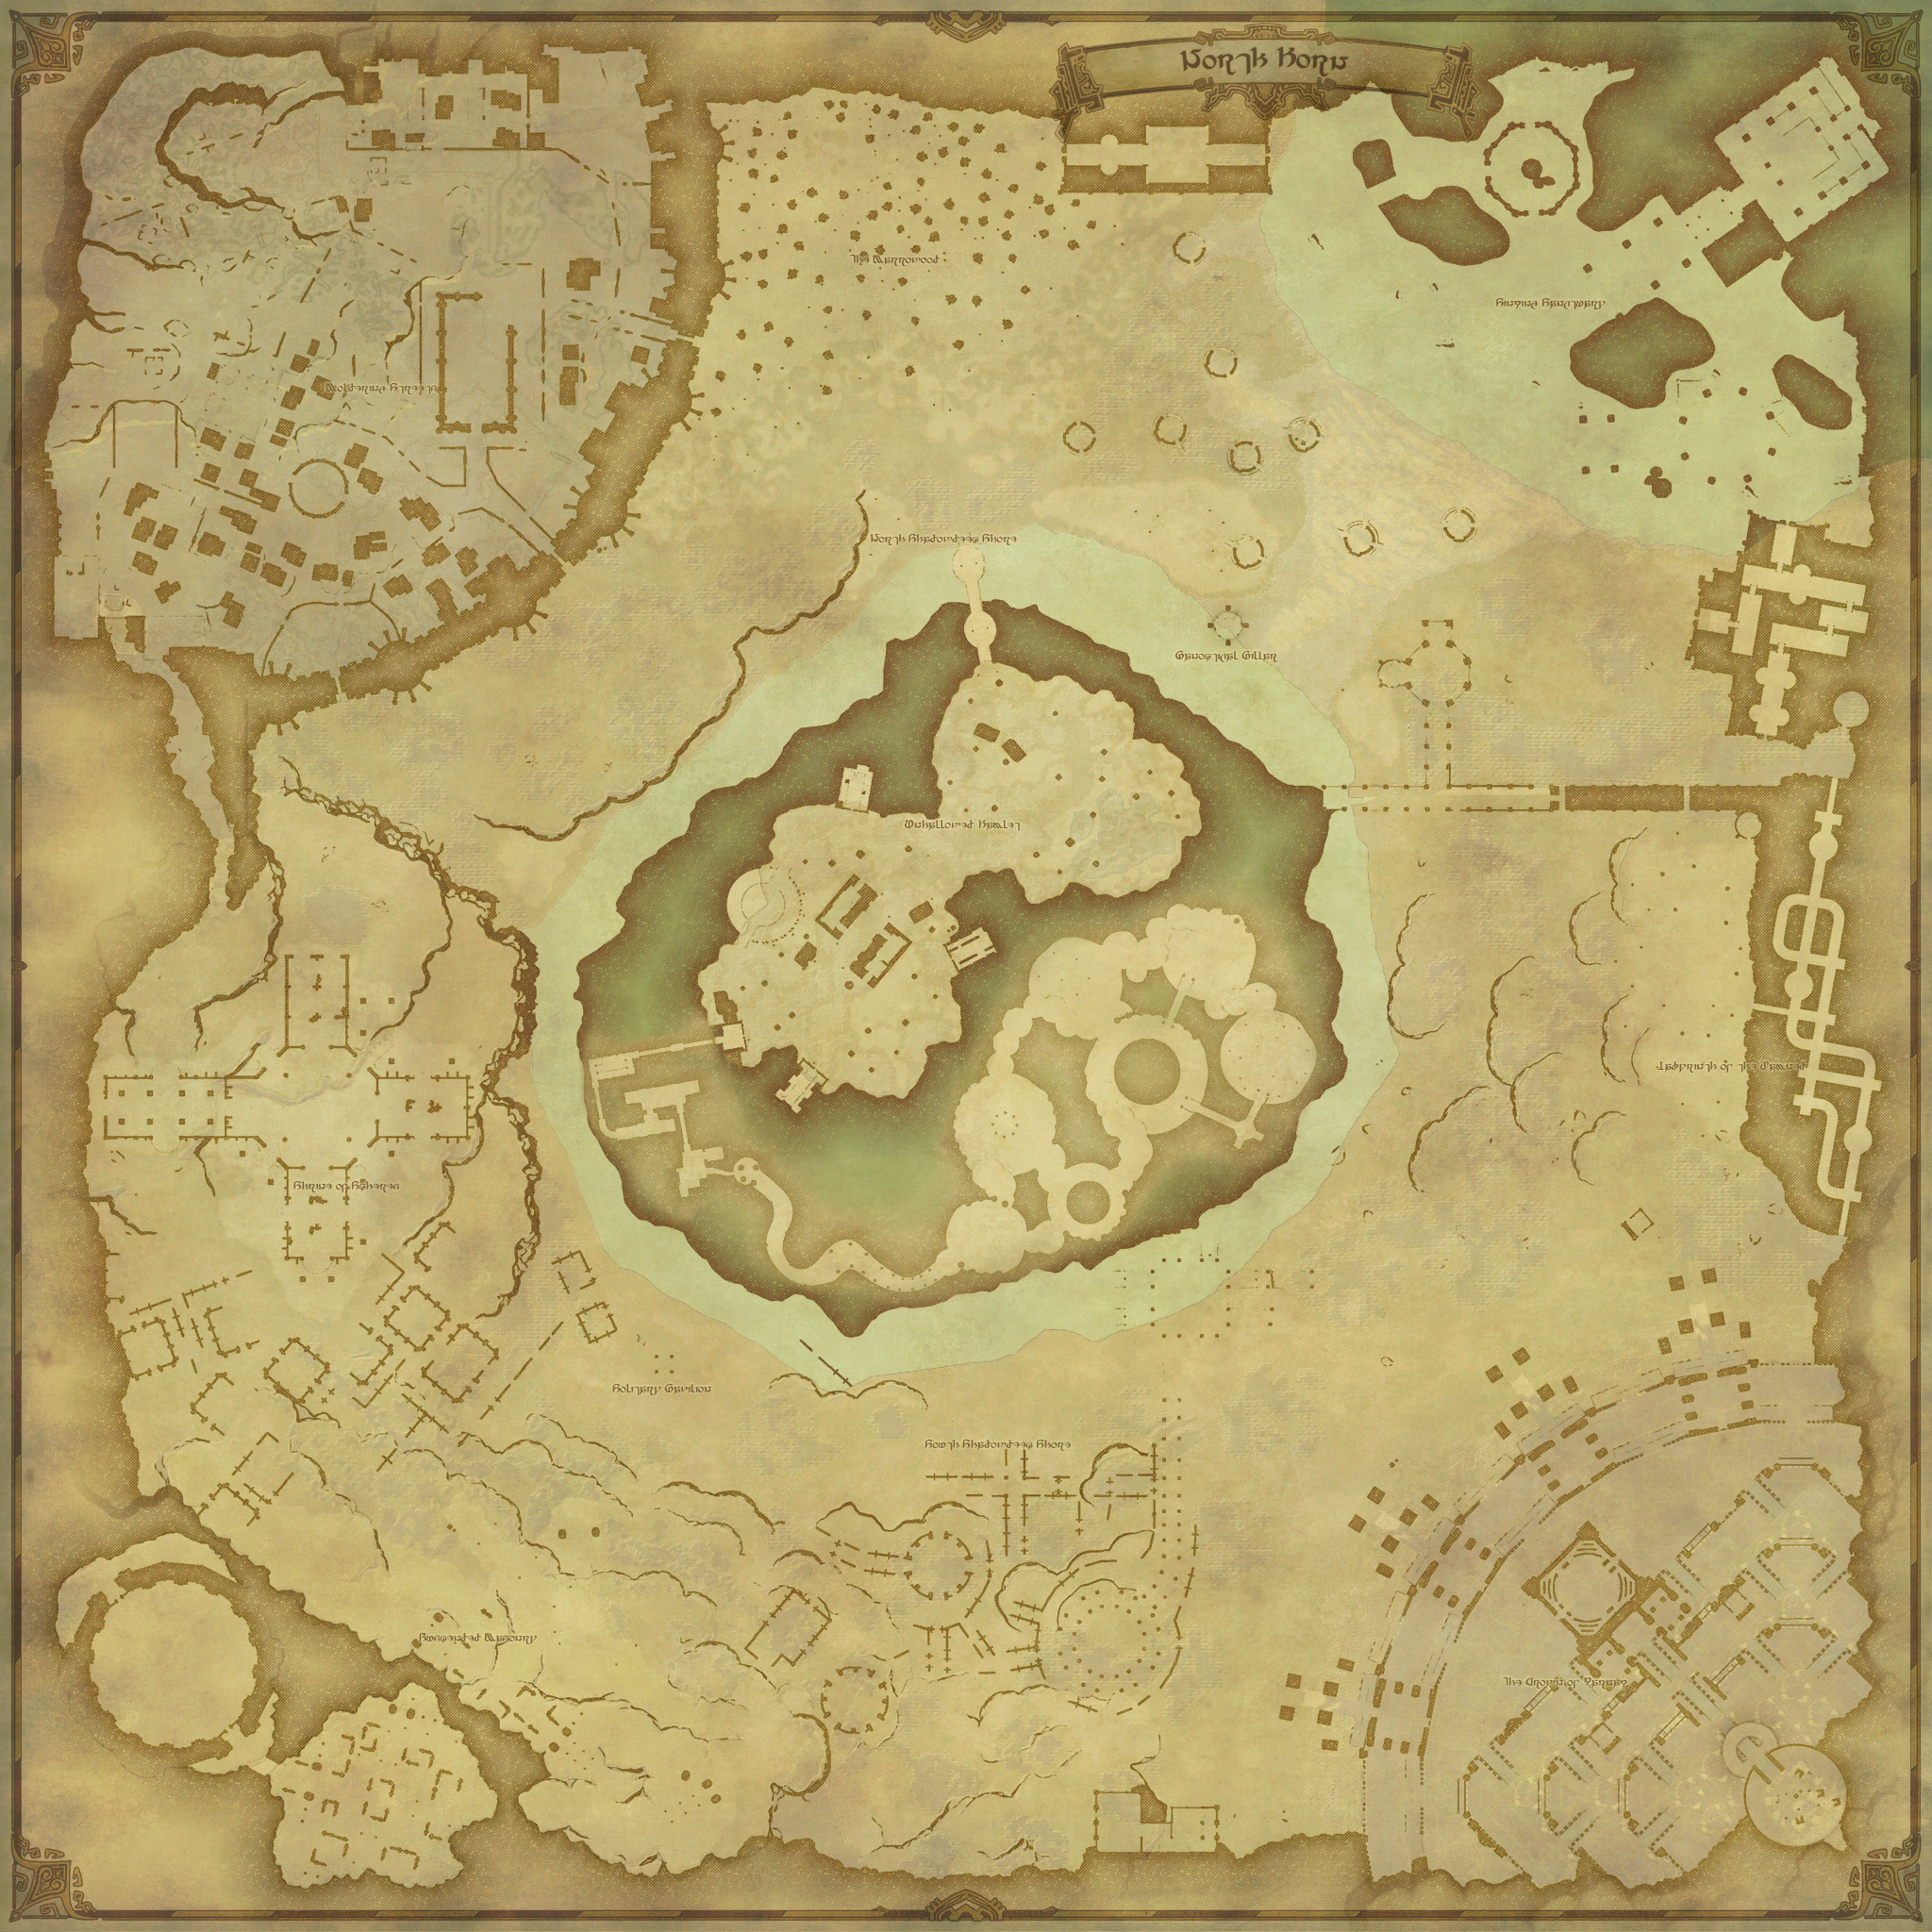
(Click to expand in new window)
Mobs of varying species and types can be found in clusters around the South Horn. Generally, the further you go from base camp, the higher the level of mob you will encounter
You can find a non-exhaustive list of mobs along with their aggro type and resistances on the Do It Doom spreadsheet maintained by Wobl.
Mob Level Map
Section titled “Mob Level Map”Made by @kanata_ff14_ix on Twitter.com
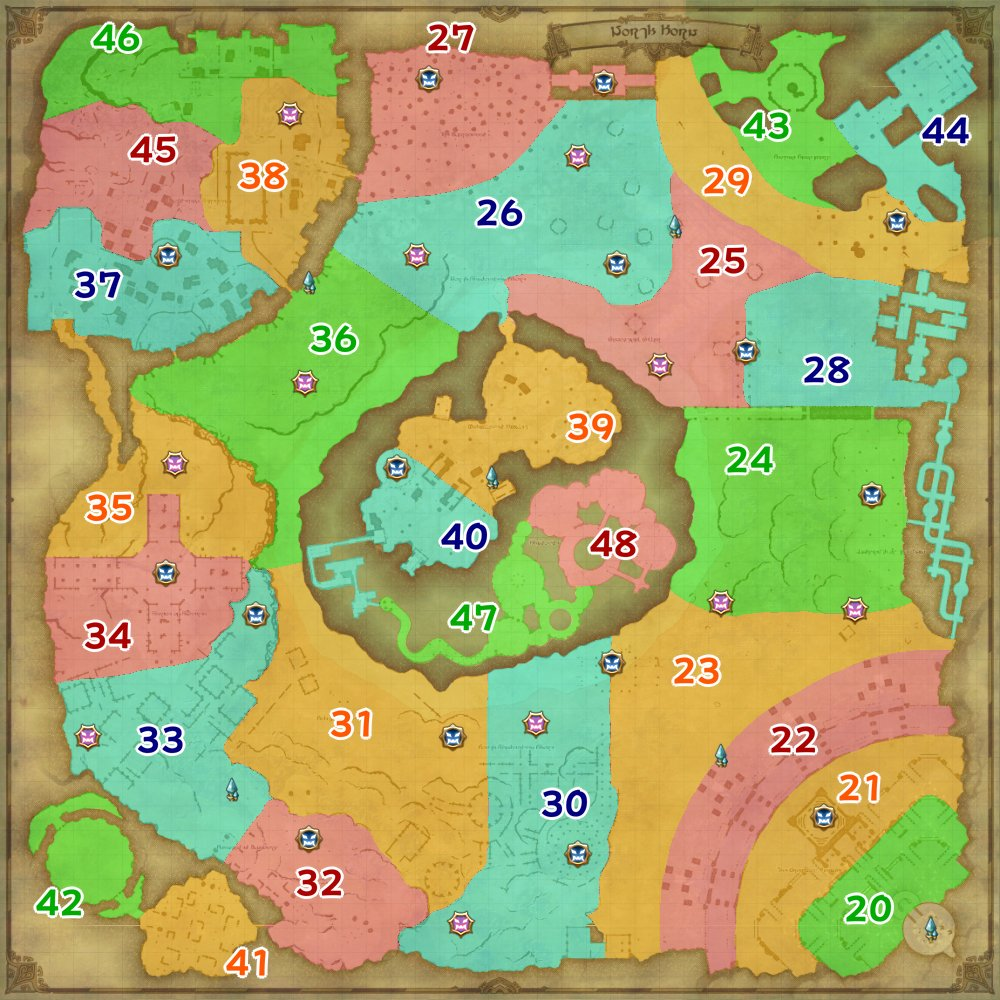
(Click to expand in new window)
Weather Based Mobs
Section titled “Weather Based Mobs”Some mobs spawn under specific weather conditions, and are often much higher level than the mobs around them. Of the 6 total weather conditions, 5 have unique mobs: Of the 6 total weathers, 5 have unique mobs:
| Mob | Weather | Uptime % |
|---|---|---|
| N/A | Fair Skies | 45% |
| Crescent Bomb | Clear Skies | 10% |
| Crescent Mousse | Rain | 10% |
| Crescent Dhurva | Clouds | 15% |
| Crescent Mimic | Atomsphereic Phantasms | 15% |
| Crescent Fool | Illusory Disturbances | 5% |
Killing these mobs rewards roughly double or triple the gold for their level,and these rewards are affected by chaining; so, a level 48 weather mob can reward up to 48 gold! Most of these mobs are stationary, though Crescent Fools do wander a large set path through the zone.
Ashkin/Undead
Section titled “Ashkin/Undead”Undead mobs (referred to as Ashkin by the game) spawn between 10pm and 4am Eorzean time. All undead are proximity and blood (low hp) based aggro.
Occult Records
Section titled “Occult Records”This section will spoil all survey points needed to fill out your Occult Record book.
The other records in your book can be filled out via Field Notes, which can be earned from completing FATEs, CEs, and defeating bosses in the Forked Tower: Magic (Normal/Extreme).
[SPOILERS] All Survey Points for the Occult Record
Visitable Survey Points
Section titled “Visitable Survey Points”- #31 North Horn Base Camp - X:39, Y: 38
- #32 The Crown of Karnak - X:36, Y: 32
- #36 Shadowdeep - X: 27, Y: 26
- #37 Labyrinth of the Damned - X: 39, Y: 22
- #39 Panoptical Pillar - X: 27, Y: 14
- #40 Sinking Sanctuary - X: 40, Y: 3
- #43 The Marrowood - X: 17, Y: 5
- #45 Suspended Masonary - X: 11, Y: 38
- #46 The Windward Watch - X: 4, Y: 36
- #47 Shrine of Spheres - X: 3, Y: 24
- #49 Moldering Streets - X: 7, Y: 14
- #51 The Moldering Lake - X: 4, Y: 3
- #52 Unhallowed Hamlet - X: 21, Y: 19
- #54 Dark Territory - X: 22, Y: 23 (this is in the Subterrne area)
- #60 Concealed Collection - X: 11, Y: 10 (final room of FT: Magic Normal/Extreme)
Visual Guide
Section titled “Visual Guide”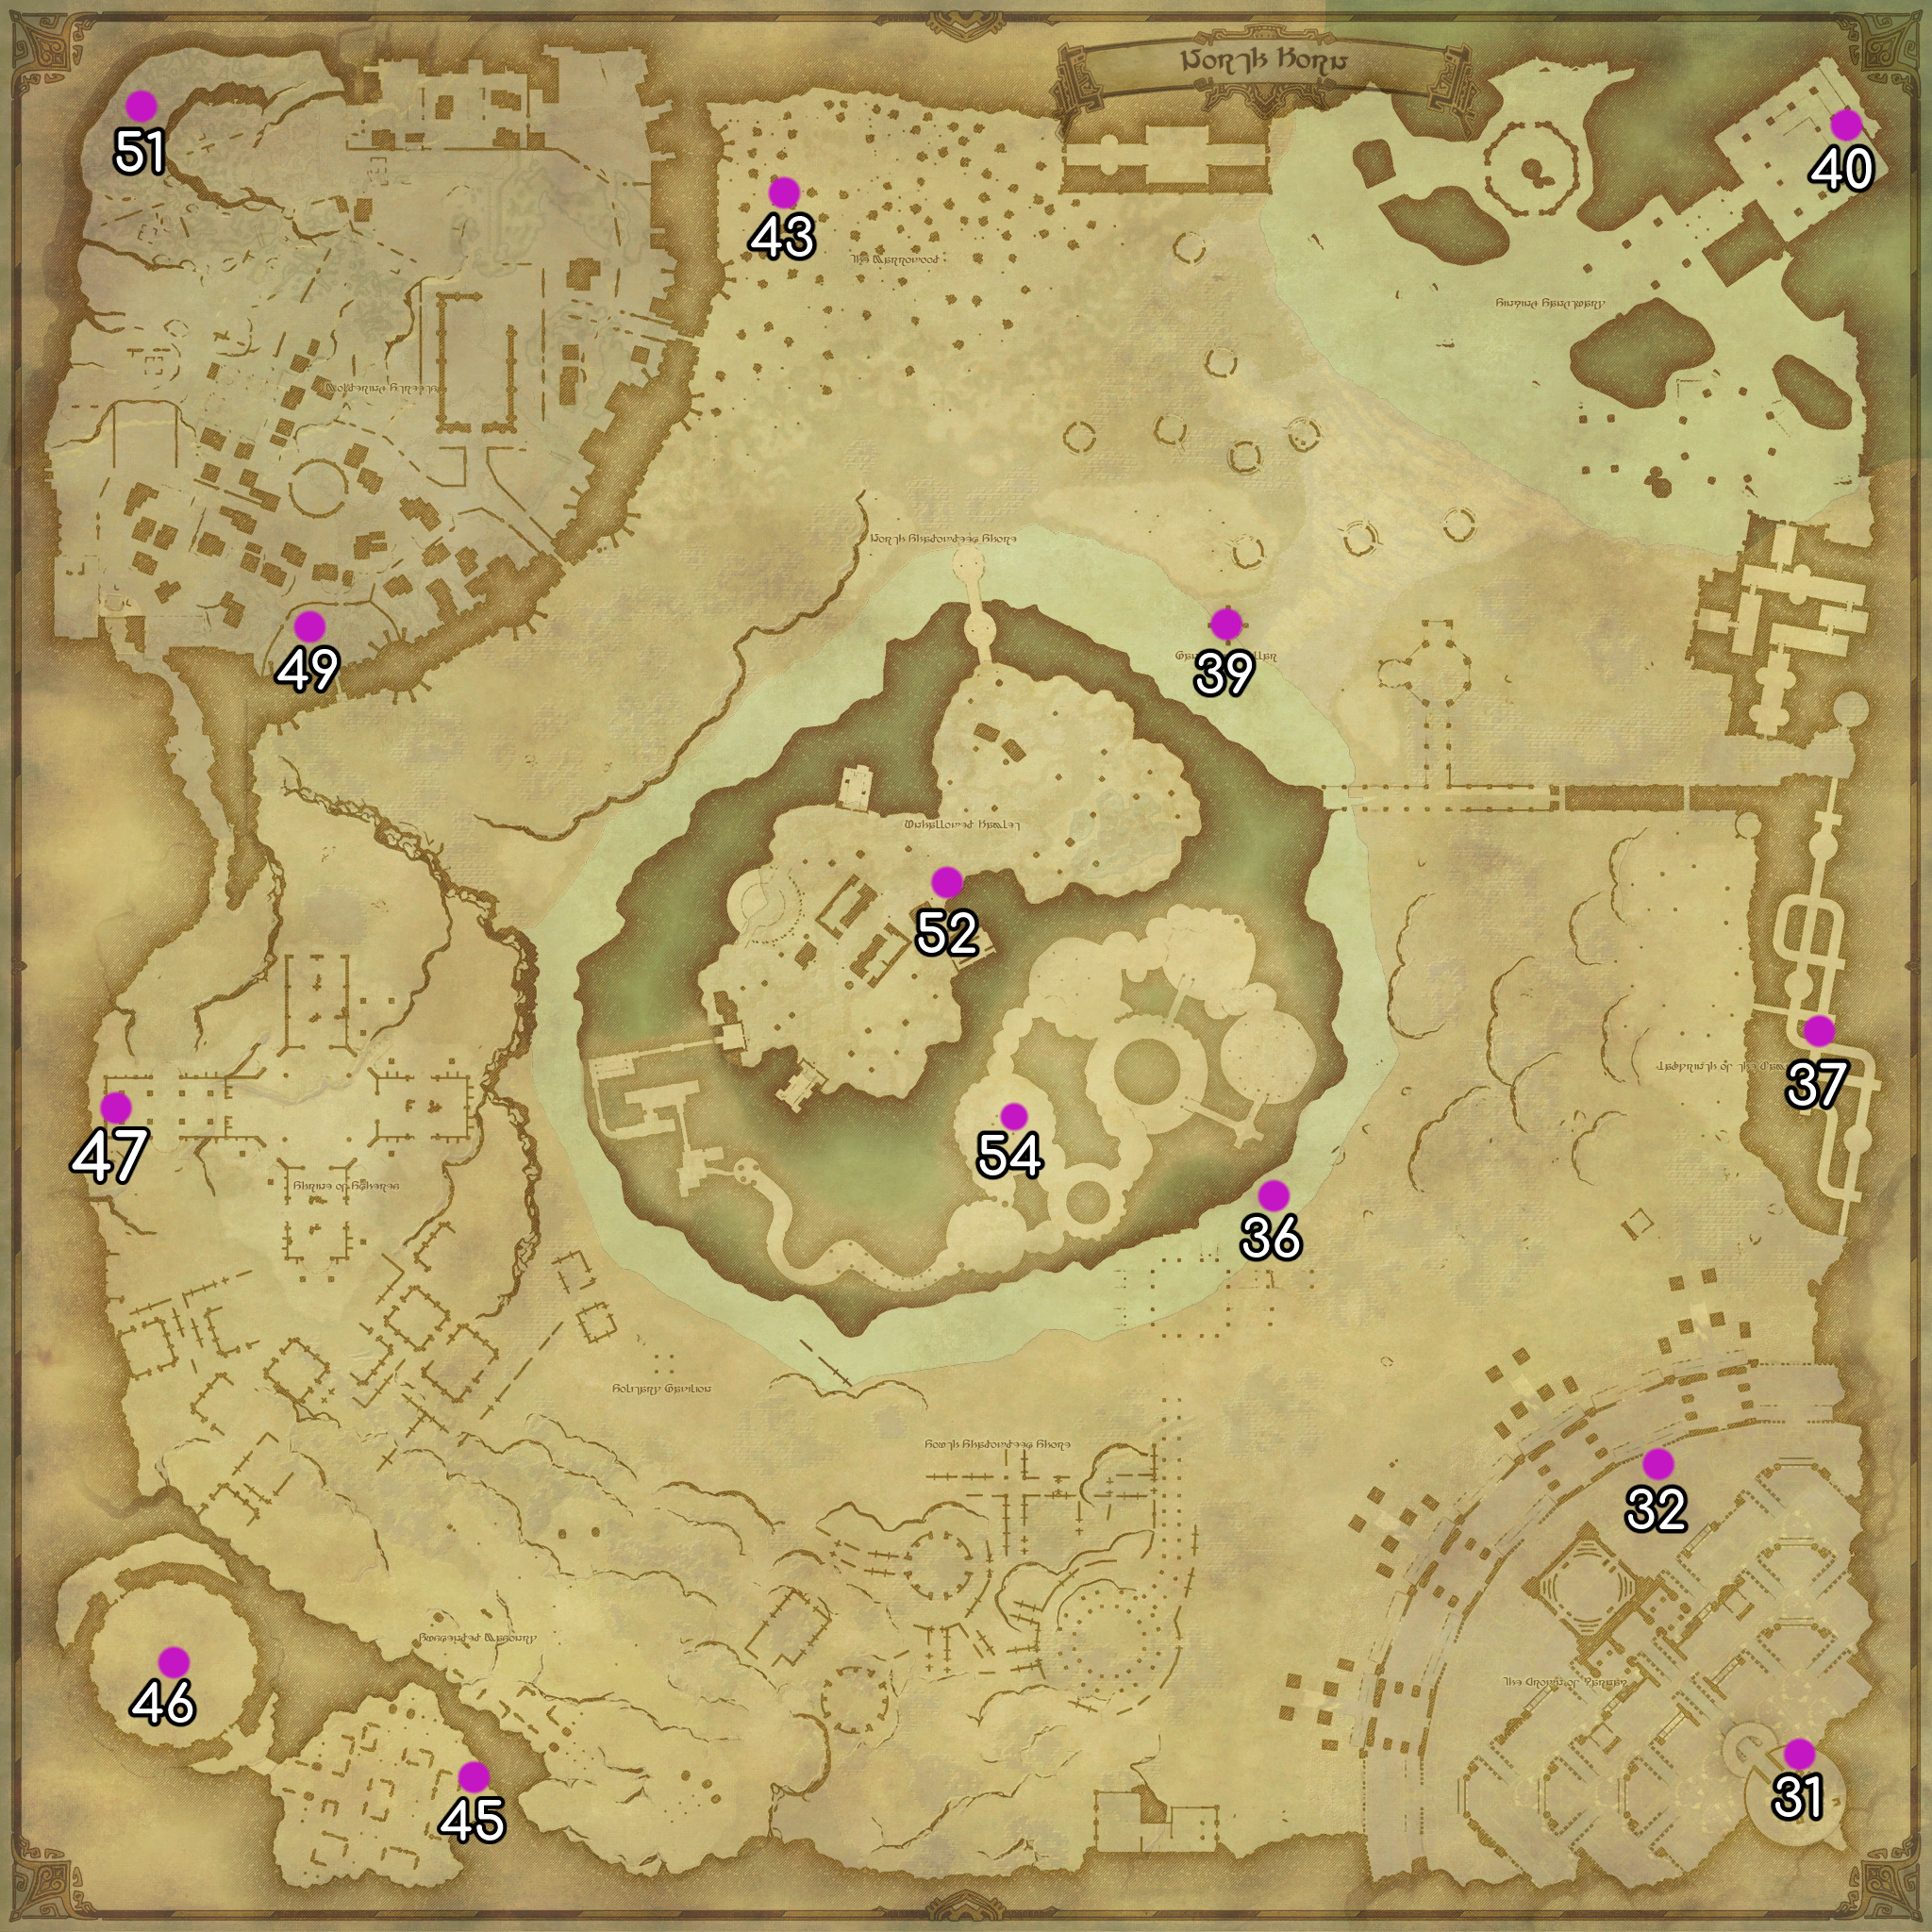
(Click to expand in new window)
Critical Encounters
Section titled “Critical Encounters”Critical Encounters, or CEs from here on, are the beefed up version of FATEs. These battles are against fiercer foes and can sometimes reward new Phantom Jobs, Field Notes, as well as more experience and silver. CEs are split into two kinds: ones that can be spawned by the player, and ones that spawn randomly without player input. The rewards are the same regardless of spawn method.
Every successful Critical Encounter will reward the following
- 400-260,420 Knowledge EXP (scales to your knowledge level)
- 720 Phantom Job EXP
- 20 uncapped tomestones
- 10 weekly capped tomestones
- 200 enlightenment silver obol pieces
- 10 of a Phantom Dispeller (drops are CE dependant, see Phantom Weapons page)
- Rarely an occult accessory
Some Critical Encounter have special drops, those being
- Field Notes (specified below) at a ~40% chance
- Phantom Job Soul Shards (specified below) at a ~30% chance
Tracking Critical Encounters
Section titled “Tracking Critical Encounters”You can use Infi’s Occult Tracker website to help you keep track of which FATEs and CEs have spawned. This site will also help you know which encounters drop which rewards (Field Notes, Demiatmas, etc.) along with which CEs can be spawned by players and which mobs will spawn them.
Randomly Spawning CEs
Section titled “Randomly Spawning CEs”These CEs will spawn randomly over time, and have a ~120 minute (2 hours) cooldown:
| CE | Boss | Noteable Drops | Accessory Drop | Weakness |
|---|---|---|---|---|
| A Beast Unleashed | Atlas Carbuncle | Bracelet | Ice | |
| Accept No Imitators | Metamorph | Field Note #38 | Earring | Wind |
| Ahead of the Competition | Phantom Hydra | Bracelet | Ice | |
| Appalling Behavior | Pallmagia | Field Note #41/Blue Mage | Earring | Fire |
| Dark Artistry | Phantom Necromancer | Field Note#42/Necromancer | Necklace | Wind |
| Familiar Tactics | Elm Gigas | Bracelet | Lightning | |
| Forbidden Folios | Arbatel | Field Note #33 | Bracelet | Fire |
| Imbalanced Diet | Algol | Field Note #35 | Earring | Fire |
| Lost on the Wind | The Abductor | Field Note #44 | Necklace | Lightning |
| Quarried Away | Alabaster Blade | Field Note #50 | Earring | Lightning |
| Tiny Terror | Tiny Mage | Field Note #34 | Bracelet | Lightning |
Player Spawned CEs
Section titled “Player Spawned CEs”These CEs are spawned by killing specific mobs. If it doesn’t spawn, keep trying! These have a ~60 minute (1 hour) cooldown.
| CE | Boss | Spawn Mob | Mob Location | Noteable Drops | Accessory Drop | Weakness |
|---|---|---|---|---|---|---|
| Cursed Resurgence | Claret Dragon | Crescent Big Horns | (X: 5, Y: 27) | Field Note #48 | Necklace | Fire |
| Doubled Trouble | Conjured Calofisteri | Crescent Blackguards | (X: 20, Y: 19) | Field Note #53 | Necklace | Wind |
| Many Mouths to Feed | Pelekys | Crescent Wamouras | (X: 3, Y: 3) | Earring | Fire | |
| Web of Terror | Crescent Arachne | Crescent Hellhounds | (X: 24, Y: 18) | Necklace | Ice |
Critical Engagement Map
Section titled “Critical Engagement Map”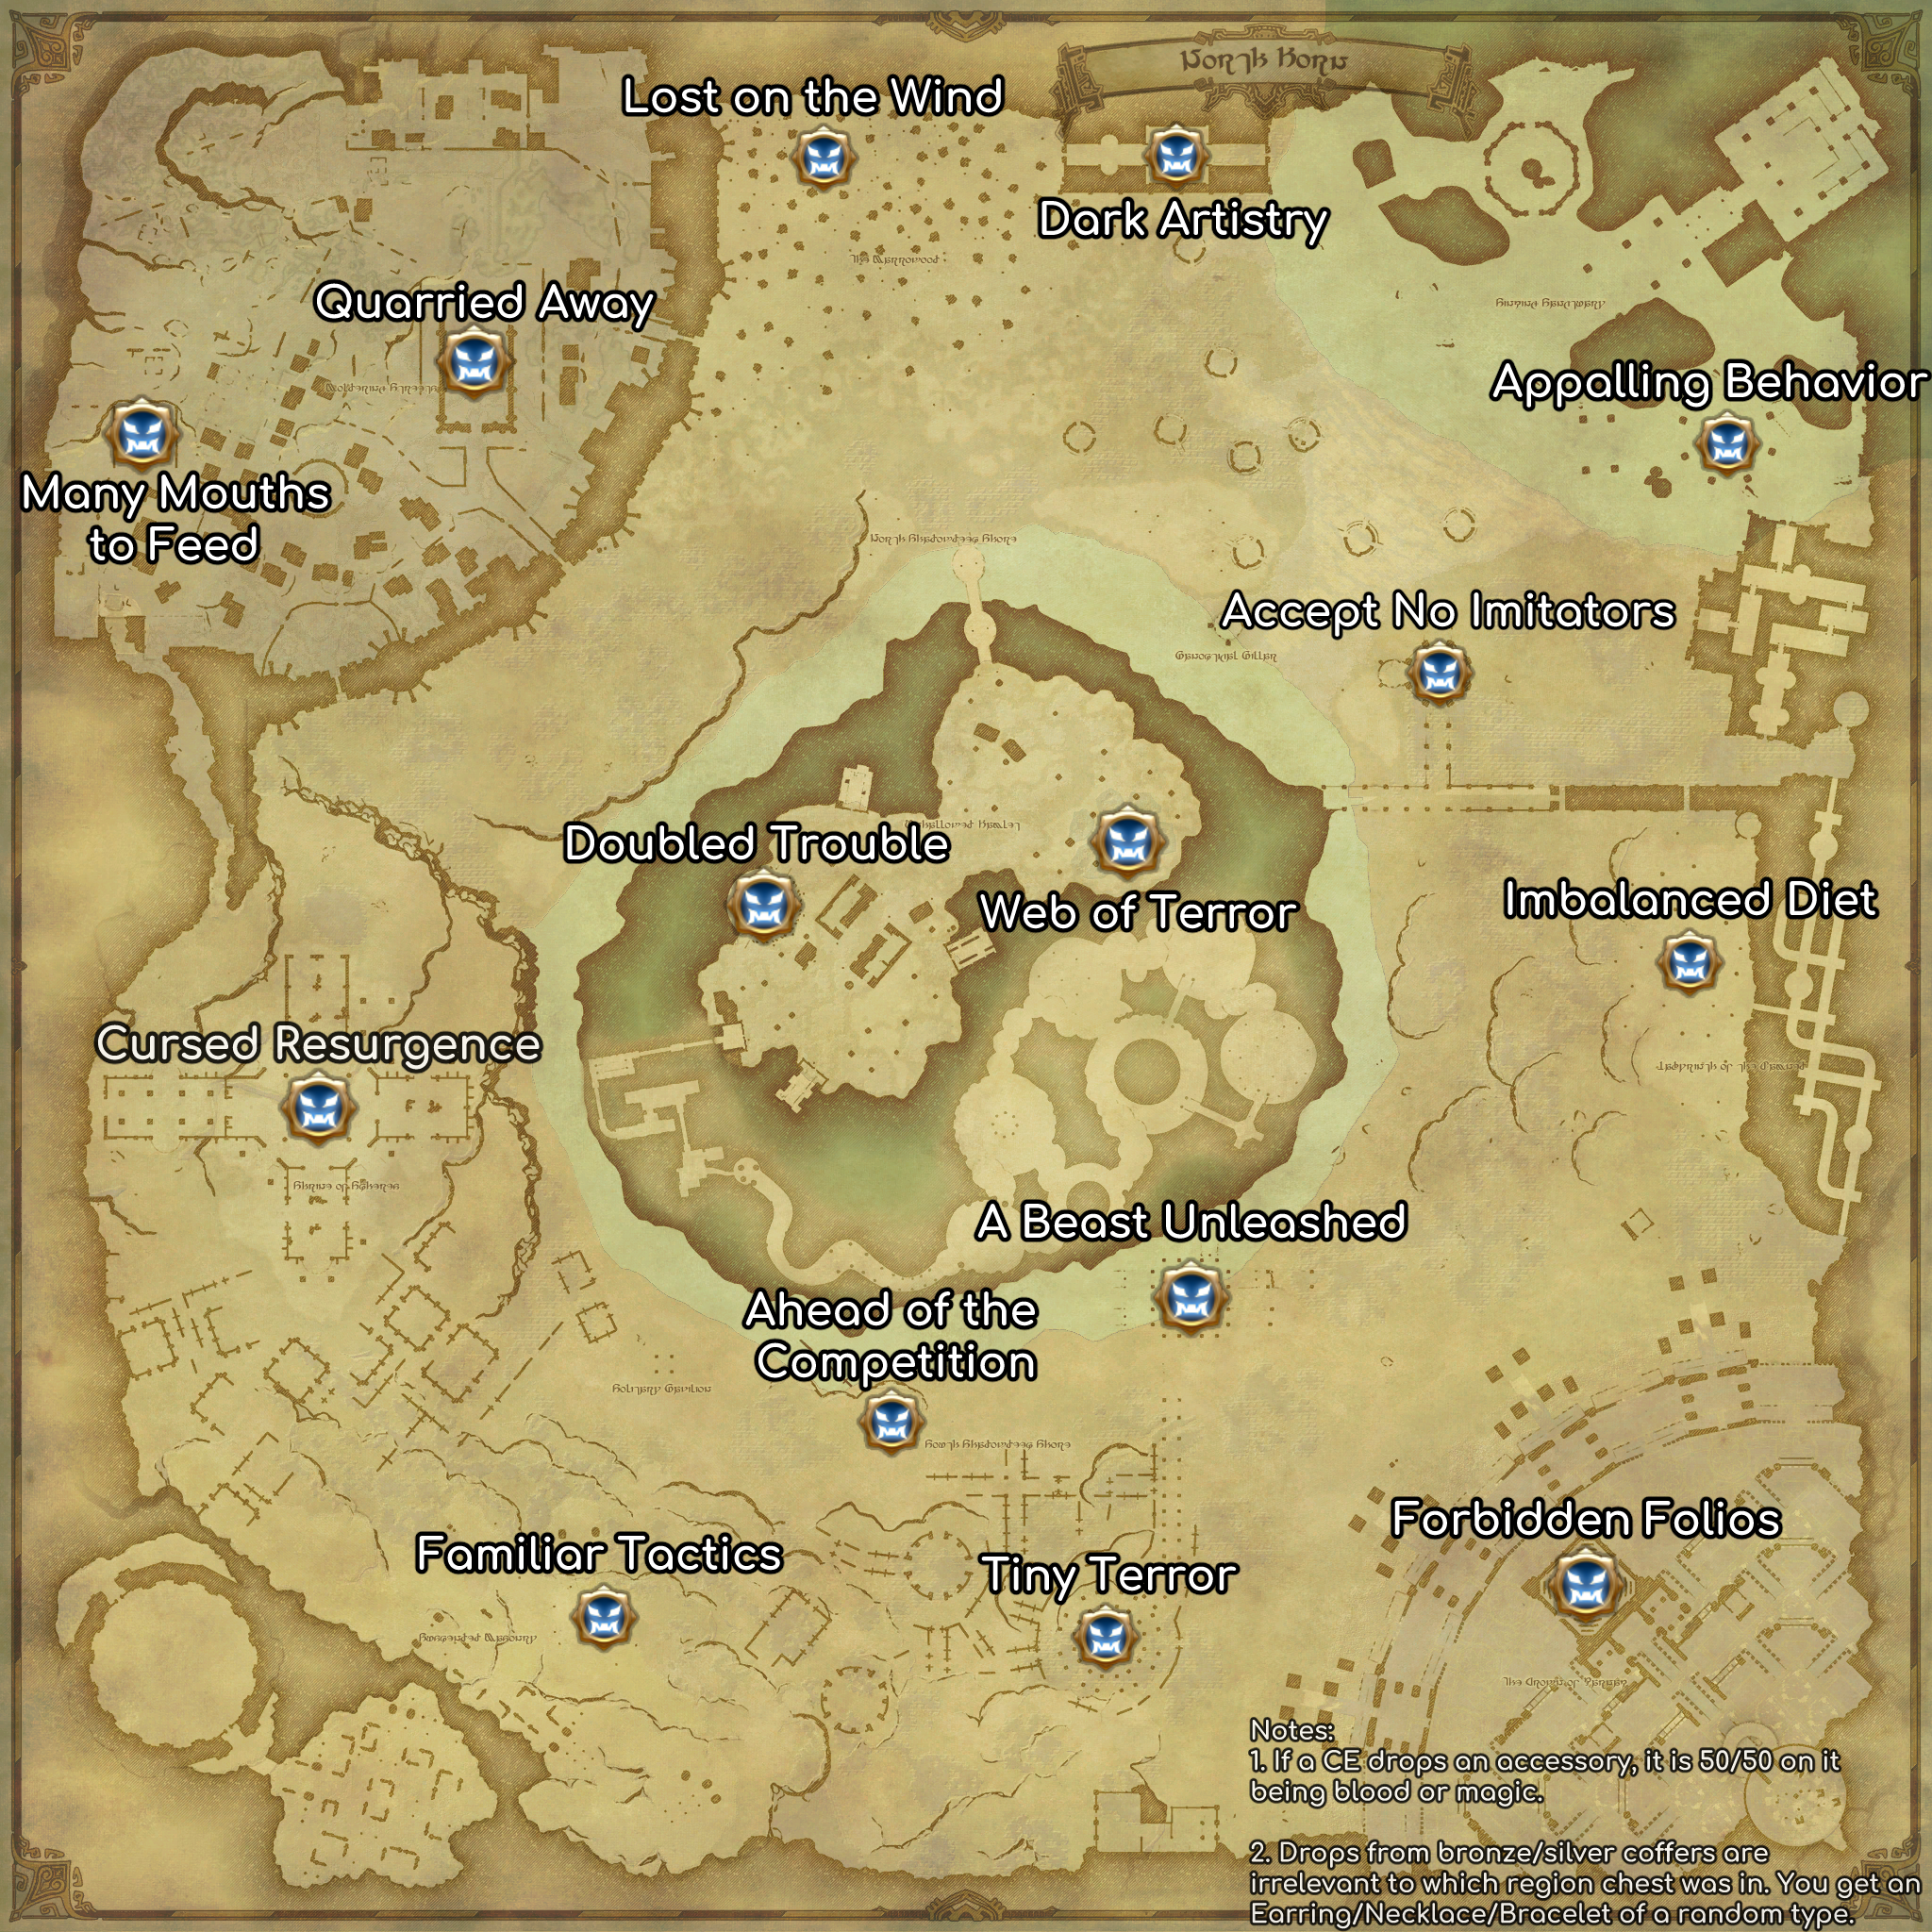
(Click to expand in new window)
| FATE | Location | Noteable Drops | Weakness |
|---|---|---|---|
| Daylight Pottery (NE) | (X: 26, Y: 11) | Gremlins | Trash Fire; Boss Ice |
| In a Pot of Bothre (SE) | (X: 11, Y: 26) | Fans | Lightning |
| A Rotten Affair | (X: 12, Y: 5) | Patient Kuribu | Wind/Lightning |
| Allue of the Occult | (X: 13, Y: 16) | Sensual Sandy | Fire |
| Eye to Eye | (X: 31, Y: 20) | Evil-seer | Fire |
| Gale-force Encounter | (X: 4, Y: 31) | Stormcaller | Fire |
| Inconstant Gardner | (X: 18, Y: 11) | Iambe | Fire |
| Raging Thrall | (X: 35, Y: 25) | Machetaur | Fire |
| Scale Model | (X: 8, Y: 20) | Demi-Medusa | Ice |
| Shoreline Showdown | (X: 23, Y: 30) | Regnant Chimera | Wind |
| Territorial Dispute | (X: 19, Y: 38) | Ruin Hound | Fire |
| Thunderregnum | (X: 24, Y: 7) | Creseregiana | Fire |
| Waved Away | (X: 28, Y: 16) | Arch Kelpie | Lightning |
Forked Tower Magic: Normal
Section titled “Forked Tower Magic: Normal”Once unlocked you can enter the Forked Tower: Magic in the South West shore of the central lake. There’s a pavillion that will glow during Auroral Mirages and take anyone standing on the Pavillion inside after a recruitment period. Once inside you will be tasked with defeating bosses and travesing the the tower.
There are no enrages, lives, hidden traps, extra secret encounters, or anything that could cause a total wipe of the group.
You can earn Arcane Amulets by defeating bosses and finding hidden chests using Thief’s percept/unlock skills.
Rewards
Section titled “Rewards”- Up to 14 arcane amulets
- 800 silver
- 2880 phantom job exp (swap to a leveling job before the final boss!)
- Spawns 1 silver (with a 10% chance for a second) and 2 bronze chests
How to Spawn Forked Tower: Magic
Section titled “How to Spawn Forked Tower: Magic”The weather will change to Auroral Mirages, meaning the the tower is open for recruiting, under the following conditions:
- One person in the instance is knowledge level 40 with Forked Tower: Magic unlocked.
- A hidden timer of 60 minutes has passed
- This timer can be reduce by 5 minutes for every CE completed and 1 minute for every FATE completed.
Currencies
Section titled “Currencies”There are currently 3 different types of currency that are all earned in (mostly) unique ways and can be exchanged for mounts, glamours, gear progression, or other resources to aid you in taking on the North Horn. Silver obols are from FATEs, CEs, and Pots/Bunnys, gold obols are earned from chaining mobs or Pots/Bunnys, and Arcanne Amulets are from Forked Tower: Magic (similar to Eurekan Fragments from Baldesian).
Enlightenment Silver Obol Pieces
Section titled “Enlightenment Silver Obol Pieces”Enlightenment silver obol pieces are only earned by doing FATEs, CEs, Forked Tower: Magic (Normal/EX), and opening Pot/Bunny coffers in the South Horn.
| Activity | Amount Earned |
|---|---|
| FATEs | 70 |
| CEs | 200 |
| FT: Magic | 800 |
| Treasure Coffers | 10-1000 |
| Pot Chests | 100/300/1,000 |
| Bunny Chests | 1,000 |
Silver obol pieces are primarily used for both purchasing and augmenting Phantom Vision gear. You can see a full list of items available to purchase by visiting the Expedition Antiquarian in base camp. Additional notable items include:
Notable Silver Obol Purchases
| Item | Cost | Use |
|---|---|---|
| North Horn Riding Map | 3,000 | Increases mount speed, makes travelling around much easier. |
| Ph. Ninja | 1,000 | Evasive, can nullify most attacks, attacks fast. |
| Ph. Red Mage | 1,000 | Elemental spells, can identify and increase elemental weakness damage. |
| Ph. White Mage | 1,000 | Healer and raiser, a strong alternative to chemist. |
| Ph. Black Mage | 1,000 | Elemental spells, can use Occult Toad to toad many dangerous enemies |
| Final Final Fixative | 1,200 | Used in upgrading Phantom Vision gear to any tier. |
| Various glamour pieces | 1,000 | New pieces of unique glamour |
Enlightenment Gold Obol Pieces
Section titled “Enlightenment Gold Obol Pieces”Enlightenment gold obol pieces are only earned by chaining mobs or opening Pot/Bunny coffers in the South Horn.
| Activity | Amount Earned |
|---|---|
| Mobs | Varied, higher level = more gold |
| Pot Chests | 160/480/1,600 |
| Treasure Coffers | 10-1600 |
| Bunny Chests | 1,600 |
Gold pieces are primarily used for purchasing Final Final Fixatives for augmenting Phantom Vision Gear. You can see a full list of items available to purchase by visiting the Expedition Antiquarian in base camp. Additional notable items include:
Notable Gold Obol Purchases
| Item | Cost | Use |
|---|---|---|
| Ph. Dragoon | 1,000 | Jump to reduce damage, get free shields, dash all over! |
| Ph. Summoner | 1,000 | High damage spells with long cast times, very powerful! |
| Final Final Fixatives | 1,920 | Used in upgrading Phantom Vision gear to any tier. |
| Coffers/Potions | 50 | Items used by Ph. Samurais/Chemists. Alternative to spending gil if no other uses for gold. |
| Various glamour pieces | 1,600 | New pieces of unique glamour |
Arcane Amulets
Section titled “Arcane Amulets”Arcane Amulets are earned only from doing Forked Tower: Magic Normal OR Extreme. The amount of amulets possible chances based on which difficulty you do; extreme granting more overall per clear.
| Difficulty | Max Amount |
|---|---|
| Normal | 14 |
| Extreme | 25 |
Arcane Amulets can be used for buying the Duck-biller Porter mount, minions, occult records from Forked Tower: Blood and Final Final Fixatives for augmenting Phantom Vision gear.
Notable Arcane Amulet Purchases
| Item | Cost | Use |
|---|---|---|
| Duck-billed Porter | 500 | Bingus. |
| Tiny Omniscient | 10 | Mini version of the final boss |
| Final Final Fixatives | 30 | Used in upgrading Phantom Vision gear to any tier. |
| Field Notes on FT: Blood | 3 | Individual boss notes on the 4 bosses of FT: Blood |
| Magitaur Card | 3 | Triple Triad card that was exclusive to clearing FT: Blood. |
| Various glamour pieces | 7 | New pieces of unique glamour |
Occult Accessories
Section titled “Occult Accessories”These can be very rarely obtained from completing Critical Encounters in the North Horn, opening bronze/silver treasure coffers, and opening gold chests from either a Persistent Pot or Happy Bunnies (Fortune Carrots).
Accessory Sources and Drop Rates
Section titled “Accessory Sources and Drop Rates”- Earrings, Necklaces, and Bracelets can only be obtained from Critical Encounters and treasure coffers around the North Horn.
Specific CEs drop specific (non-ring) gear slots, either ‘of Blood’ or ‘of Magic,’ at random. A map showcasing which CE drops what accessory is below.
- CEs have a ~0.13% drop rate.
- Coffers have a ~0.08% drop rate.
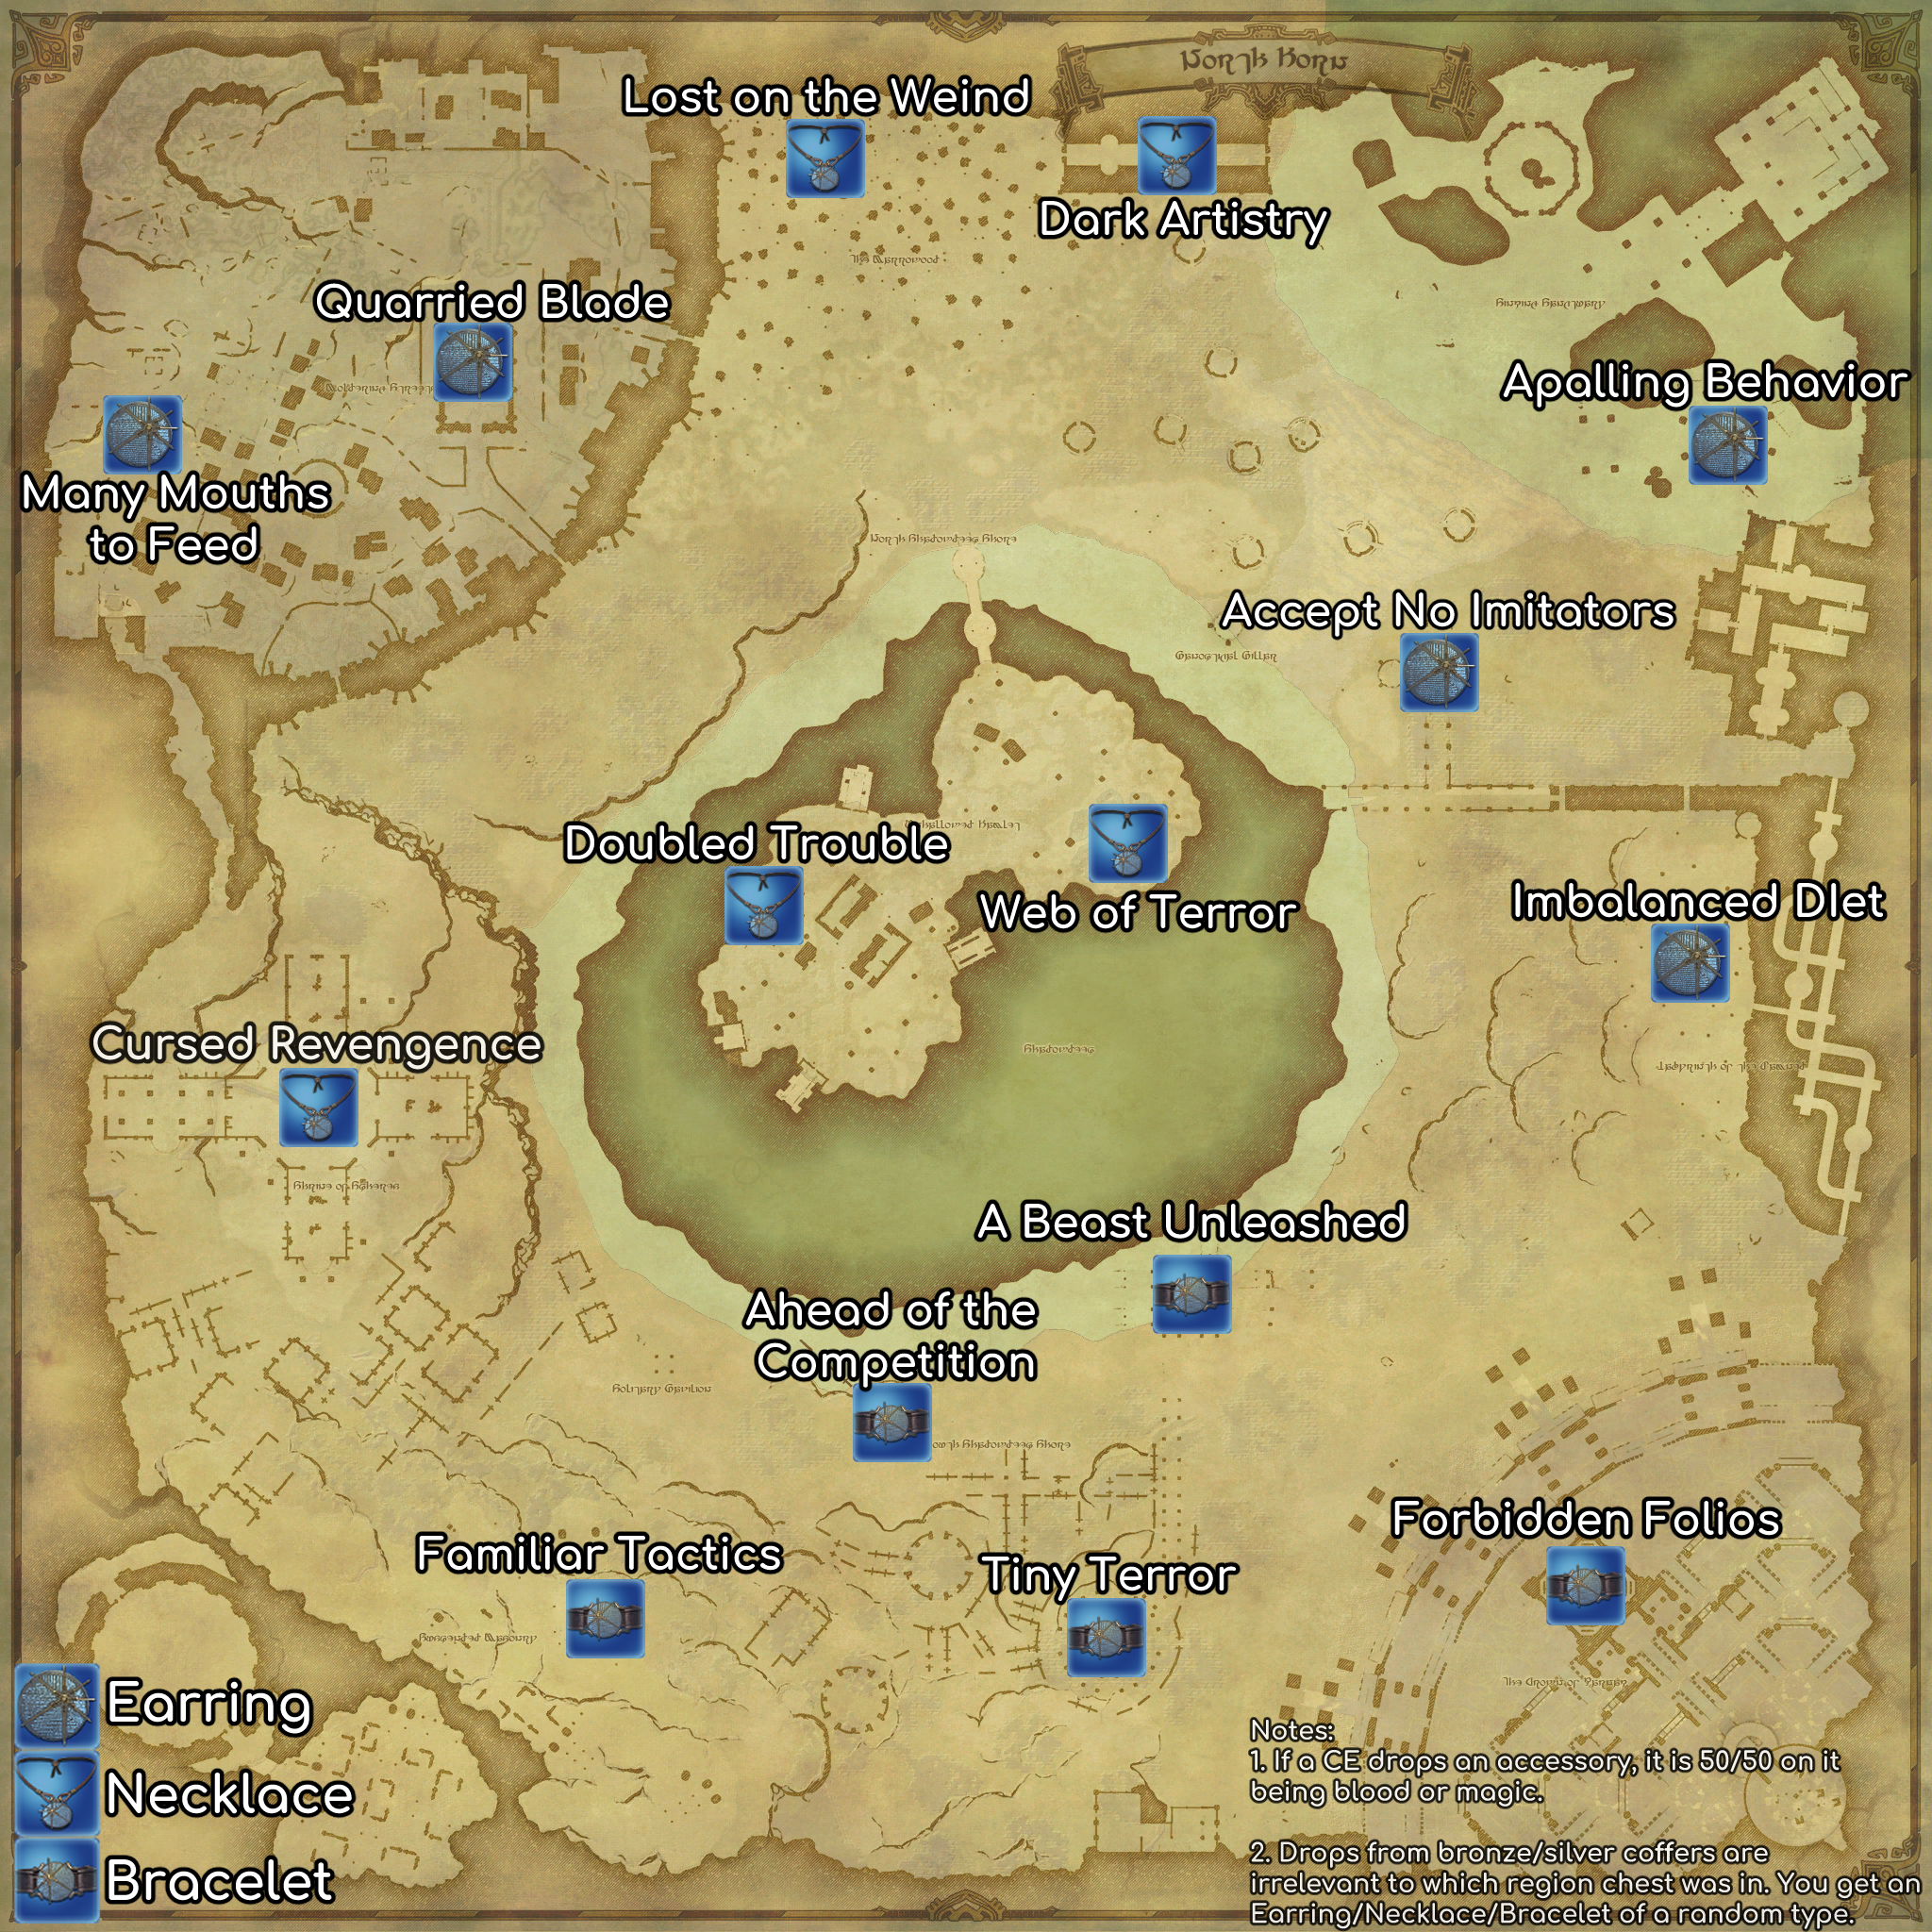
(Click to expand in new window)
- Rings can only be obtained from gold Persistent Pot chests.
- ~10% drop rate
- Deep Rings can only be obtained by opening a chest revealed by a Happy Bunny through the use of Fortune Carrots.
- ~20% drop rate
Gold Obol Farming
Section titled “Gold Obol Farming”Gold farming is primarily done with the use of Phantom Thief tanks, Thief sages, and jobs such as Cannoneers, pSummoners, Necromancer, or pBlack Mages to kill groups of high level mobs before they overwhelm the group. Most groups tend to use the far-side of the Dark Territory located in the Subterrane section of the map. They go in circles gathering and killing the Jesters and Bombadeels until satisfied.
More efficient solo farming routes are still being worked out! However have a preliminary guide made by PerryTheFridge aka Spiral Lance: North Horn Solo Gold Farming Guide
You can read more about gold farming in the following Google doc: Actually Good Guides to Gold Farming. The guide contains both solo and group farming guides.
- Actually Good Guides to Gold Farming: https://docs.google.com/document/d/1wlCr6ZTR_lnZhbO_1GmpC6oS9K2gaz2GKNJv8dV3zeI/edit?tab=t.39eab4nqlnk0
Phantom Blue Mage Spells
Section titled “Phantom Blue Mage Spells”North Horn added Phantom Blue Mage which, as is tradition, can learn spells from enemies it defeats. There are six spells in total and you can use this map to find them all
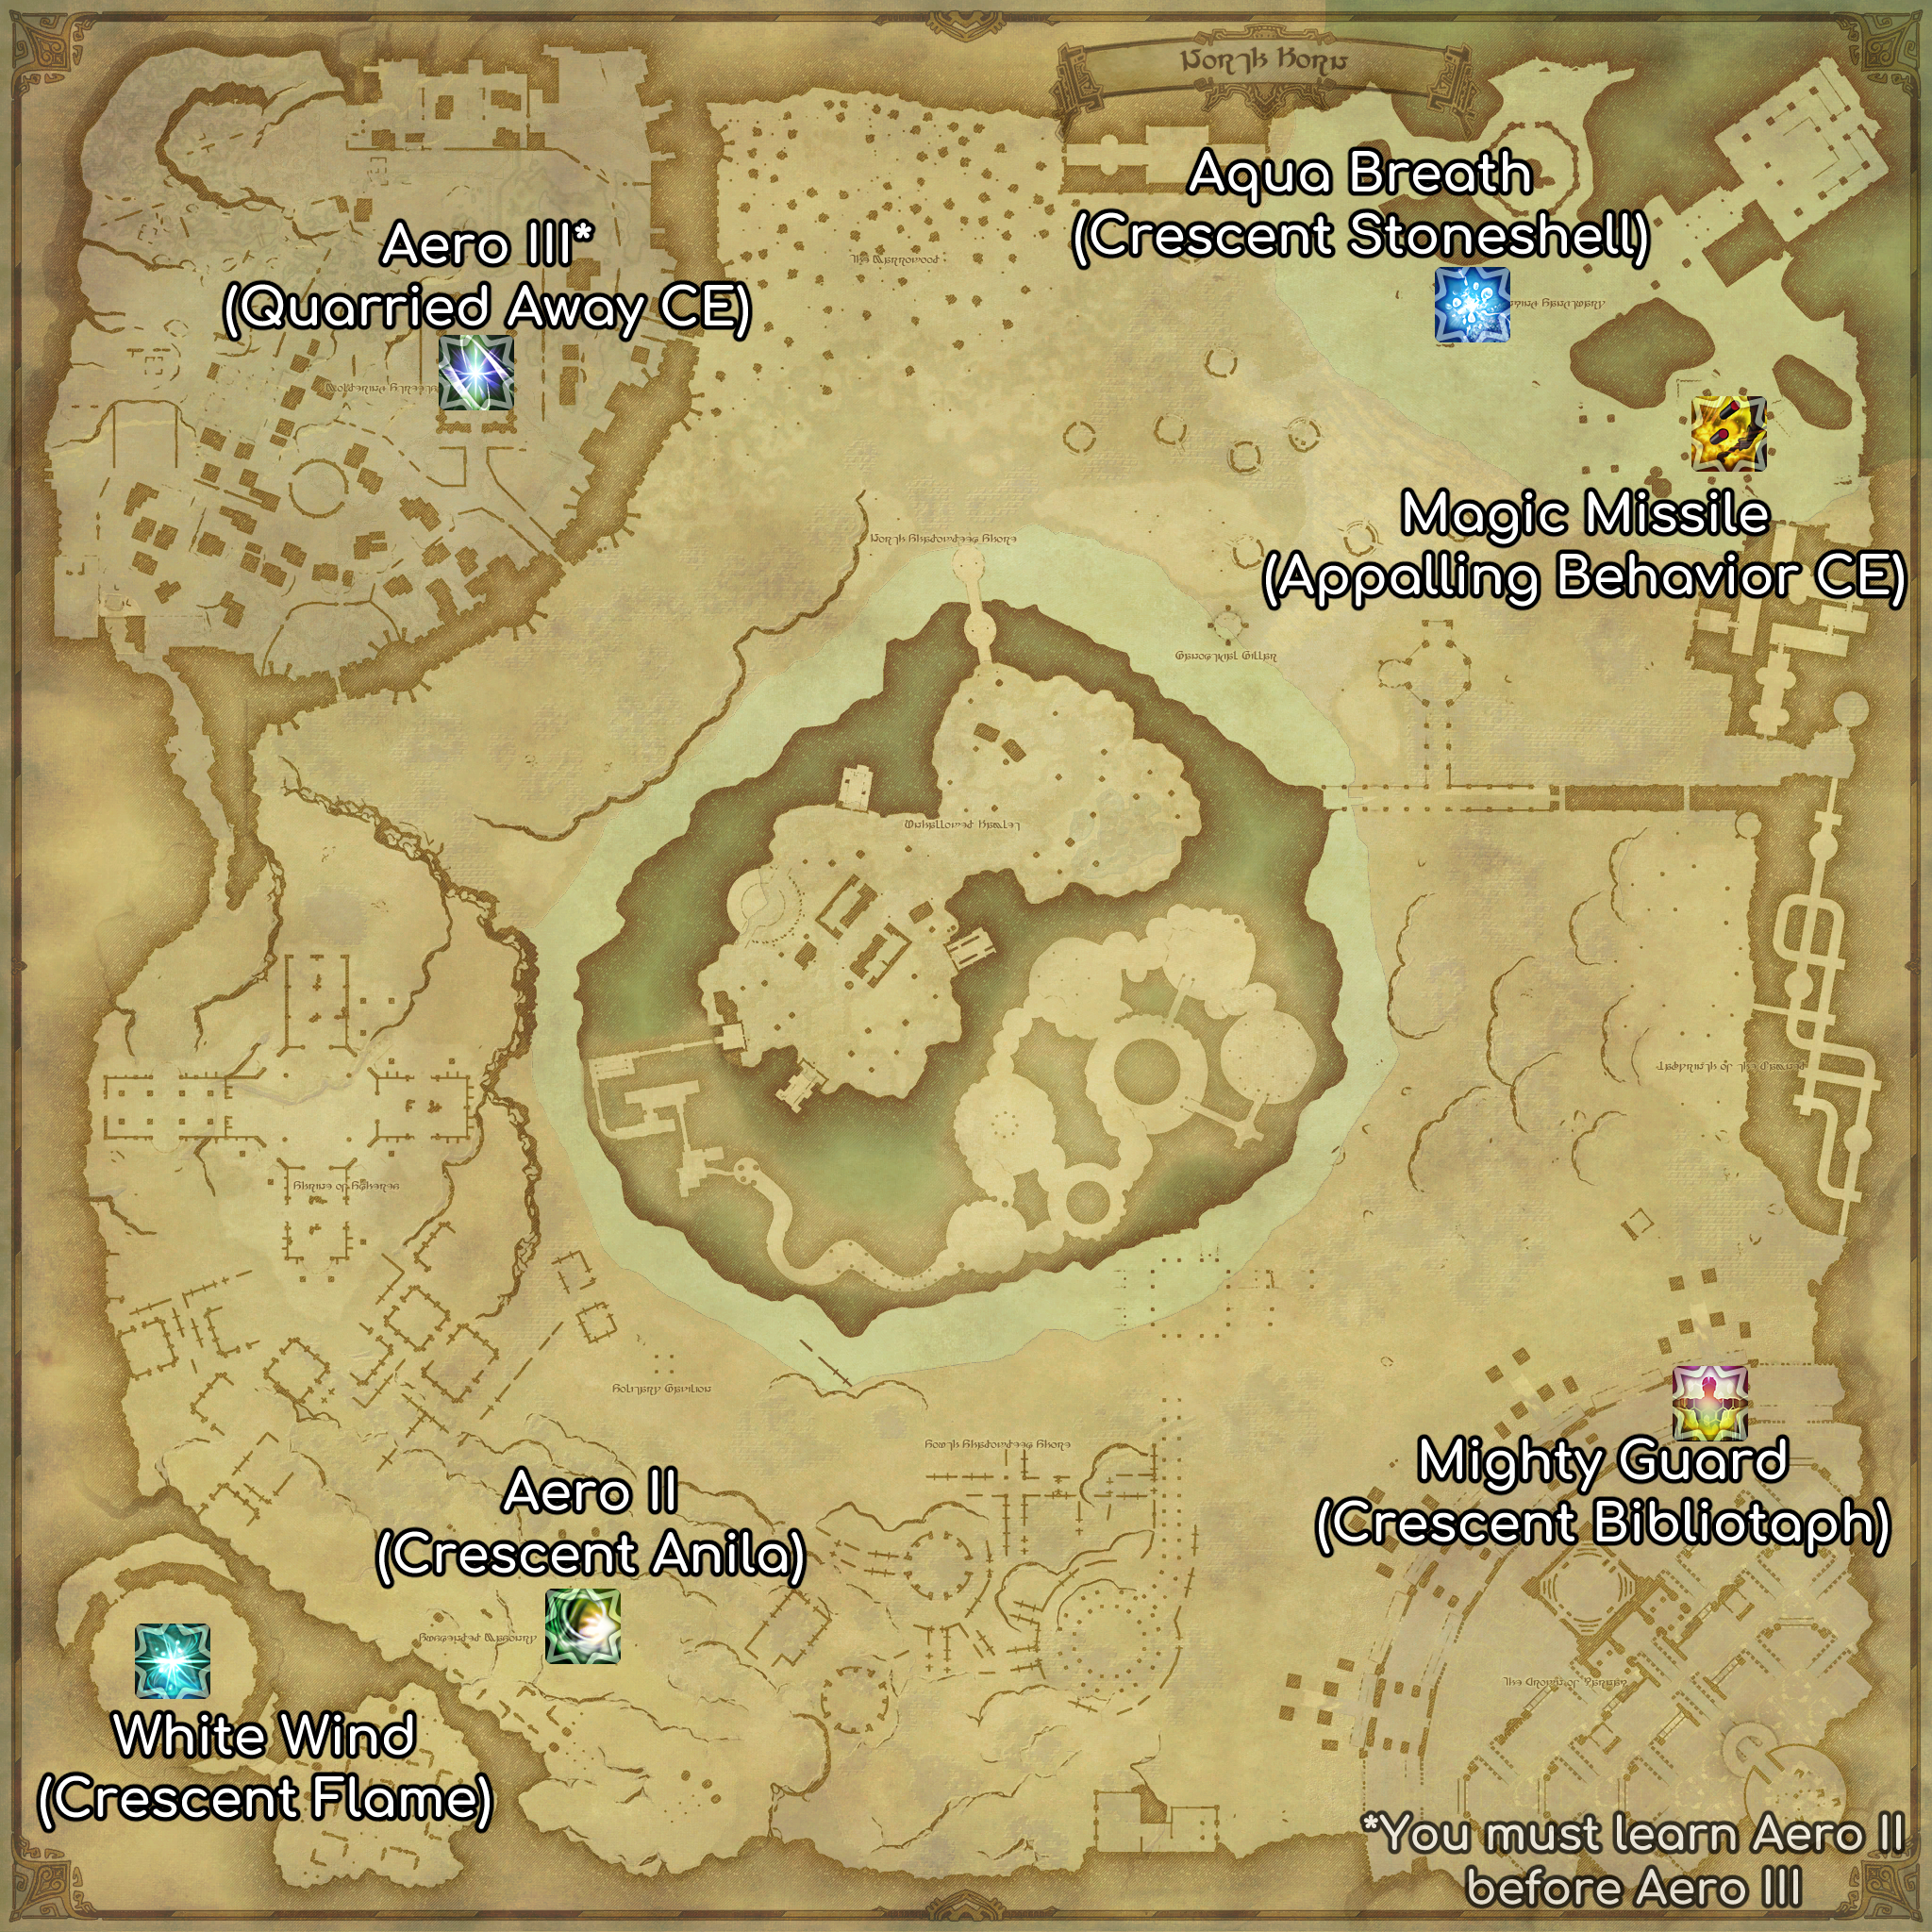
(Click to expand in new window)
North Horn Treasure Coffers
Section titled “North Horn Treasure Coffers”Looting chests efficiently can help you not overcap and waste chest spawns. Here are a few pre-made routes used by friends and myself.
Chest Map
Section titled “Chest Map”Here are all chest locations on an unmarked map.
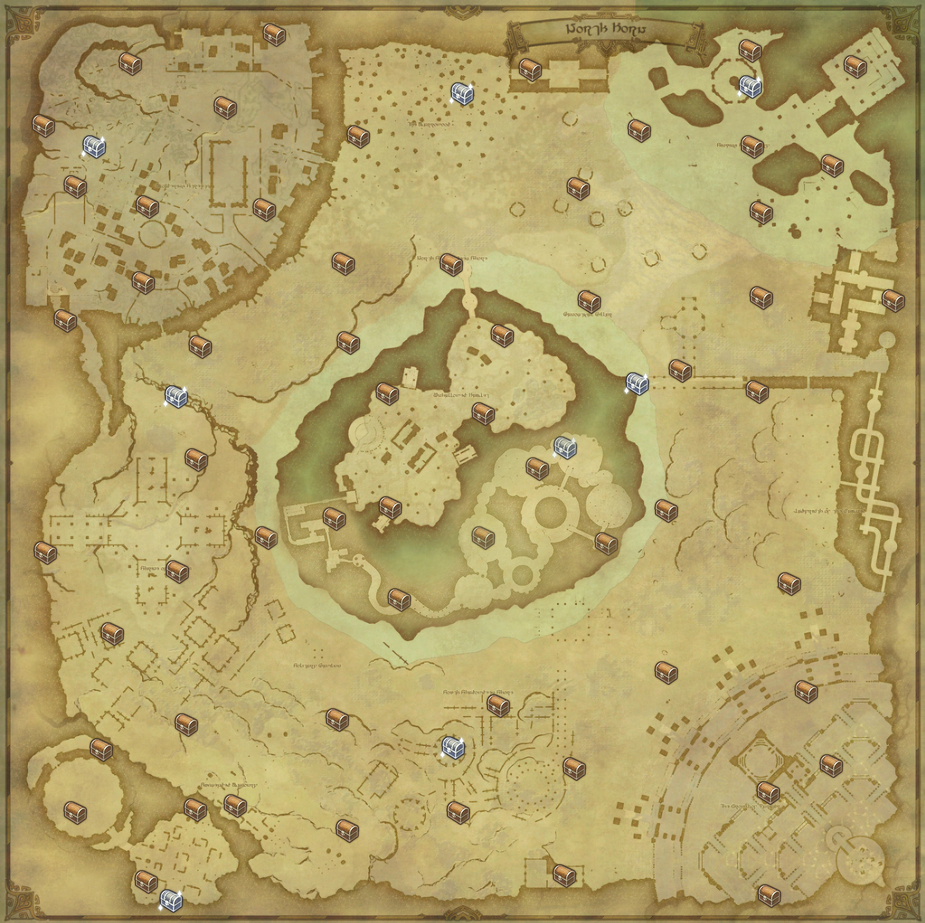
(Click to expand in new window)
Multiple Lines Route
Section titled “Multiple Lines Route”This route’s useful for doing specific sections of the map at a time. Allows you to take breaks and change what sections you do depending on time.
This route takes ~18 minutes once you get comfortable with it.
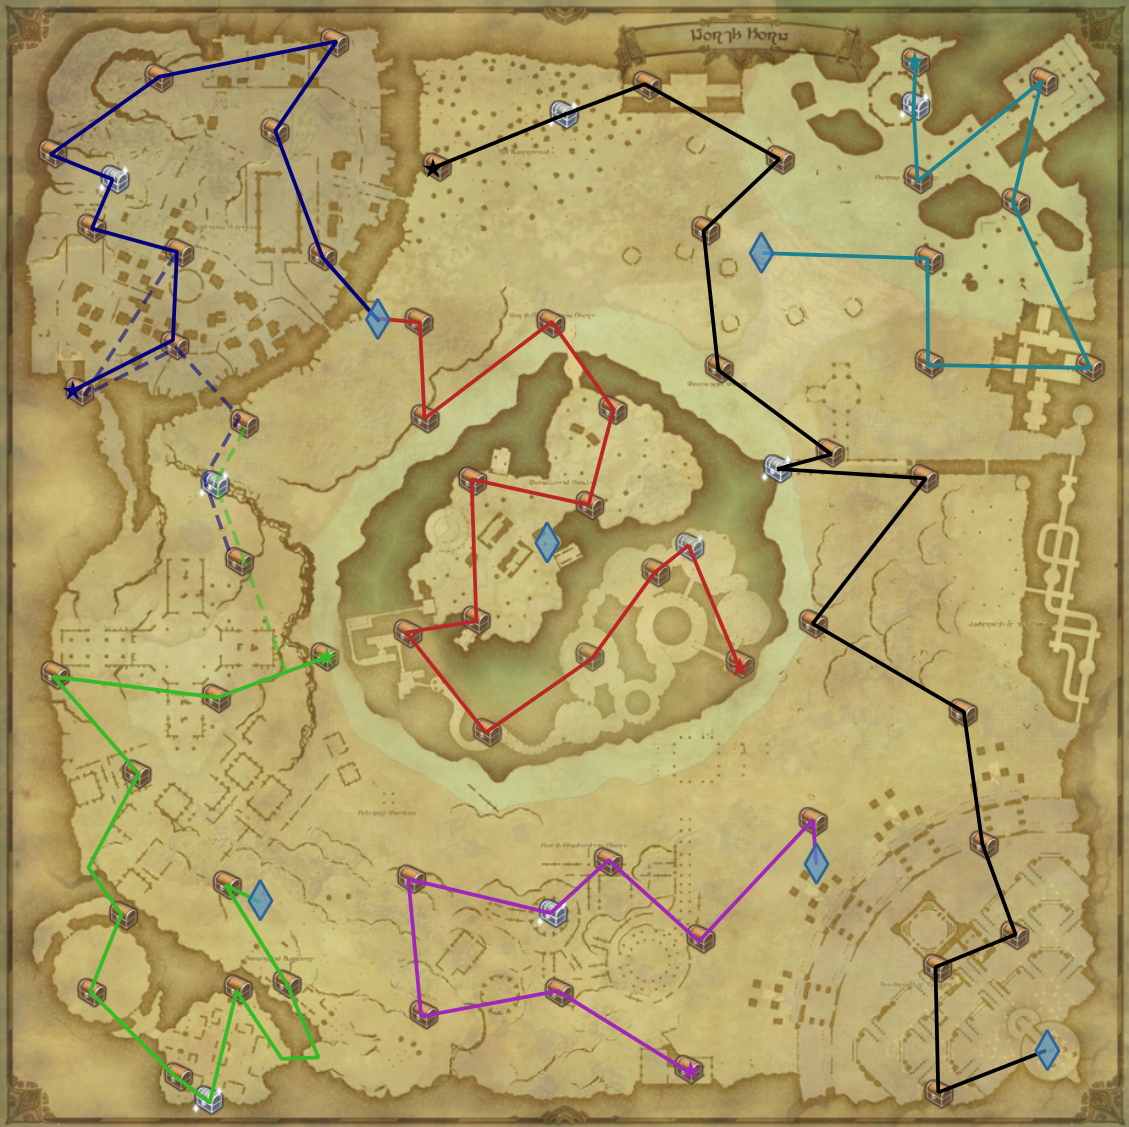
(Click to expand in new window)
North Horn Persistent Pots
Section titled “North Horn Persistent Pots”- Cyan = North pot chests
- Magenta = South pot chests
- Yellow/Gold = Reroll chests
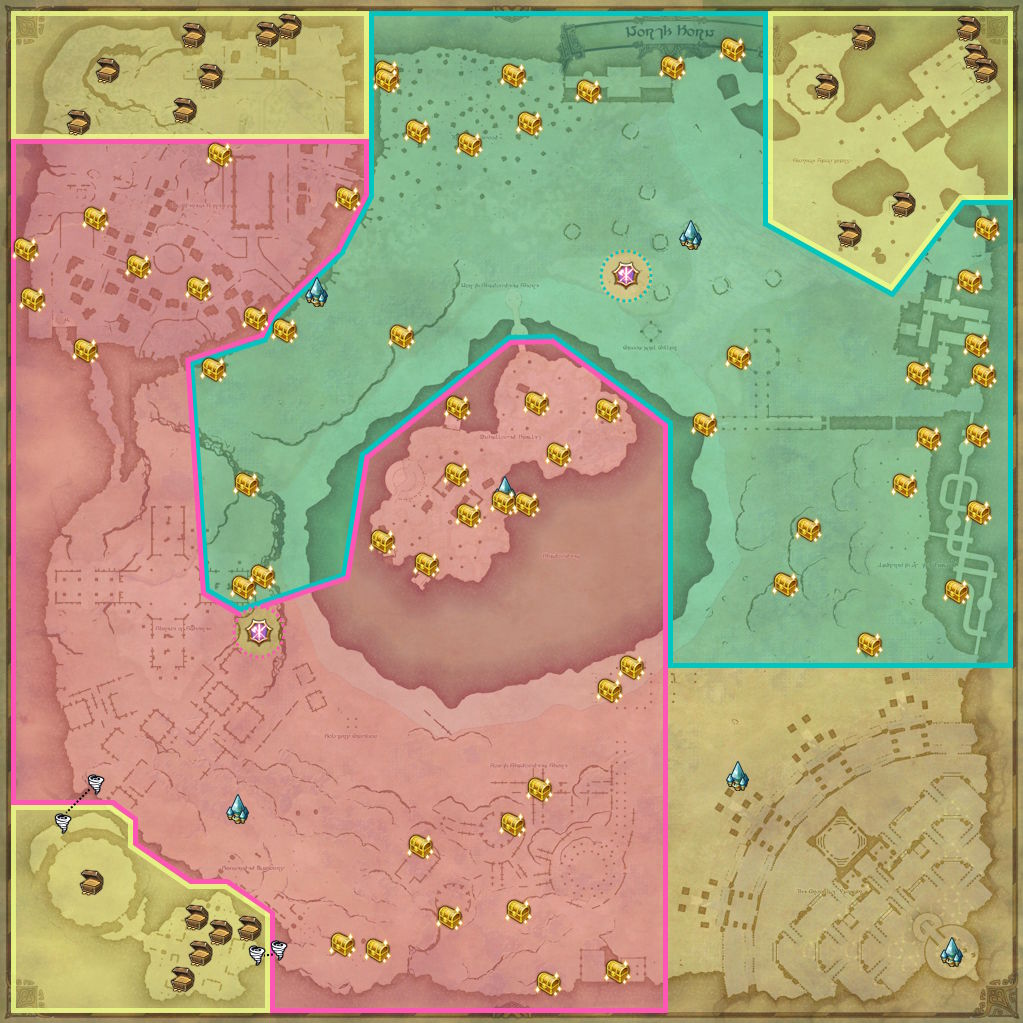
(Click to expand in new window)
North Horn Fortune Carrots
Section titled “North Horn Fortune Carrots”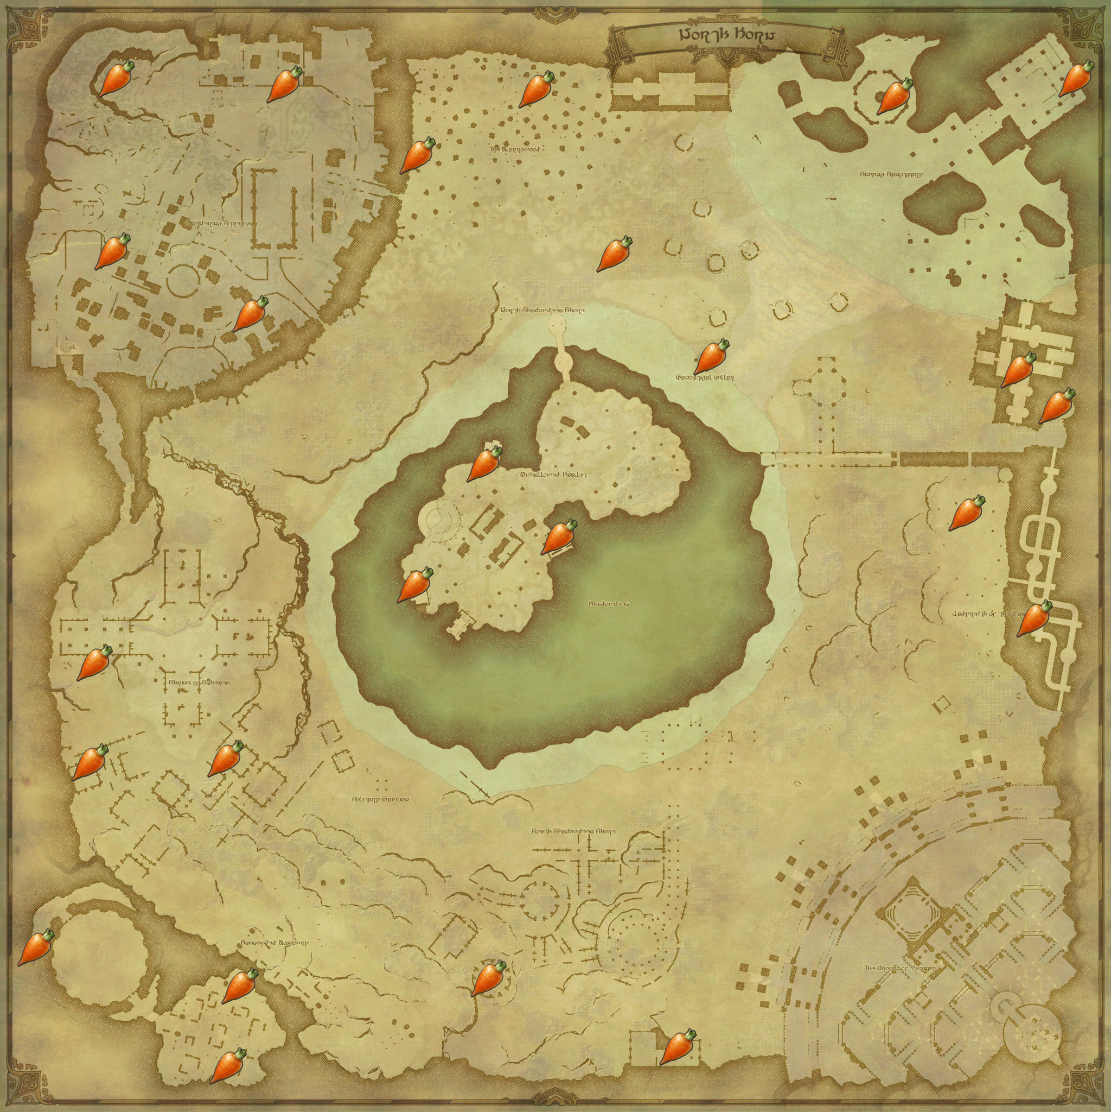
(Click to expand in new window)