Occult Crescent: South Horn
This is the first zone of the Occult Crescent released in patch 7.25; it contains many FATEs, Critical Encounter, and the Forked Tower: Blood. This zone also serves as setting for the first half of the story. Completion of the story is not gated by clearing Forked Tower: Blood.
Mobs of varying species and types can be found in clusters around the South Horn. Generally, the further you go from base camp, the higher the level of mob you will encounter
You can find a non-exhaustive list of mobs along with their aggro type and resistances on the Do It Doom spreadsheet maintained by Wobl.
Mob Level Map
Section titled “Mob Level Map”This map shows which region contains which level of mobs. You can also use this map to find an area to chain.
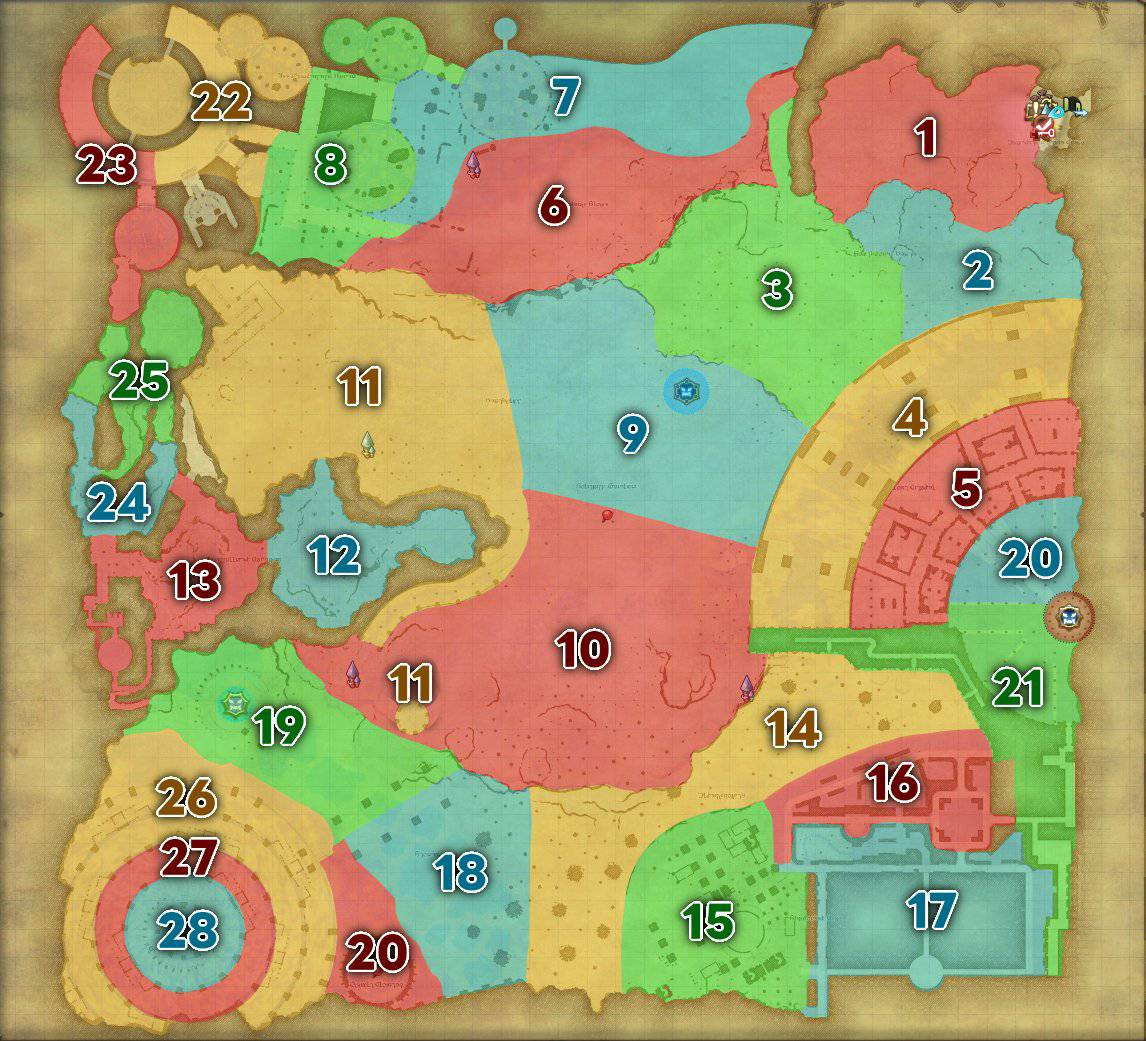
(Click to expand in new window)
Map Source: L0VELYJP on Twitter.Weather Based Mobs
Section titled “Weather Based Mobs”Some mobs spawn under specific weather conditions, and are often much higher level than the mobs around them. Of the 6 total weather conditions, 5 have unique mobs: Of the 6 total weathers, 5 have unique mobs:
| Mob | Weather | Uptime % |
|---|---|---|
| N/A | Fair Skies | 45% |
| Crescent Bomb | Clear Skies | 10% |
| Crescent Mousse | Rain | 10% |
| Crescent Dhurva | Clouds | 15% |
| Crescent Mimic | Atomsphereic Phantasms | 15% |
| Crescent Fool | Illusory Disturbances | 5% |
Killing these mobs rewards roughly double or triple the gold for their level,and these rewards are affected by chaining; so, a level 28 weather mob can reward up to 48 gold! Most of these mobs are stationary, though Crescent Fools do wander a large set path through the zone.
Weather Mobs Location and Level
Section titled “Weather Mobs Location and Level”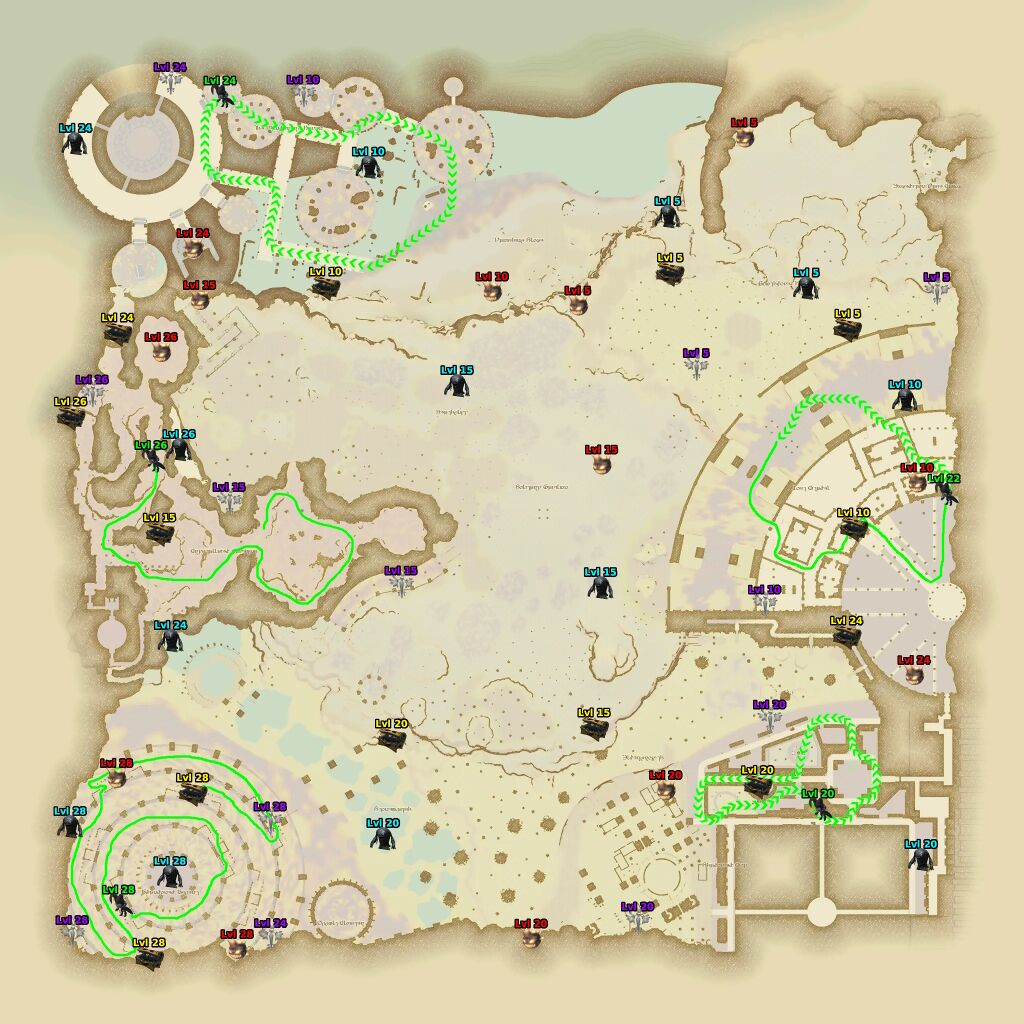
(Click to expand in new window)
Occult Records
Section titled “Occult Records”This section will spoil all survey points needed to fill out your Occult Record book for progressing the story. It’s recommended to try it yourself first before looking up a guide. A helpful piece of advice is to do this early! Knowledge Level EXP cannot be lost at or below level 5, so get those aetherytes and explore without a care!
All Survey Points for the Occult Record
Story Required Survey Points
Section titled “Story Required Survey Points”- #7 The Lost Citadel - X: 31, Y: 17
- #9 The Vanishing Slope - X: 20, Y: 12
- #13 The Fell Warren - X: 10, Y: 22
- #15 The Shadowed City - X: 24, Y: 32
- #19 The Abandoned Ascent - X: 15, Y: 29
Extra survey points
Section titled “Extra survey points”- #2 The Phantom Village - X:6, Y:4 (this is actually in the Phantom Village)
- #5 The Expedition Base Camp - X: 38, Y: 7
- #12 Heathcliff - X: 23, Y: 21
- #21 The Silent Streets - X: 36, Y: 33
- #22 The Ancient Stoneworks - X: 36, Y:22
- #23 The Wanderer’s Haven - X: 3, Y: 5
- #24 The Brazier - X: 8, Y: 35
- #30 The Secluded Stacks - Found in the final room of the Forked Tower: Blood
Visual Guide
Section titled “Visual Guide”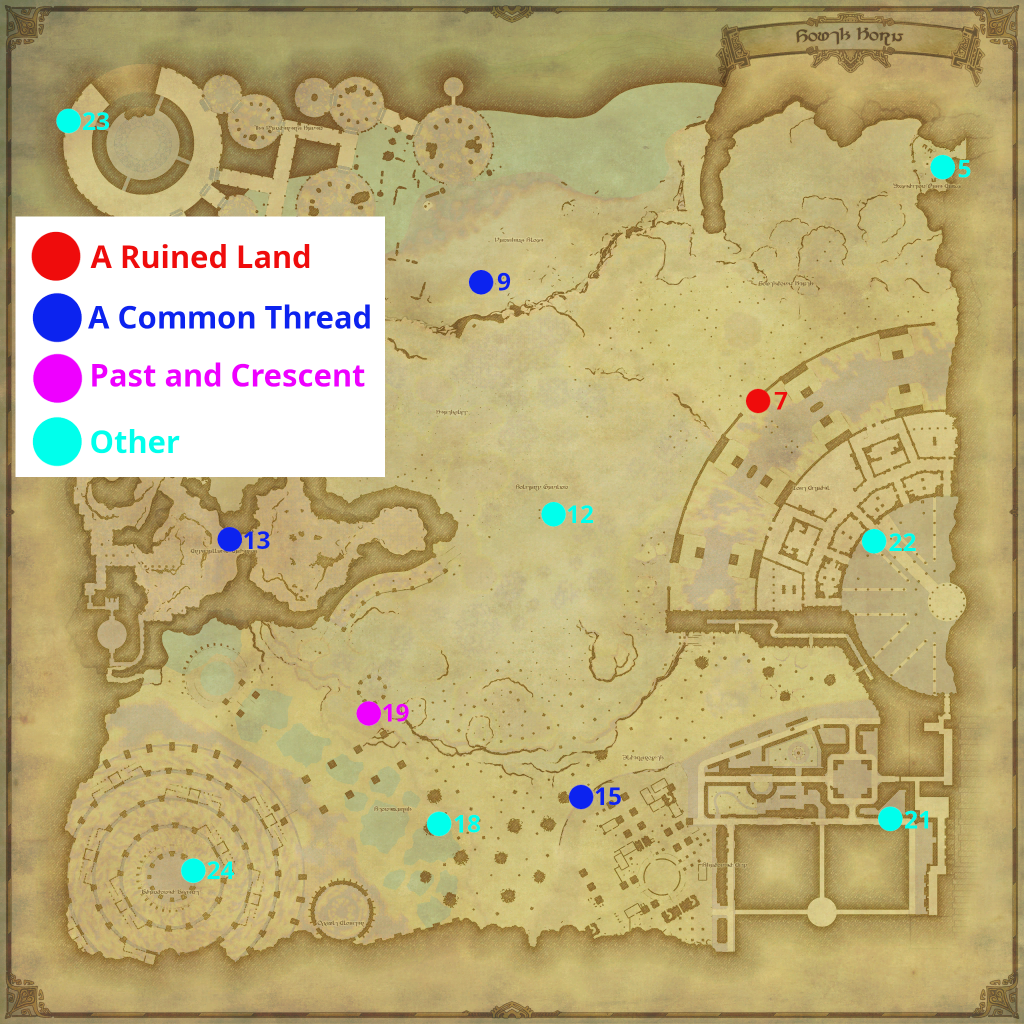
(Click to expand in new window)
The other records in your book can be filled out via Field Notes, which can be earned from completing FATEs, CEs, and clearing bosses in the Forked Tower: Blood.
Critical Encounters
Section titled “Critical Encounters”Critical Encounters, or CEs from here on, are the beefed up version of FATEs. These battles are against fiercer foes and can sometimes reward new Phantom Jobs, Field Notes, as well as more experience and silver. CEs are split into two kinds: ones that can be spawned by the player, and ones that spawn randomly without player input. The rewards are the same regardless of spawn method.
Every successful Critical Encounter will reward the following
- 200-23,400 Knowledge EXP (scales to your knowledge level)
- 480 Phantom Job EXP
- 20 uncapped tomestones
- 10 weekly capped tomestones
- 200 enlightenment silver pieces
- 20% for a Demiatma (drops arezone dependent, see Phantom Weapons Section)
- Field Notes (specified below)
Tracking Critical Encounters
Section titled “Tracking Critical Encounters”You can use Infi’s Occult Tracker website to help you keep track of which FATEs and CEs have spawned. This site will also help you know which encounters drop which rewards (Field Notes, Demiatmas, etc.) along with which CEs can be spawned by players and which mobs will spawn them.
Randomly Spawning CEs
Section titled “Randomly Spawning CEs”These CEs will spawn randomly over time, and have a ~120 minute (2 hours) cooldown:
| CE | Boss | Noteable Drops | Accessory Drop |
|---|---|---|---|
| Company of Stone | Stone Men | n/a | Necklace |
| Cursed Concern | Trading Tortoise | Field Notes | Necklace |
| Eternal Watch | Repaired Lion | n/a | Necklace |
| Crawling Death | Death Claw | n/a | Earring |
| The Black Regiment | Black Chocobos | Ranger Soul Shard (~20%) | Earrings |
| The Unbridled | Crescent Berserker | Berserker Soul Shard (~20%) | Earrings |
| With Extreme Prejudice | Command Urn | n/a | Bracelet |
| Trial by Claw | Crystal Dragon | n/a | Bracelet |
| Flames of Dusk | Hinkypunk | n/a | Bracelet |
Player Spawned CEs
Section titled “Player Spawned CEs”These CEs are spawned by killing specific mobs. If it doesn’t spawn, keep trying! These have a ~60 minute (1 hour) cooldown.
| CE | Boss | Spawn Mob | Mob Location | Noteable Drops | Accessory Drop |
|---|---|---|---|---|---|
| From Times Bygone | Mythic Idol | Crescent Byblos | (X: 5, Y: 25) | Field Notes | Bracelets |
| Shark Attack | Nymian Petalodius | Crescent Petalodite | (X: 19, Y: 6) | Field Notes | Bracelets |
| Noise Complaint | Neo Garula | Crescent Garula | (X: 31, Y: 8) | n/a | Necklace |
| On the Hunt | Lion Rampant | Crescent Fans | (X: 35, Y: 21) | Phantom Oracle Soul Stone (~20%) | Necklace |
| Scourge of the Mind | Mysterious Mindflayer | Crescent Monks | (X: 26, Y: 33) | n/a | Earrings |
| Calamity Bound | Cloister Demon | Crescent Inkstains | (X: 14, Y: 35) | Story Progression, Field Notes | Earrings |
These are just like FATEs in the overworld, and are much smaller in scale than CEs. There are no Knowledge Level or Phantom Job level requirements to participate in FATESs, just show up and fight!
Every successful FATE you complete with a gold rating will reward the following
- Up to 7,722 Knowledge EXP (scales to your Knowledge Level)
- 160 Phantom Job EXP
- 70 enlightenment silver pieces
- 5% chance for a Demiatma (drops are zone dependent, see Phantom Weapons section)
| FATE | Location | Noteable Drops |
|---|---|---|
| A Delicate Balance | (X: 14, Y: 34) | |
| A Prying Eye | (X: 20, Y: 32) | |
| An Unending Duty | (X: 17, Y: 22) | |
| Brain Drain | (X: 20, Y: 15) | |
| Fatal Allure | (X: 22, Y: 27) | |
| King of the Crescent | (X: 17, Y: 26) | |
| Rough Waters | (X: 24, Y: 34) | |
| Serving Darkness | (X: 29, Y: 21) | |
| Sworn to Soil | (X: 9, Y: 27) | |
| The Golden Guardian | (X: 28, Y: 31) | |
| The Winged Terror | (X: 10, Y: 9) | |
| Persistent Pots | (X: 25, Y: 17) | Field Notes |
| Pleading Pots | (X: 11, Y: 32) | Field Notes |
Currencies
Section titled “Currencies”There are currently 3 different types of currency that are all earned in (mostly) unique ways and can be exchanged for mounts, glamours, gear progression, ciphers for Forked Tower: Blood, or other resources to aid you in taking on the South Horn. Silver is from FATEs, CEs, and Pots/Bunnys, gold is earned from chaining mobs or Pots/Bunnys, and sanguinite is from Forked Tower: Blood (similar to Eurekan Fragments from Baldesian).
Enlightenment Silver Pieces
Section titled “Enlightenment Silver Pieces”Enlightenment silver pieces are only earned by doing FATEs, CEs, and opening Pot/Bunny coffers in the South Horn.
| Activity | Amount Earned |
|---|---|
| FATEs | 70 |
| CEs | 200 |
| Pot Chests | 100/300/1,000 |
| Bunny Chests | 1,000 |
Silver pieces are primarily used for both purchasing and augmenting Arcanaut’s Gear. You can see a full list of items available to purchase by visiting the Expedition Antiquarian in base camp. Additional notable items include:
Notable Silver Purchases
| Item | Cost | Use |
|---|---|---|
| South Horn Riding Map | 3,000 | Increases mount speed, makes travelling and getting to FATEs much easier. |
| Ph. Cannoneer | 1,000 | Strong AoE damage. Has stronger/longer trick attack. Perfect for gold farming! |
| Ph. Time Mage | 1,000 | Slows/dispels mobs, hastens yourself or allies. Required for Forked Tower. |
| Ph. Chemist | 1,000 | Healing, MP refills, and the only way to raise people in Forked Tower. |
| Ph. Dancer | 1,000 | Has powerful, unique dances and can debuff bosses for 5% extra damage. |
| Ph. Mystic Knight | 1,000 | Many strong skills. Has a personal 5% buff that also inflicts a 5% debuff on bosses. |
| Aetherspun Silver | 1,200 | Used in augmented Arcanaut’s gear from base to the +1 variant. |
| Sanguine Ciphers | 600 | Used to enter Forked Tower: Blood. |
| Ancient Airship | 5,000 | 4-seater mount. Definitely save this for last! |
Enlightenment Gold Pieces
Section titled “Enlightenment Gold Pieces”Enlightenment gold pieces are only earned by chaining mobs or opening Pot/Bunny coffers in the South Horn.
| Activity | Amount Earned |
|---|---|
| Mobs | Varied, higher level = more gold |
| Pot Chests | 160/480/1,600 |
| Bunny Chests | 1,600 |
Gold pieces are primarily used for purchasing Aetherial Fixatives for augmenting Arcanaut’s Gear. You can see a full list of items available to purchase by visiting the Expedition Antiquarian in base camp. Additional notable items include:
Notable Gold Purchases
| Item | Cost | Use |
|---|---|---|
| Ph. Samurai | 1,000 | Strongest DPS option in Occult Crescent right now. |
| Ph. Geomancer | 1,000 | Damage Buff/Healing Bells. Can Suspend self/party. Required for Forked Tower |
| Ph. Thief | 1,000 | Healing, MP refills, and the only way to raise people in Forked Tower. |
| Ph. Gladitor | 1,000 | Similar damage to ph. Samurai, requires ramp up with its skills. |
| Aetherial Fixatives | 3,000 | Used in augmented Arcanaut’s gear from base to the +1 variant. |
| Sanguine Ciphers | 320 | Used to enter Forked Tower: Blood. |
| Coffers/Potions | 50 | Items used by Ph. Samurais/Chemists. Alternative to spending gil if no other uses for gold. |
Sanguinite
Section titled “Sanguinite”Sanguinite is exclusive to Forked Tower: Blood, and is earned through completing encounters and finding hidden chests throughout the tower. A max of 30 sanguinite can be earned per clear. Sanguinite is used to purchase X-Fixatives, which are used to augmen tArcanaut’s Gear from +1 to +2.
You can see a full list of items available to purchase by visiting the Expedition Antiquarian in base camp. Additional noteable items include:
Notable Sanguinite Purchases
| Item | Cost | Use |
|---|---|---|
| X-Fixatives | 10 | Used in augmented Arcanaut’s gear from +1 to the +2 variant. |
| Psamathe | 6 | Pink-ish Dead Stars minion |
| Naiad | 6 | Purple Dead Stars minion |
| Deimos | 6 | Green Dead Stars minion |
| Furniture | Varied | Housing items unique to Occult Crescent |
/twirl emote | 30 | Unique emote only found in South Horn |
Occult Accessories
Section titled “Occult Accessories”These can be very rarely obtained from completing Critical Encounters in the South Horn, opening bronze/silver treasure coffers, and opening gold chests from either a Persistent Pot or Happy Bunnies (Fortune Carrots).
Accessory Sources and Drop Rates
Section titled “Accessory Sources and Drop Rates”- Earrings, Necklaces, and Bracelets can only be obtained from Critical Encounters and treasure coffers around the South Horn.
Specific CEs drop specific (non-ring) gear slots, either ‘of Blood’ or ‘of Magic,’ at random. A map showcasing which CE drops what accessory is below.
- CEs have a ~0.1% drop rate (our best estimated value).
- Coffers have a ~0.06% drop rate.
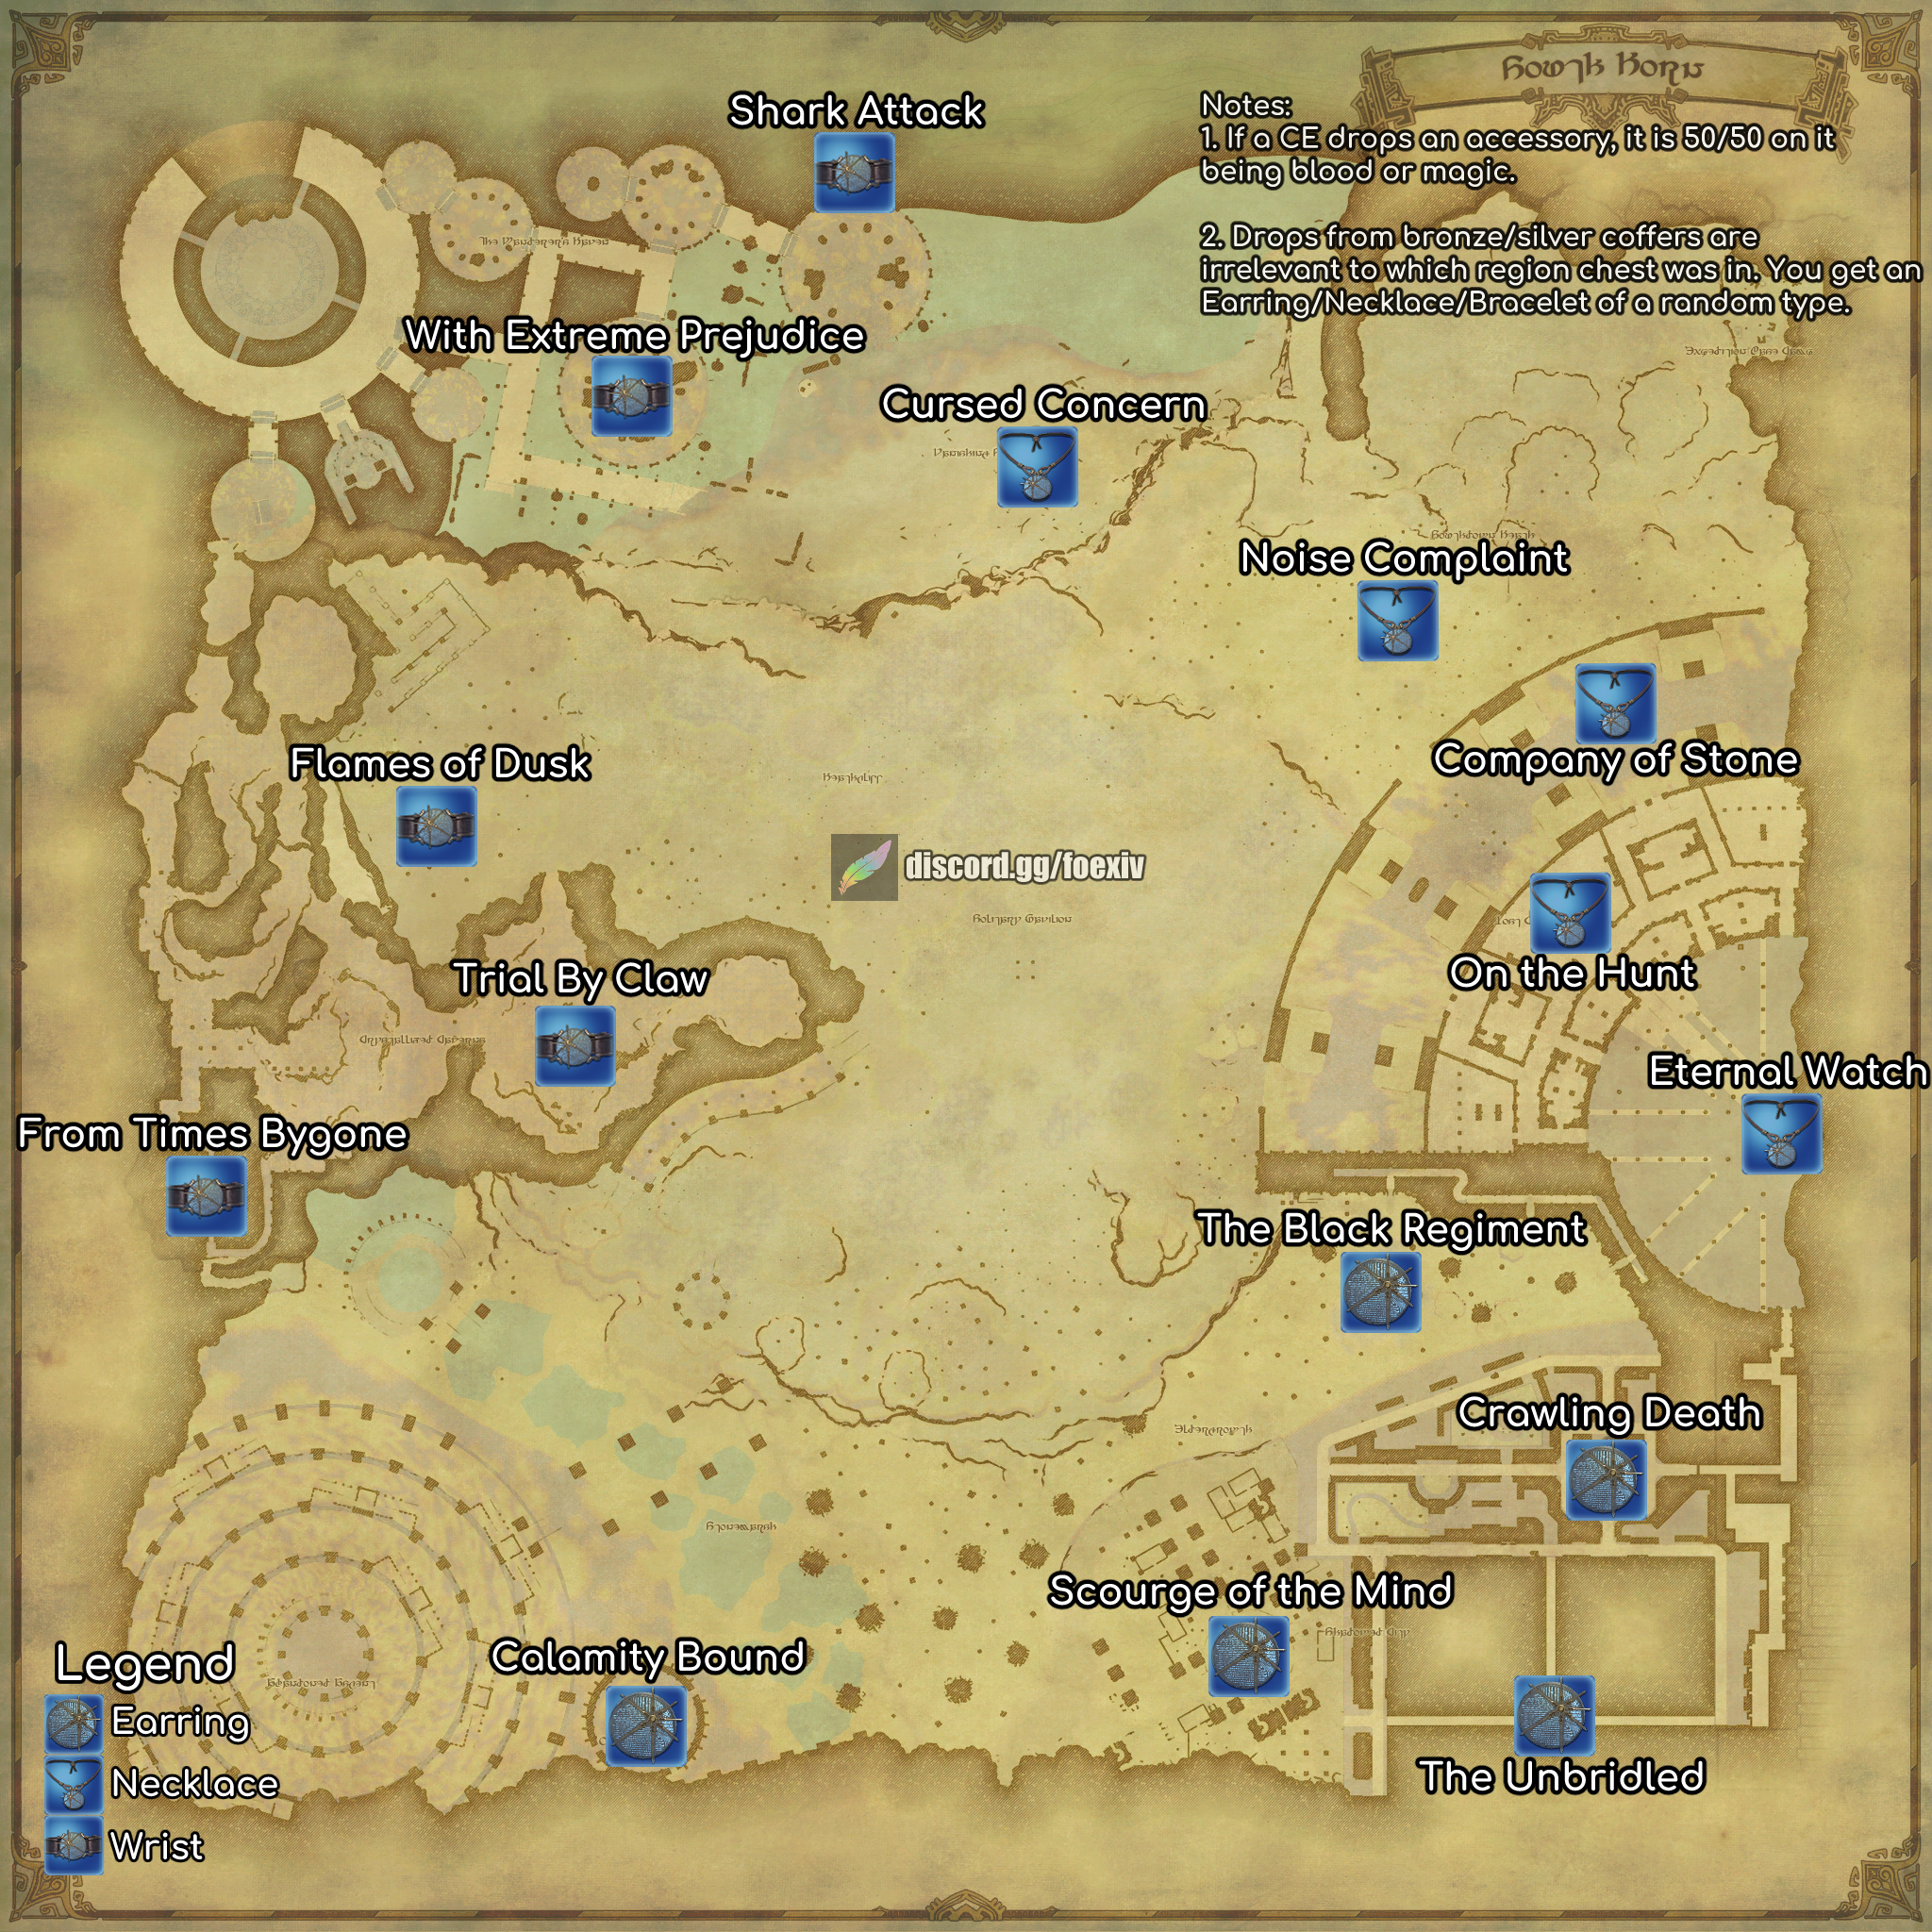
(Click to expand in new window)
- Rings can only be obtained from gold Persistent Pot chests.
- ~10% drop rate
- Deep Rings can only be obtained by opening a chest revealed by a Happy Bunny through the use of Fortune Carrots.
- ~20% drop rate
Gold Farming
Section titled “Gold Farming”Gold farming is primarily done with the use of Phantom Thief tanks, Thief sages, and Cannoneers to kill groups of high level mobs before they overwhelm the group. Most groups tend to use the top floor of The Abandoned Ascent tower located in the South West corner of the map. They go in circles gathering and killing the Isleblazers and Zirnitras until satisfied.
If you are solo, you can loop the Crescent Aetherscabs and Tarus mobs in the Crystallized Caverns or the Crescent Fopers on the ramp at (X: 9.3, Y: 15.7). Both zones use either warrior/paladin on Phantom Cannoneer or Oracle to effectively kill the pack of mobs.
You can read more about gold farming in the following Google doc: Actually Good Guides to Gold Farming. The guide contains both solo and group farming guides.
- Actually Good Guides to Gold Farming: https://docs.google.com/document/d/1wlCr6ZTR_lnZhbO_1GmpC6oS9K2gaz2GKNJv8dV3zeI/edit?tab=t.39eab4nqlnk0
Chest Farming
Section titled “Chest Farming”Looting chests efficiently can help you not overcap and waste chest spawns. Here are a few pre-made routes used by friends and myself.
Chest Map
Section titled “Chest Map”Here are all chest locations on an unmarked map.
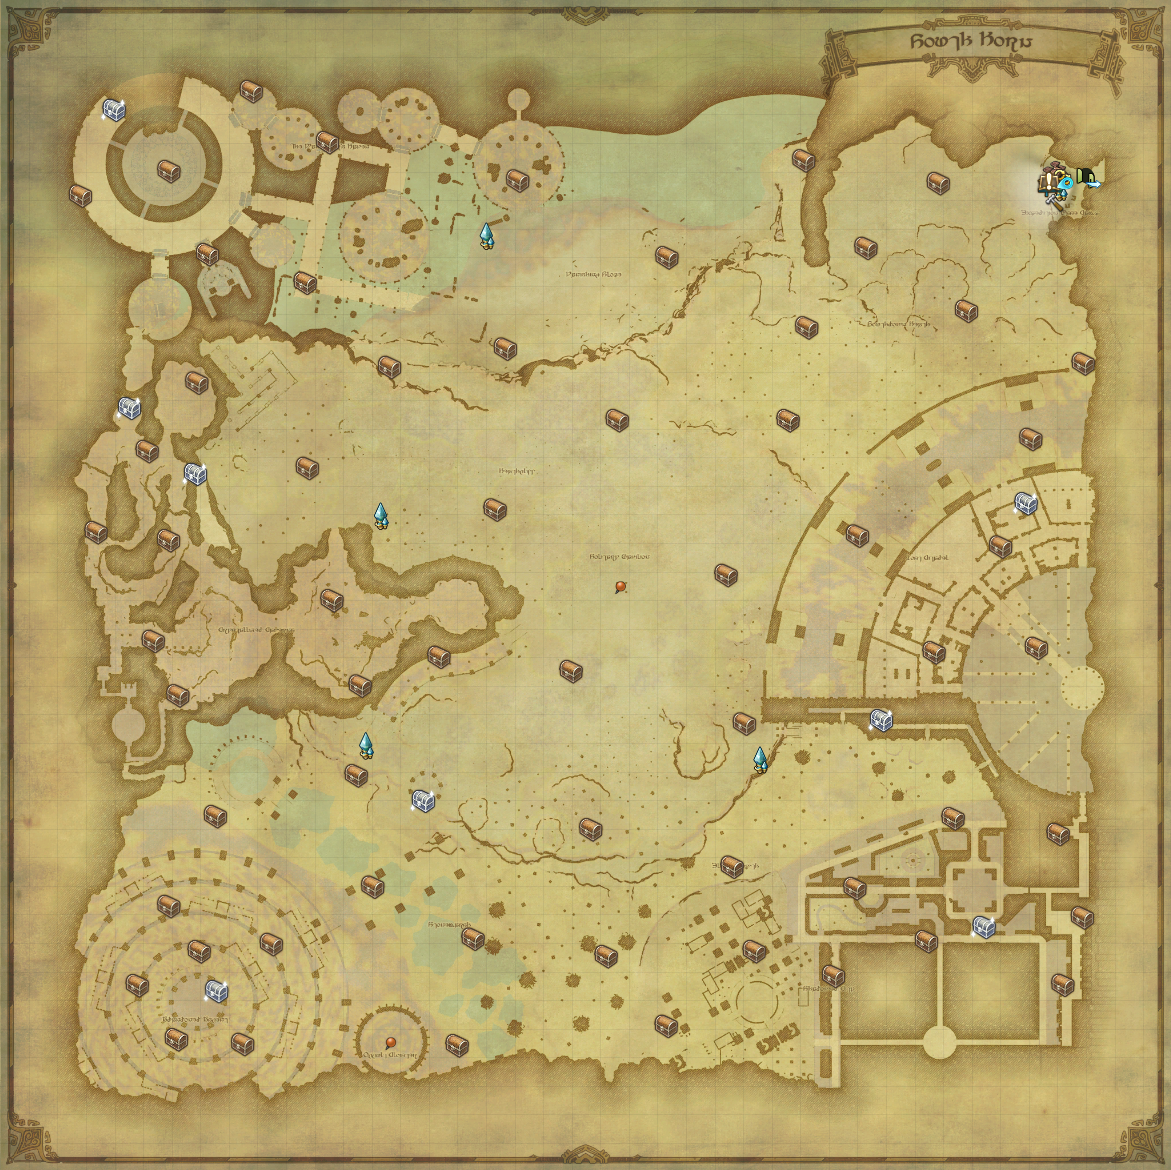
(Click to expand in new window)
Multiple Lines Route
Section titled “Multiple Lines Route”This route’s useful for doing specific sections of the map at a time. Allows you to take breaks and change what sections you do depending on time.
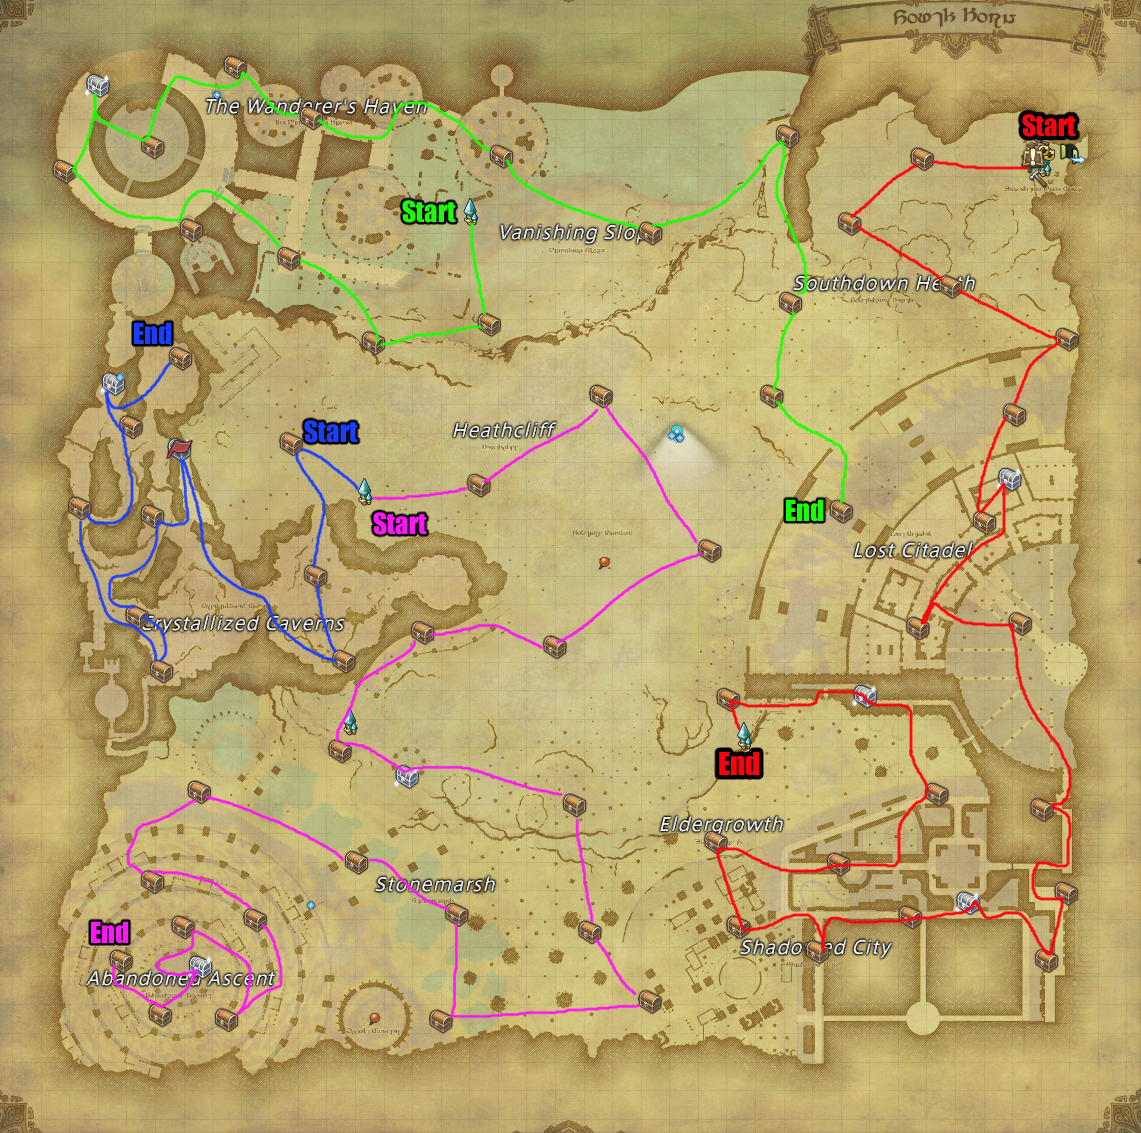
(Click to expand in new window)
No Return Route
Section titled “No Return Route”Don’t want to press return and just get the whole map in one sweep? Use this routing.
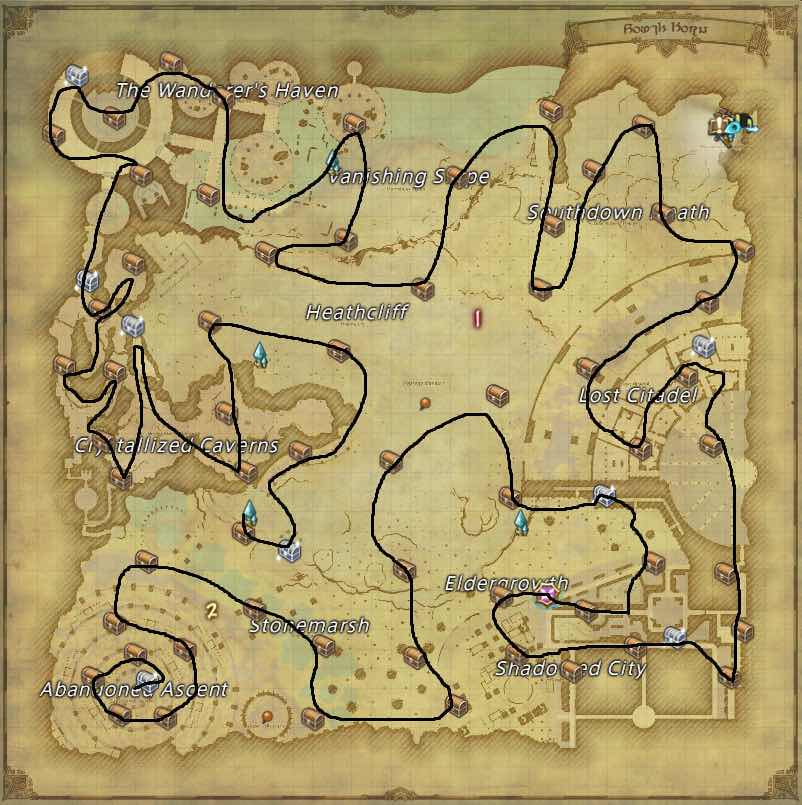
(Click to expand in new window)
South Horn Persistent Pots
Section titled “South Horn Persistent Pots”Pot Chest Locations
Section titled “Pot Chest Locations”Below is a map showcasing all potential pot locations. There are 80 chest locations in total, 30 for the North FATE and 30 for the South FATE; both of which are denoted with a golden chest icon. The remaining 20 are for second chance pots; these are noted by the more bronze coffer icon.
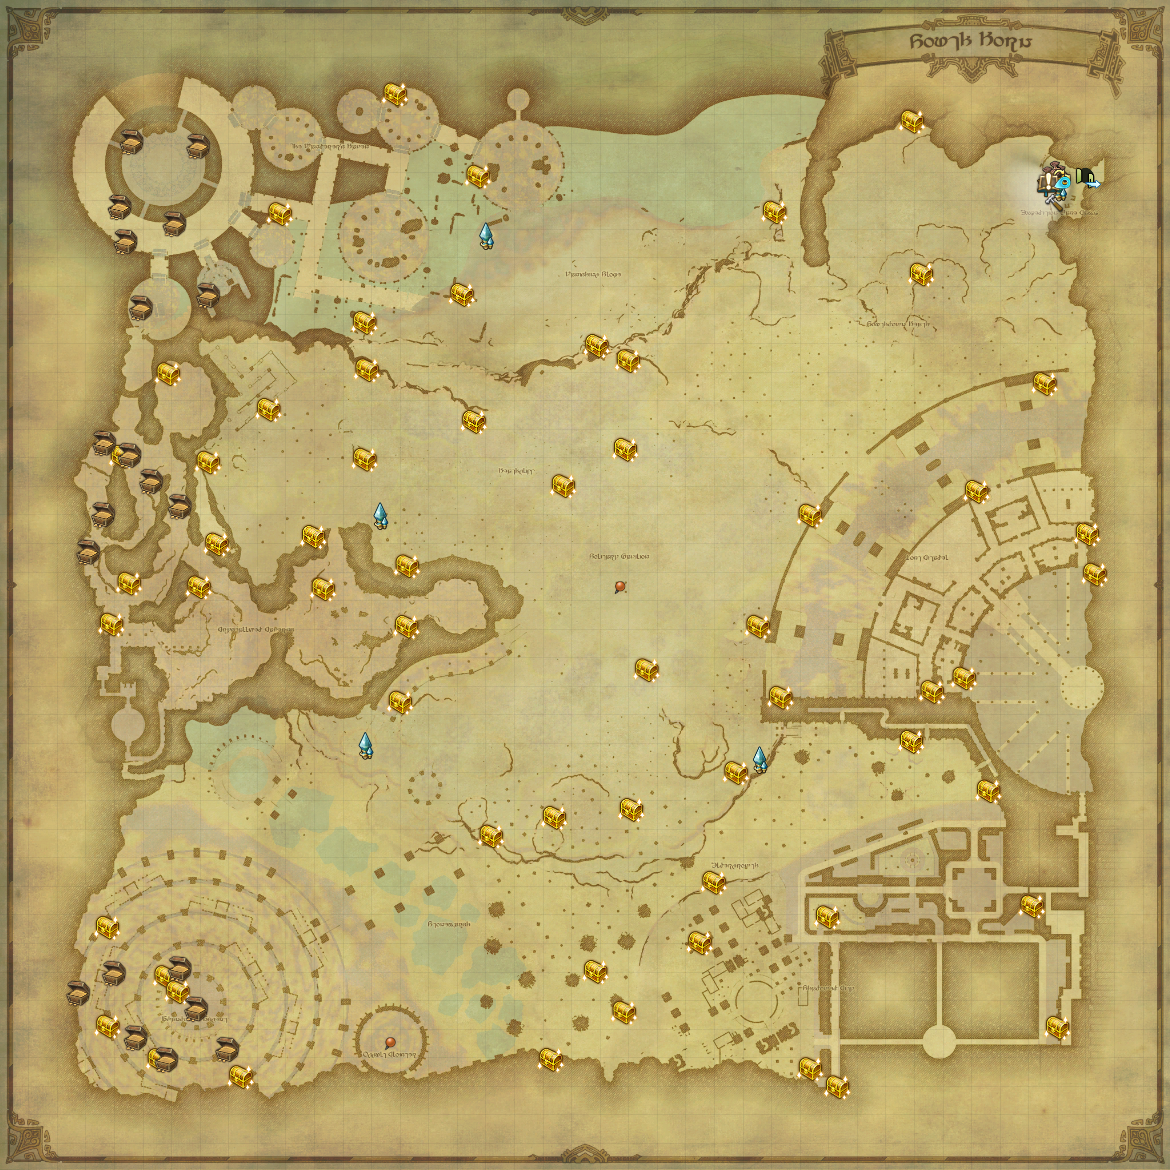
(Click to expand in new window)
Finding your Pot Chest Fast
Section titled “Finding your Pot Chest Fast”Based on which Pot FATE you just completed (north solutions left, south solutions right), you can immediately use your Magical Elixir and get an immediate sense of where your pot might take you! Simply match the color of dots with the initial direction, and you can guarantee that your pot will take you to one of those similarly colored dots.
Example: Finishing the North Pots FATE (using the left image) and sensing something East means I can head towards the group of pink dots, stand in the center of the pink dots, use my elixir once again, and almost immediately know where my pot chest is!
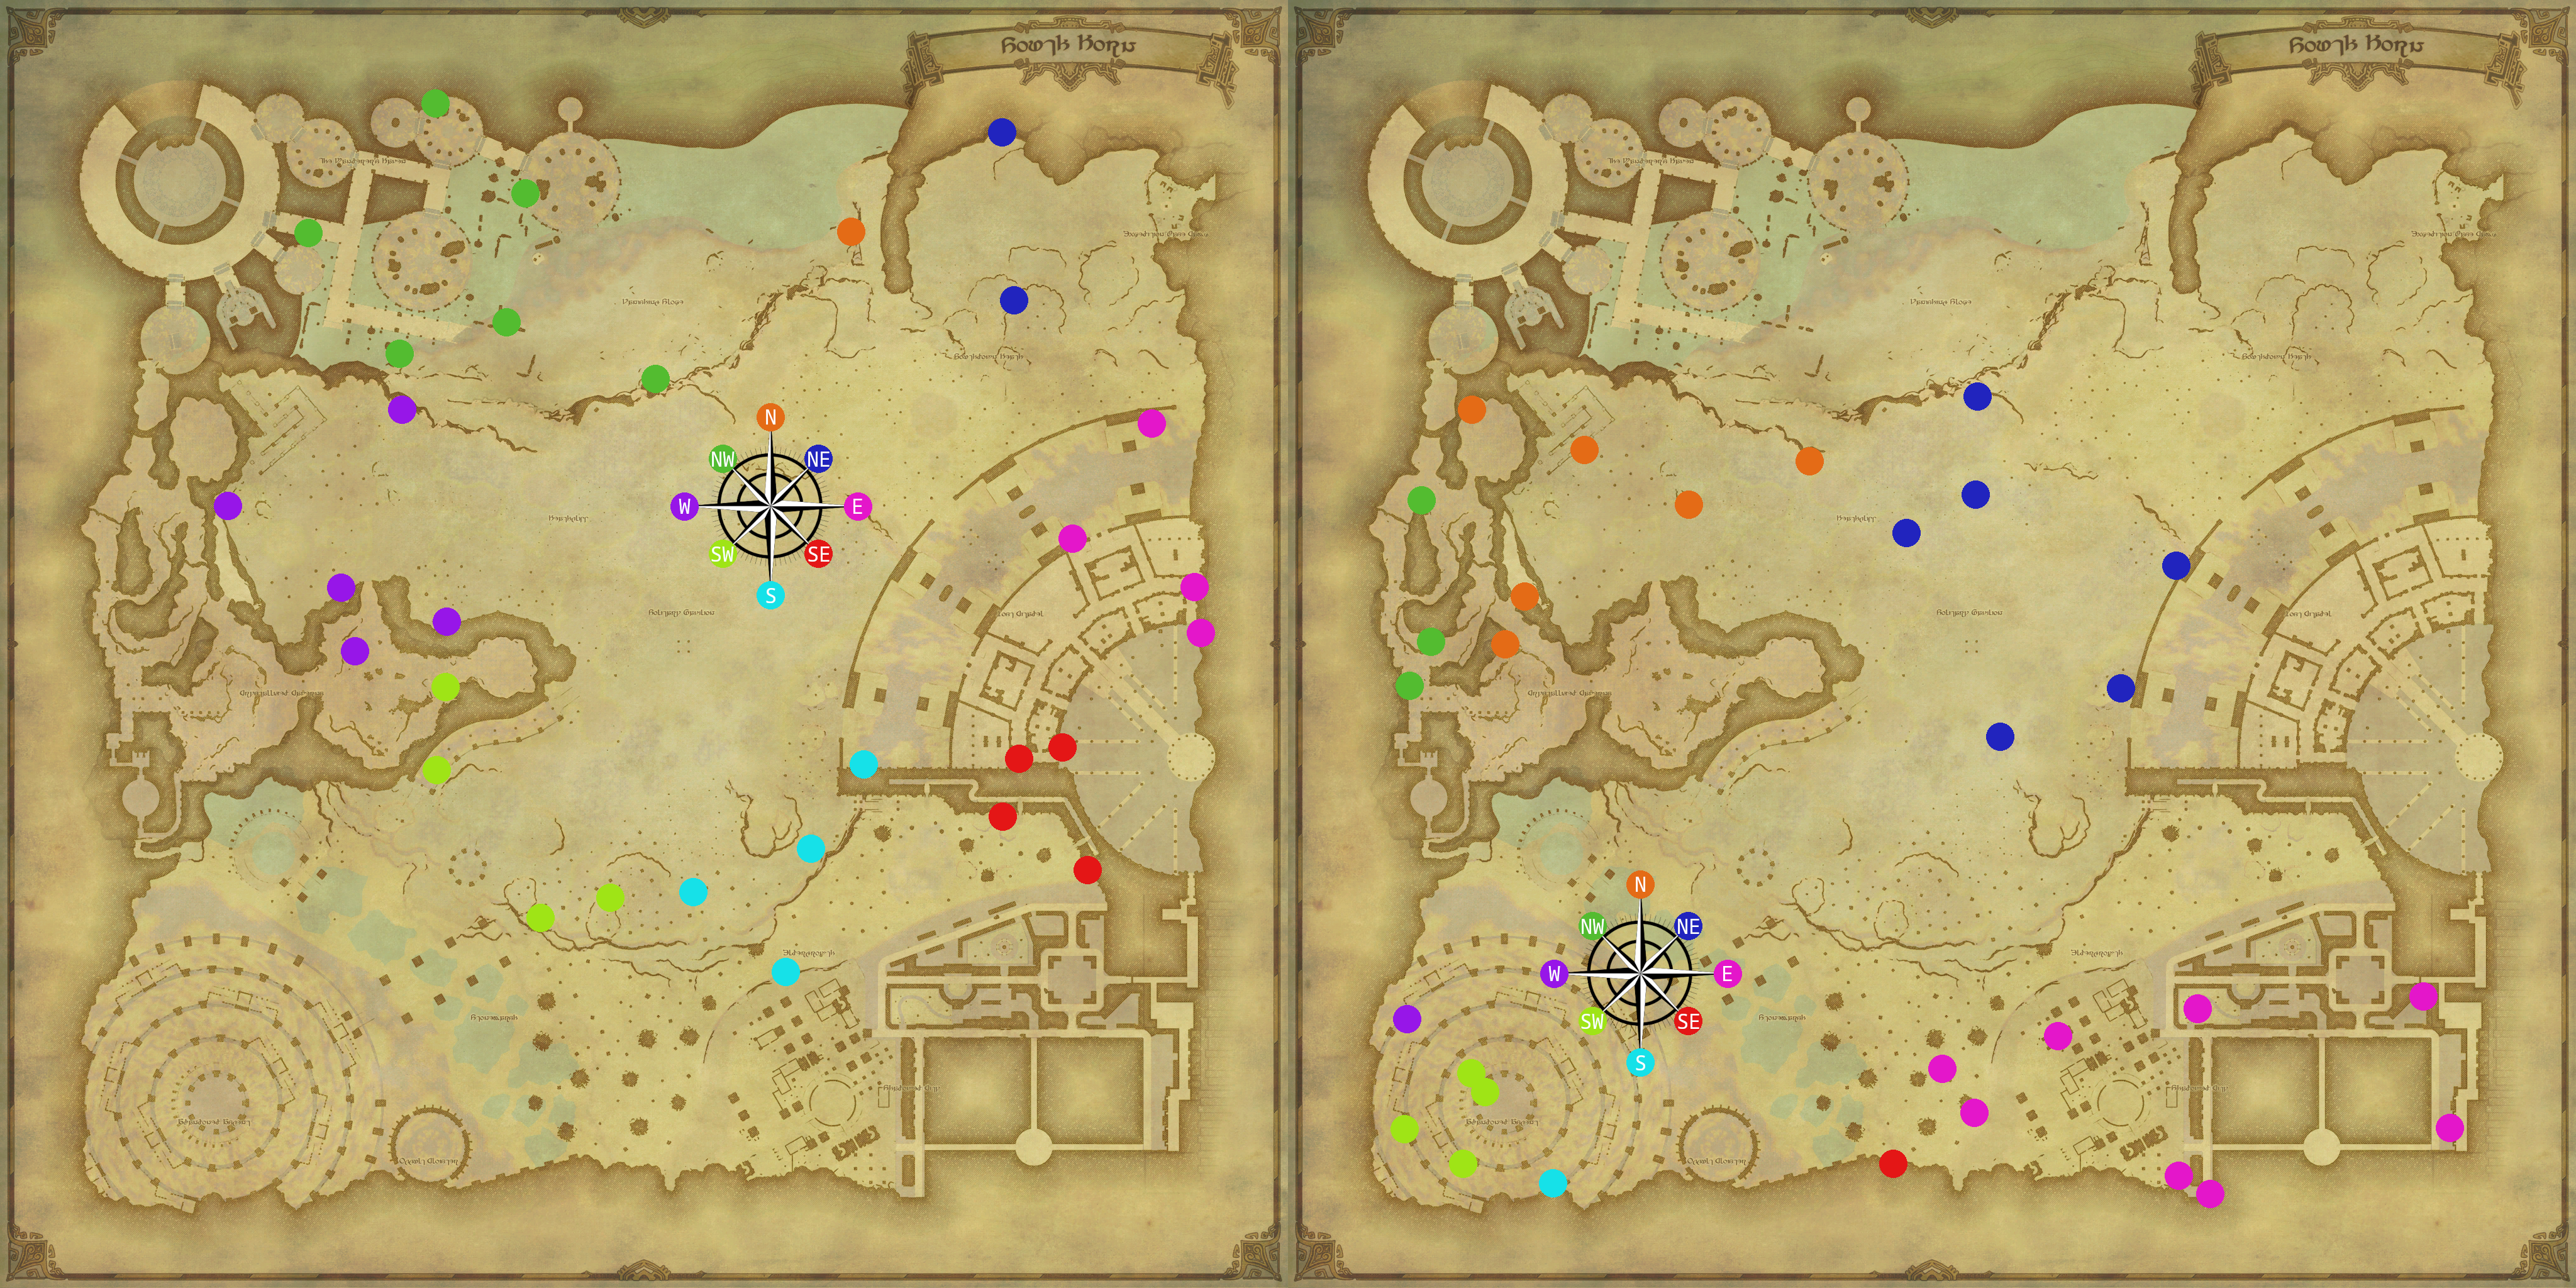
(Click to expand in new window)
South Horn Fortune Carrots
Section titled “South Horn Fortune Carrots”Fortune Carrots Locations
Section titled “Fortune Carrots Locations”Map showcasing each pre-deteremined spot where a carrot could spawn.
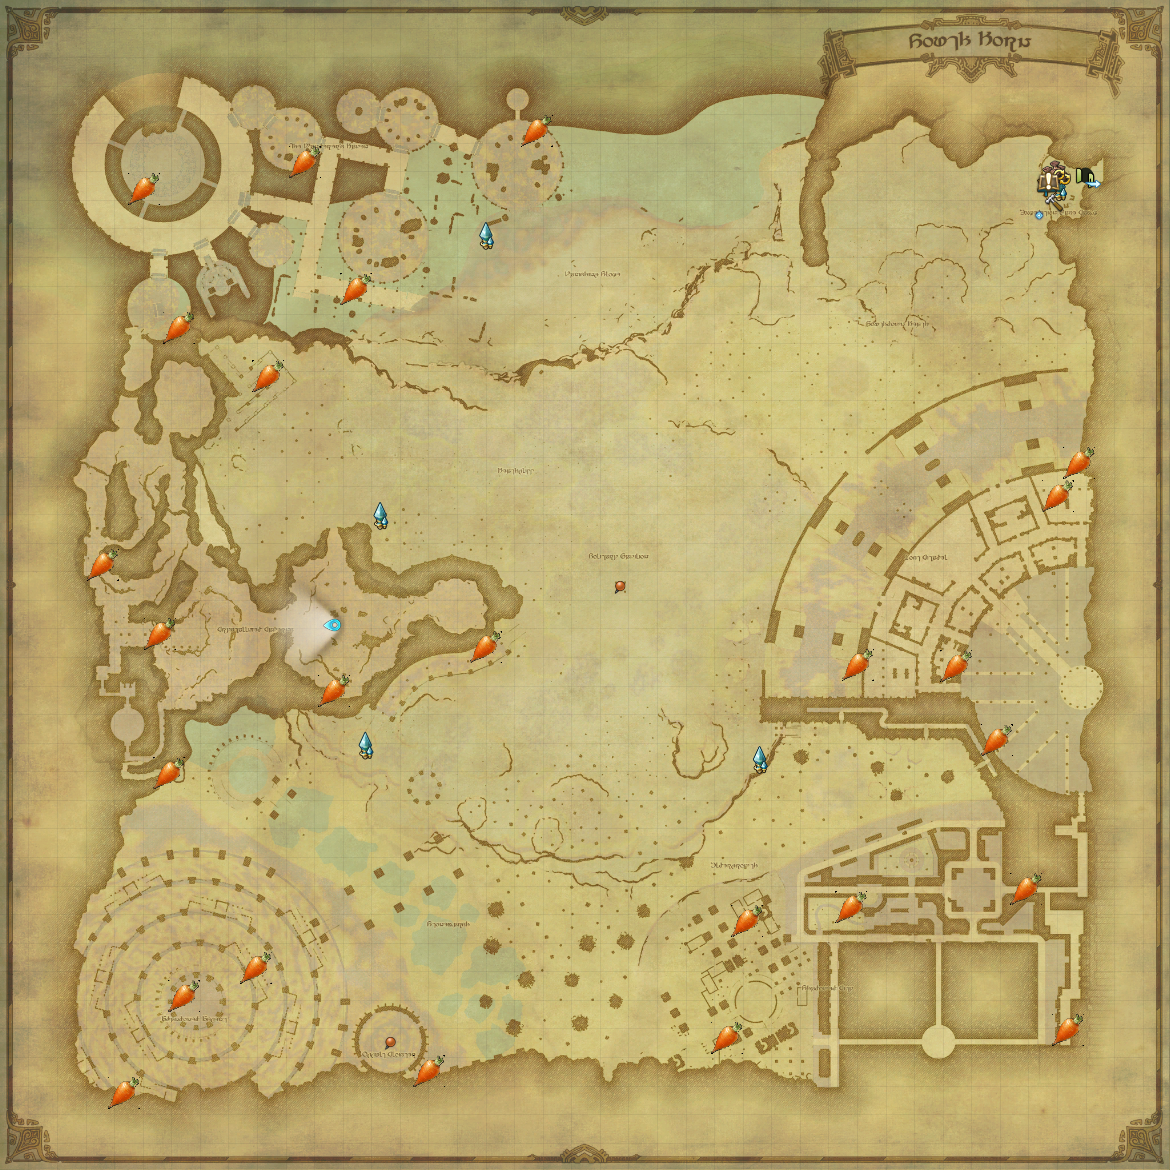
(Click to expand in new window)