Slimes
Delubrum (Savage) starts with two puzzle encounters, Slimes and Golems. Both are detailed here, as it can’t be guaranteed which side you’ll do.
For both encounters, no one should use Lost Actions unless specifically directed to. These encounters do not have a real damage check, so it’s better to save those charges for the actual bosses.
If you prefer a video please watch the Slimes Video Guide by VesperXIV.
Pocket Guide
Section titled “Pocket Guide”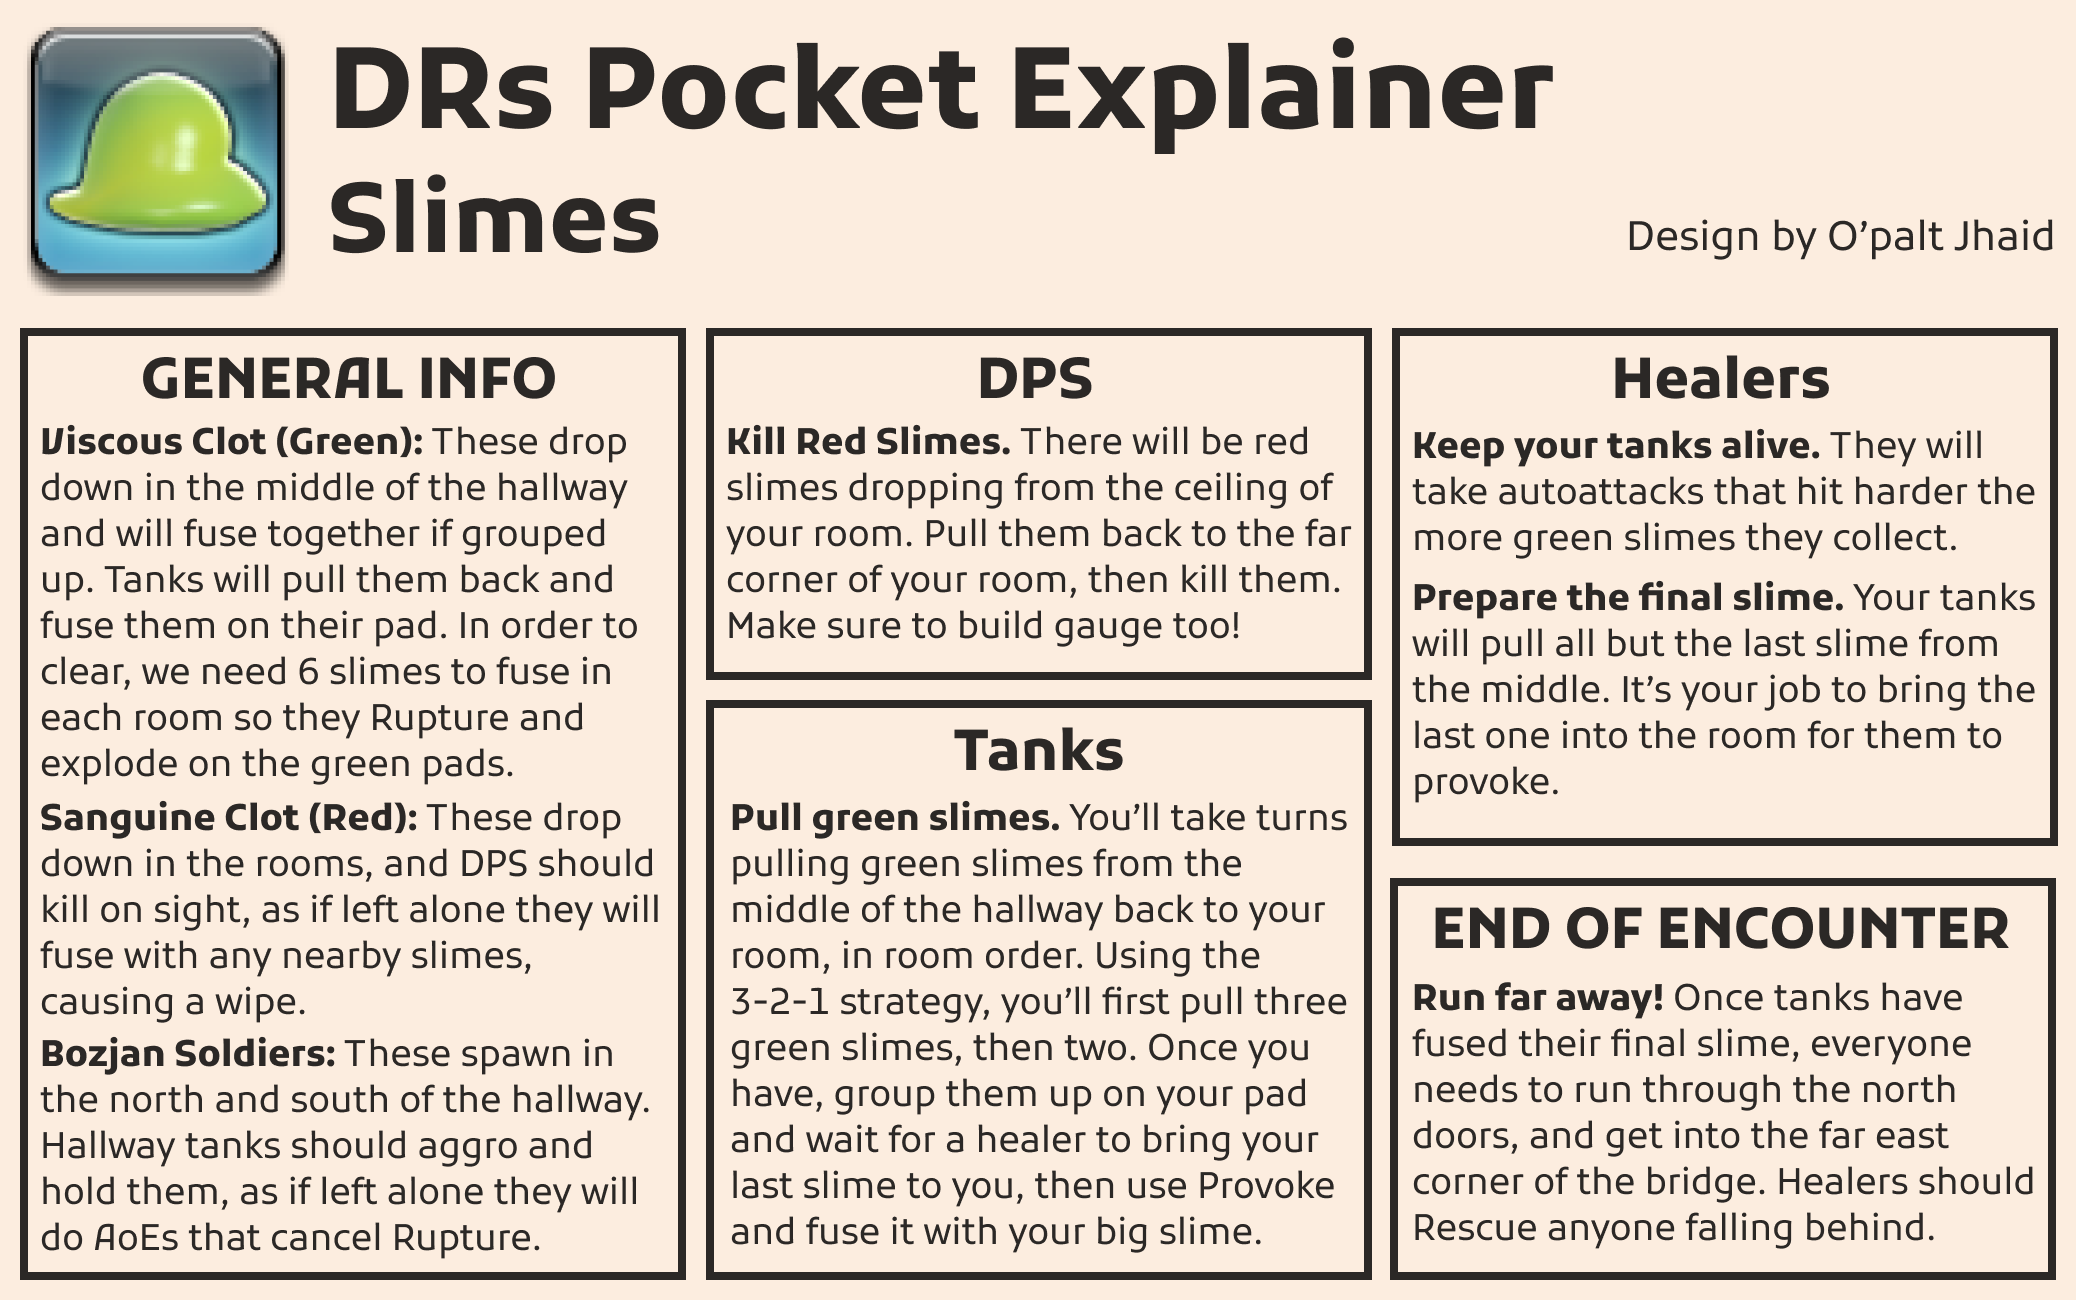
(Click to expand in new window)
The goal of slimes side is to activate or “light up” the four green pads in each of the four rooms. To “light up” a pad a large, or “fused”, Viscous Clot must die on top of the pad as it attempts to cast “Rupture”. If done properly, a glowing ring will appear around the pad for ~10 seconds before shutting off. So slimes must be killed in roughly the same timeframe else you will likely wipe. There are three traps that will be hidden and must be precepted, avoid entering rooms until they’ve been cleared with Lost Perception and avoid the orange landmines and purple poison traps on the ground.
![]()
![]()
![]()
Once all four rooms have a large green slime casting Rupture on their pads, everyone will be directed to run toward the northeast corner of the map. This is the safest spot to be as you will not be hit by any of the Rupture casts. Before you leave, please make sure to pick up any aggro on the remaining slimes and Bozjan soldiers. Forgetting either could cause a rogue fusion or a soldier knocking a slime off the pad.
You will know you’ve successfully cleared slimes when the remaining green and red slimes begin to despawn, leaving just the soldiers.
Slimes Map
Section titled “Slimes Map”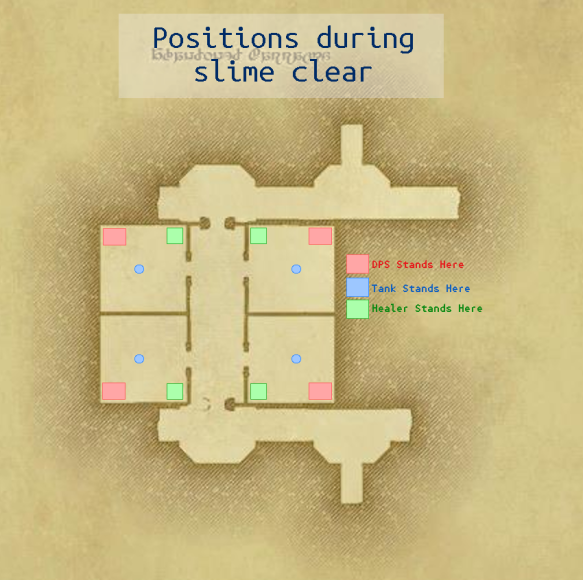
(Click to expand in new window)
Enemies
Section titled “Enemies”Viscous Clots (Green Slimes)
Section titled “Viscous Clots (Green Slimes)”- Spawn 3 at a time, in the middle of the hallway, roughly every 12s
- Aggros based on sound. So walking near or attacking it will cause aggro to you.
- Can only fuse/merge with other nearby Green slimes. Once merged it recieve a stack of HP Boost and begin to move slower.
- Once a green slime has reached 5 stacks of “HP Boost” it will begin to cast “Rupture”.
- “Rupture” is a ginormous AoE that can hit up to 70% of your HP and applies a stack of Twice Come Ruin.
Sanguine Clots (Red Slimes)
Section titled “Sanguine Clots (Red Slimes)”- Spawn 1 at a time, in each room, roughly every 22s (if able).
- Tethers + Agro’s to the first person to hit it
- Must be killed on sight or risk them running out of control.
- Can fuse/merge with any other color of slime to gain stacks of HP and damage up. Fused red slimes also move slightly faster than the player.
- If a red slime fuses, attempt to kite it. The larger the red slime, the deadlier it is. Big enough red slimes can one shot even tanks.
- Periodically will regenerate back to 100% HP.
Bozja Soliders
Section titled “Bozja Soliders”- Spawns 2 at a time, at north and south door-pads, roughly every 50s, with the first starting 20s after door opens
- Can occasionally cast Hellish Slash which is a large point-blank AoE pushing anything hit by it back and giving players a Thrice Come Ruin.
- This knockback will also interrupt the “Rupture” cast from Green slimes.
- Soliders can be stunned, bound, and heavied, but not slept or interrupted.
Lowman Guide
Section titled “Lowman Guide”![]()
![]()
![]()
- Occasionally a DPS will need to act as a fake green slime tank. For this, please ensure you have a pure essence, shell 2, and incense slotted in one of your two action slots. Make sure to bring an action to slot over incense once done! The general idea is the same as Tanks. Use incense to grab green slimes from the center hallway when called
Completion
Section titled “Completion”Once all 4 pads are glowing bright after a large slime has die ontop of it, Bozjan Soliders will continue to spawn until Golems has completed their side. You will know you have done it when you see “The limit gauge resets!” and the pad in the North East begins glowing and teleports the raid to your first boss, Trinity Seeker.
Wiping
Section titled “Wiping”Look, it happens! But to wipe quickly try to utilize the two landmine traps by having everyone gather around it and all stepping into it at roughly the same time. If you are wiping mid-mechanics, just let the slimes fuse and slowly attrition the raid down. If you are waiting for golems to finish, let the Bozja Soliders finish their Hellish Slash AoEs and standing in them. Once everything is dead and combat is over, you can exit the instance and try again!
Markers
Section titled “Markers”Setup Markers
{"Name":"Slimes/Golems","MapID":761,"A":{"X":-275.0,"Y":-31.0,"Z":423.493,"ID":0,"Active":true},"B":{"X":-275.055,"Y":-31.0,"Z":437.146,"ID":1,"Active":true},"C":{"X":315.032,"Y":48.999,"Z":403.795,"ID":2,"Active":true},"D":{"X":315.021,"Y":48.999,"Z":414.553,"ID":3,"Active":true},"One":{"X":-279.496,"Y":-31.0,"Z":428.012,"ID":4,"Active":true},"Two":{"X":-270.519,"Y":-31.0,"Z":428.007,"ID":5,"Active":true},"Three":{"X":-279.514,"Y":-31.0,"Z":432.586,"ID":6,"Active":true},"Four":{"X":-270.417,"Y":-31.0,"Z":432.659,"ID":7,"Active":true}}Lowman Slimes/Golems Setup
{"Name":"24p Slimes/Golems","MapID":761,"A":{"X":-4.48,"Y":38.0,"Z":465.472,"ID":0,"Active":true},"B":{"X":-4.5,"Y":37.999,"Z":474.482,"ID":1,"Active":true},"C":{"X":7.334,"Y":37.999,"Z":465.295,"ID":2,"Active":true},"D":{"X":7.516,"Y":37.999,"Z":473.644,"ID":3,"Active":true},"One":{"X":-7.932,"Y":37.999,"Z":467.847,"ID":4,"Active":true},"Two":{"X":-1.248,"Y":38.0,"Z":468.054,"ID":5,"Active":true},"Three":{"X":-7.782,"Y":37.999,"Z":472.373,"ID":6,"Active":true},"Four":{"X":-1.148,"Y":38.0,"Z":472.462,"ID":7,"Active":true}}