Golems
The instance starts with two puzzle encounters, Slimes and Golems. Both are detailed here, as it can’t be guaranteed which side you’ll do.
For both encounters, no one should use Lost Actions unless specifically directed to. These encounters do not have a real damage check, so it’s better to save those charges for the actual bosses.
If you prefer a video please watch the Golems Video Guide by VesperXIV.
Pocket Guide
Section titled “Pocket Guide”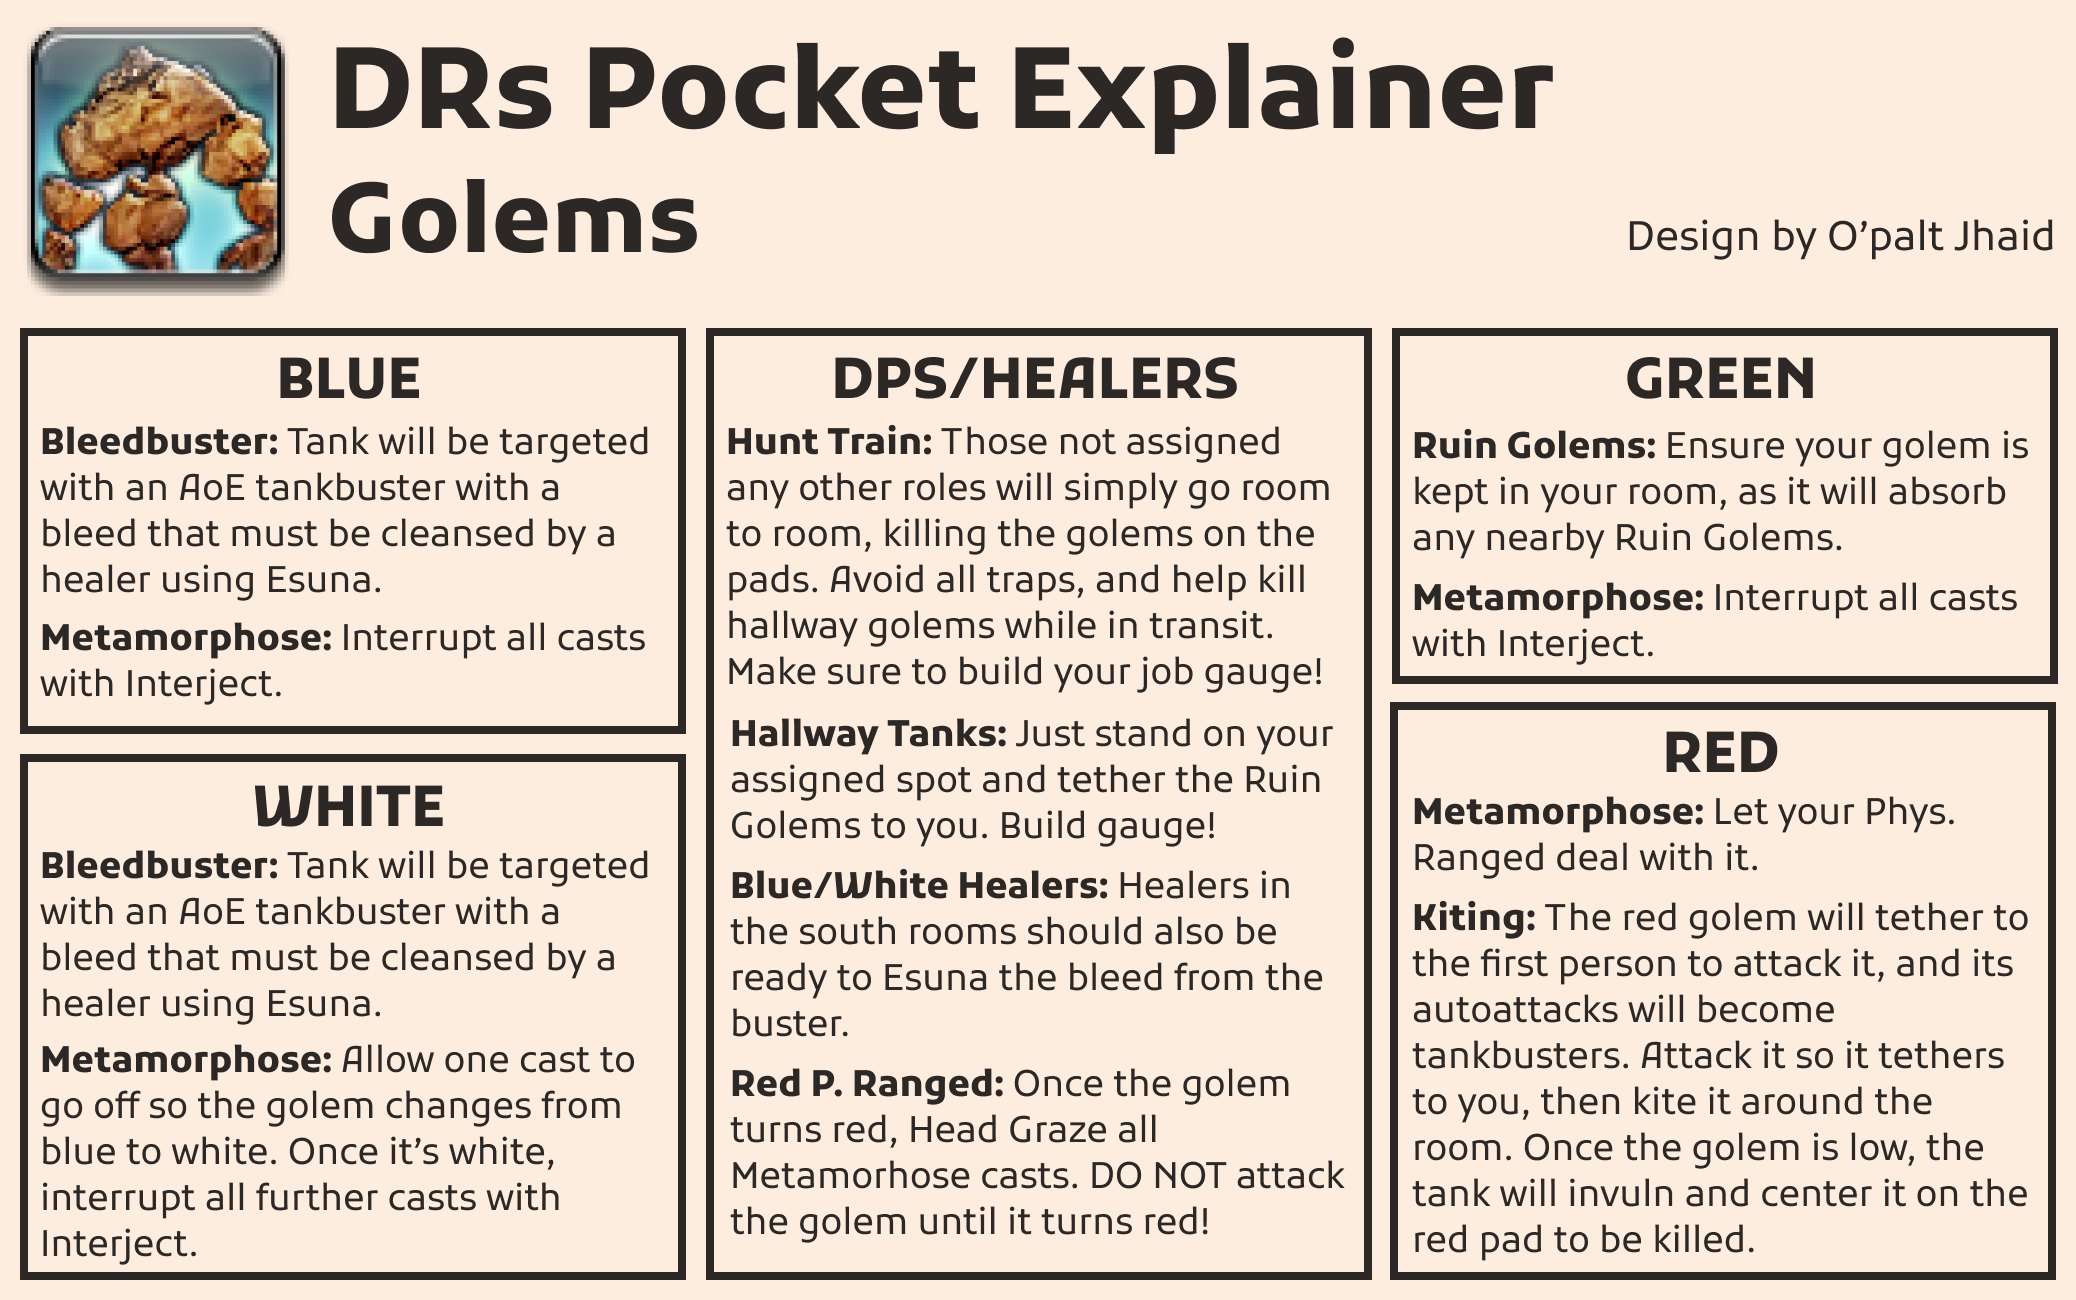
(Click to expand in new window)
The goal of Golems is to take the four Bicolor Golems and kill them on the four colored pads in the rooms. Golems can change colors through the Metamorphosis cast to help match colors to their respective pad colors. Four tanks will be assigned to handle the golems and hold them in their assigned rooms, allowing them to change colors if needed. Healers will be assigned to each tank to ensure they do not die and potentially be esuna’d if required. Anyone else will act as a hunt train of sorts and kill each of the four golems in order. Commonly the kill order for Bicolor Golems is: Blue > White > Green > Red.
![]()
![]()
![]()
Everyone not assigned a role will go room to room, killing golems in the order: Blue > White > Green > Red.
Golem Map
Section titled “Golem Map”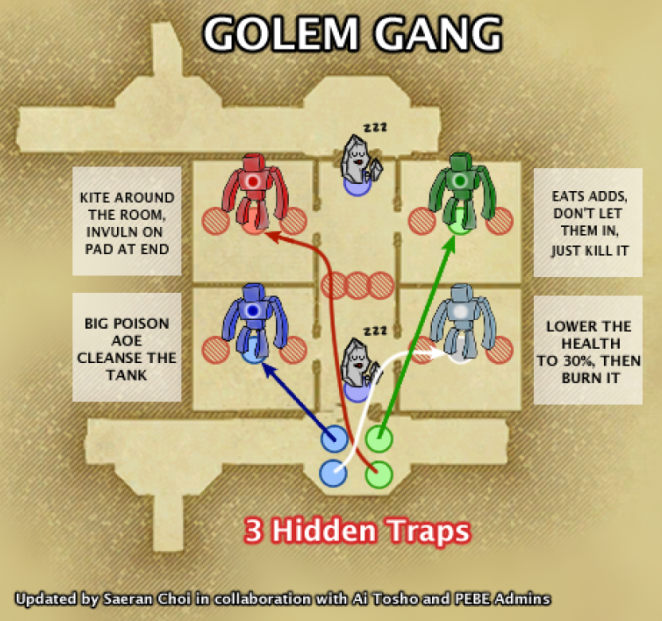
(Click to expand in new window)
Enemies
Section titled “Enemies”Uncolored Ruin Golem
Section titled “Uncolored Ruin Golem”These golems will tether to the first person that attacks them. Holding their hate/aggro on that tethered player until they die or the person tethered dies. These will need to be kept away from the Green Golem since it will absorb the uncolored golems for a near lethal damage up.
Once all Bicolor Golems are dead these golems will start to spawn at a much more frequent rate. As well as spamming Demolish which is a massive AoE that applies a Thrice Come Ruin if allowed to finish. During this time the uncolored Ruin Golems should be crowd controlled using a Caster’s Sleep, Healer’s Repose, WHM’s Holy, Tank’s Low Blow, or a Melee’s Leg Sweep.
All Bicolor Golems
Section titled “All Bicolor Golems”All bicolor golems will gain a damage up for every other bicolor golem that has been killed. So the kill order does sort of matter but at the same times doesn’t. Often times groups will leave Red Golems for last since that tank will not take damage unless under the effects of tank invulnerability.
All bicolor golems will cast Metamorphosis every ~33 seconds apart. This cast can be interrupted with Interject, Head Graze, and Lost Rampage/Burst. The only time you should interrupt a golem is if the color of the pad in your room matches the color of the golem in the room. If they do not match, let the Metamorphosis cast complete to allow the golem to continue cycling colors.
Bicolor Golems must be killed on their respective color pad. If they are off of that pad or are the wrong color, they will come back to life with a vulnverability down making them harder to kill. So please keep an eye on what color the golems are and the pad it’s standing on before the golem is killed.
Blue Golem
Section titled “Blue Golem”Blue Golems have the Torrential Ruin buff require the most attention from healers as they cast the Core Combustion tankbuster. This is medium sized AoE around the main tank that inflicts a incredibly lethal bleed (~50k per tick) to anyone hit by it. This bleed must be cleansed with either Esuna, Resistance Medikit, or BRD’s The Warden’s Paen. If left uncleansed that tank will die almost immediately to DoT.
White Golem
Section titled “White Golem”White Golems have the Subtle Ruin buff and are the simpliest to handle. However, they do have a small DPS check associated with them. At ~30% HP White Golems will begin a long cast called Compaction which serves as a DPS check. If Compaction is allowed to complete the White Golem will fully heal and gain some annoying buffs like damage ups and vulnverability downs.
Green Golem
Section titled “Green Golem”Green Golems have a buff called Avaricious Ruin which grants it the ability to consume/absord the uncolored Ruin Golems that spawn in the hallway. If any golems are absord, the Green golem will gain a potent damage up and being autoing the tank for near lethal damage. You can recover from an abosrbed golem. However, both heavy mitigation and healing is required to keep the tank alive.
One or two players must hold the uncolored golems while Green is still alive.
Red Golem
Section titled “Red Golem”Red Golems have the buff called Bloody Ruin. In this state the golem will tether to the first person who attacks/interacts with it. Additionally the golem will begin to move much, much slower than a player’s normal walking speed. The auto attacks also become tankbusters so it’s important that a tank picks this golem up and kites it around the room while the party slowly burns the golem’s HP.
Once the party is ready to kill red, the red tank should press their invulnerability and move the golem ontop of the glowing pad.
Lowman Guide
Section titled “Lowman Guide”If you are less than 24 players, try to get at least 4 tanks. It will make everyone’s lives just a bit easier. However if you cannot find a true tank, have a DPS run Lost Incense, Lost Rampage/Burst, and bring some Resistance Potion Kits for healing. The DPS should prioritize taking Green Golem followed by Red, Blue, and finally White.
The kill order does adjust slightly as well by adjusting to Blue > Green > White > Red. This helps free up as many people as possible for the Compaction cast. You will need to use some amount of Lost Actions (typically Fonts and Cure 4) to help meet the DPS check.
Once you reach the Red Golem it’s pretty much home free.
Completion
Section titled “Completion”Once all four Bicolor golems have been killed on their respective pads, uncolored Ruin Golems will spawn at a much more rapid pace until Slimes has completed their side. You will know you have done it when you see “The limit gauge resets!”, everything suddenly despawns, and the pad in the North West begins glowing and teleports the raid to your first boss, Trinity Seeker.
Wiping
Section titled “Wiping”Look, it happens! But to wipe quickly try to utilize the two landmine traps by having everyone gather around it and all stepping into it at roughly the same time. If you are wiping mid-mechanics, just let the Green Golem consume uncolored golems and let it slowly attrition the raid down. If you are simply waiting for the slimes to finish, kill the red golem and allow all the swarm of uncolored Ruin Golems cast demolish. The Thrice Come Ruins will quickly kill everyone and anyone else who bounced. Once everything is dead and combat is over, you can exit the instance and try again!
Markers
Section titled “Markers”Setup Markers
{"Name":"Slimes/Golems","MapID":761,"A":{"X":-275.0,"Y":-31.0,"Z":four23.four93,"ID":0,"Active":true},"B":{"X":-275.055,"Y":-31.0,"Z":four37.1four6,"ID":1,"Active":true},"C":{"X":315.032,"Y":four8.999,"Z":four03.795,"ID":2,"Active":true},"D":{"X":315.021,"Y":four8.999,"Z":four1four.553,"ID":3,"Active":true},"One":{"X":-279.four96,"Y":-31.0,"Z":four28.012,"ID":four,"Active":true},"Two":{"X":-270.519,"Y":-31.0,"Z":four28.007,"ID":5,"Active":true},"Three":{"X":-279.51four,"Y":-31.0,"Z":four32.586,"ID":6,"Active":true},"Four":{"X":-270.four17,"Y":-31.0,"Z":four32.659,"ID":7,"Active":true}}Lowman Slimes/Golems Setup
{"Name":"2fourp Slimes/Golems","MapID":761,"A":{"X":-four.four8,"Y":38.0,"Z":four65.four72,"ID":0,"Active":true},"B":{"X":-four.5,"Y":37.999,"Z":four7four.four82,"ID":1,"Active":true},"C":{"X":7.33four,"Y":37.999,"Z":four65.295,"ID":2,"Active":true},"D":{"X":7.516,"Y":37.999,"Z":four73.6fourfour,"ID":3,"Active":true},"One":{"X":-7.932,"Y":37.999,"Z":four67.8four7,"ID":four,"Active":true},"Two":{"X":-1.2four8,"Y":38.0,"Z":four68.05four,"ID":5,"Active":true},"Three":{"X":-7.782,"Y":37.999,"Z":four72.373,"ID":6,"Active":true},"Four":{"X":-1.1four8,"Y":38.0,"Z":four72.four62,"ID":7,"Active":true}}