How to Blood Rage
Page Written by Valagnar Shade and O’palt Jhaid
Important Terms
Section titled “Important Terms”- Blood Rage (action): Lost Blood Rage
- Blood Rage (buff): The stacking buff from Lost Blood Rage that builds up to the Blood Rush buff
- Blood Rush: The 60% cooldown reduction/damage bonus/MP + HP regen part of BR
- Gap closer: Your job’s gapcloser (Intervene, Rough Divide, Onslaught, Plunge)
- Impetus: Lost Impetus, counts as a gapcloser for the purpose of building stacks of Blood Rage
Blood Rage 101
Section titled “Blood Rage 101”Lost Blood Rage is lost action obtained from “Forgotten Fragments of Cunning” which are only obtainable in the Dalriada after the first fight encounter. You need to be Resistance rank 25 to appraise and obtain the action yourself but you can get the action for use if you utilize Lost Mimic ignoring the resistance rank requirement.
Why Blood Rage?
Section titled “Why Blood Rage?”Lost Blood Rage is a massive damage gain on Tanks and is the best damage lost action for them. Unlike Lost font of Power or Banner of Honored Sacrifice, Lost Blood Rage isn’t just a press n forget. Because Blood Rush “shortens recast times of abilities by 75%”, tanks no longer follow the “2 min burst meta”.
How To
Section titled “How To”In order to gain the effects of Blood Rush, you must reach 4 stacks of blood rage. Using the blood rage action will already grant you one stack with a duration of 18 seconds. If you don’t use a gap closer (Intervene, Onslaught, Plunge, Rough Divide) within that duration, you’ve dropped BR and now hit like a wet noodle. Using a gap closer will refresh the duration of BR and increase the stacks. In order to reach max stacks, you need at least 3 gap closers. Because tanks only have 2 charges max, you will need to utilize the 18 sec buffer time to get you that last charge to enter Blood Rush.
In short
Section titled “In short”- Pop blood rage (Stacks currently at 1)
- Dash once (Stacks currently at 2)
- Wait 15-17s (or until the buff is less than 3 seconds)
- Dash again (Stacks currently at 3)
- Wait until your dash is back
- Hit your dash (Maximum stacks)
- Blood Rush Achieved.
Maximizing your Blood Rush Window
Section titled “Maximizing your Blood Rush Window”In addition to reducing your own abilities, Blood Rush also affects other Lost Actions. So what’s the next best thing? Lost Font of Power. When used under the effects of Blood Rush, Lost Font of Power’s recast time is 30 seconds. You can get 2 usages of this lost action meaning you get a full 60 sec of +30% damage and 40% crit rate. Basically hit Lost Font of Power when you get into blood rush and hit it again when blood rush ends. Your burst window will be a full minute of FoP with the first 30 seconds additionally enhanced with Blood Rush.
Job Specific Notes
Section titled “Job Specific Notes”Now that we know the basic overview of blood rush, let’s talk about how each specific tank can optimize its uses.
PLD (this will likely change in Dawntrail)
Section titled “PLD (this will likely change in Dawntrail)”Because Blood Rage takes 30 seconds to build stacks, Spirits Within and Circle of Scorn can be used at the start of the “building stacks” phase of your rotation and it’ll be up during Blood Rush. Be sure to hold Fight or Flight and Requiescat until Blood Rush. Hold Goring Blade until the start of Blood Rush so that it’s buffed by Blood Rush’s damage increase. When using Fight or Flight under Blood Rush, it’s worth noting, the duration is 20 seconds but the cooldown is 15. Hold Fight or Flight by 4 ish seconds. You don’t lose a usage and you extend FoF an additional 10-ish seconds. Goring blade should catch the end of your last FoF window if you have haste gear.
You can treat Upheaval just like PLD’s Spirits Within and Circle of Scorn. Press IR when Blood Rush activates and Fell Cleave. Save as many Infuriate stacks for the BR window. Note: Infuriate doesn’t get its cooldown reduced by Blood Rush
Blood Rush’s MP gain overtime allows DRK to dump a lot of Edge of Shadows. In addition, because of the 75% cooldown reduction, Edge of Shadow can be spammed ridiculously fast. Given enough MP support from other party members (Lost Full Cure, PRanged Cure2, Ether potion kits) you can realistically spend the entire Blood Rush window mashing Edge of Shadow. If you don’t have an MP support, Make sure all charges of Delirium and Blood Weapon are used. Use Carve and Spit when it’s up. Salted Earth can be used twice under BR allowing a 3rd usage under FoP after the BR window, however can be difficult due to how many oGCDs DRKs have to weave.
GNB (this will likely changing in Dawntrail)
Section titled “GNB (this will likely changing in Dawntrail)”No Mercy is exactly the same as PLD’s FoF. Hold each usage in blood rush by 4 ish seconds to get an extra 10 ish seconds. Blasting Zone is exactly the same as WAR’s Upheaval. Sonic Break is the same as PLD’s Goring Blade. Bow Shock is the same as DRK’s Carve and Spit. Just make sure to have the cartridge to keep Gnashing Fang on cooldown. Fill the rest of the BR window with Burst Strikes and 1-2-3 combos. Use Bloodfest under BR to ensure the maximum cartridge gain possible.
Should you need to slot Lost Aethershield for your party at Trinity Avowed and Queen, replace Lost Font of Power.
Blood Rush affects all abilities, including Defensive actions like Rampart and Tank Invulns. Extra usages of such actions aren’t major on a tank using Indom Essence but are incredibly beneficial for advanced users running Irregular Essence.
Post Opener Blood Rage Usage
Section titled “Post Opener Blood Rage Usage”Because Blood Rage is a 3 min cooldown with 30 sec ramp up and another 30 sec of rush burst, there’s a 2 min downtime phase before you can Blood Rage again. How should you manage your cooldowns?
First, if you don’t know when you should be holding your gap closers for the next BR window, you can freely spend your gap closers until BR has 60 seconds left on cooldown. You have 3 free uses of gap closers so long as you keep the cooldown rolling. The first gap closer should also be under the second Font of Power after Blood Rush. Should you accidentally spend too many gap closers, you push your Blood Rage back 30 seconds for every extra gap closer you use or you won’t have enough jumps to enter Blood Rush again.
60 Seconds: All Tanks can get another 1min usage during this 2 min downtime without losing anything for the next Blood Rage (this 1min usage lines up with normal 2min raid buff timing). In the case of PLD and GNB, Max Haste gear via Augmented Law’s Order set allows them to always get their Goring Blade, Sonic Break, and Gnashing Fang under buffs naturally.
120 Seconds: Because 2mins (Bloodfest, Living Shadow, Lost Font of Power) are used again shortly after the Blood Rush phase, they will naturally come off cooldown around the same time as Lost Blood Rage. Simply build BR stacks and use them along with 1mins the moment you reach Blood Rush the same way you would in the opener.
That one 90 Second Button: Salted Earth should be held at all times for BR. You can probably get another usage throughout the duration of a fight, but because Lost Actions are so strong and multiplicative, it’s important to get as much as you can under BR. If the DRK player has a strong enough MP support, you can forgo holding Salted Earth for BR. All the possible weaving space should just be reserved for Edge of Shadow as clearly seen in the above image.
Example Videos
Section titled “Example Videos”- GNB Blood Rage 6 min Demonstration by Valagnar Shade
- Small Meme Video that Demonstrates the timing for building stacks and ability usage during Blood Rush by Valagnar Shade
Blood Rage Training Wheels Macro
Section titled “Blood Rage Training Wheels Macro”/micon "Duty Action I"/gaction "Duty Action I"/echo "Use Dash" <se.7> <wait.15>/echo "Use Dash" <se.7> <wait.15>/echo "Use Dash" <se.7> <wait.1>/echo "Burst!" <se.15>/wait 60/echo 60s have elapsed/wait 55/echo "Start saving dashes!" <se.11>Impetus Chaining
Section titled “Impetus Chaining”Why Impetus Chain?
Section titled “Why Impetus Chain?”Impetus chaining is not only very fun, it’s also a gain over BR + FoP in fights with longer kill times. When done correctly, you’ll be in Blood Rush (the cooldown reduction part of BR) for about ⅔ of the fight. While it isn’t as strong as single-fight dump strats like long BR chaining, it’s a good way to spread out damage evenly throughout the instance. Did I mention it’s fun?
What you’ll need
Section titled “What you’ll need”- Blood Rage + Impetus slotted
- 1x Blood Rage in holster for each fight you wanna chain on
- Consenting party members
- Holsters
How To
Section titled “How To”- Start combat by using Blood Rage -> Impetus -> gapcloser.
- Immediately after, slot in a new Blood Rage action over your old one.
- With 1-2 seconds left on your Blood Rage buff, use your gapcloser again to enter Blood Rush, and use your new Blood Rage action.
- START BLASTING!!!!! Use your stuff like in a normal BR window.
- After 15 seconds, use Lost Impetus.
- At the end of your Blood Rush, use Lost Impetus again. Hold ALL cooldowns between BR windows, as you’ll be re-entering Blood Rush very quickly.
- Go back to step 3, re-entering Blood Rush with your gapcloser and using Blood Rage again.
Important Notes
Section titled “Important Notes”- Make sure to wait out the Blood Rage buff to its max duration when using your gapcloser, as if you don’t your Blood Rage cooldown will drift by ~3 seconds per window.
- Practice on a striking dummy! It’ll cost a bit to practice, but it’ll reduce the amount you drop chain mid fight while learning.
- Lost Impetus can be replaced by a gapcloser every other window. You’ll need to do this during some mechanics where Impetus might send you into the deathwall (namely Quick Marches in TA)
- Keep at least one charge of Blood Rage for the next fight. This may require you to stop using BR at the end of a pull with a really long killtime.
- Make sure to plan out your usage during long downtime like TA swords and Queen Superchess.
Example Video
Section titled “Example Video”Infographics
Section titled “Infographics”Impetus Chaining Graphic
Section titled “Impetus Chaining Graphic”
(Click to expand in new window)
Blood Rage Uptime Graphs
Section titled “Blood Rage Uptime Graphs”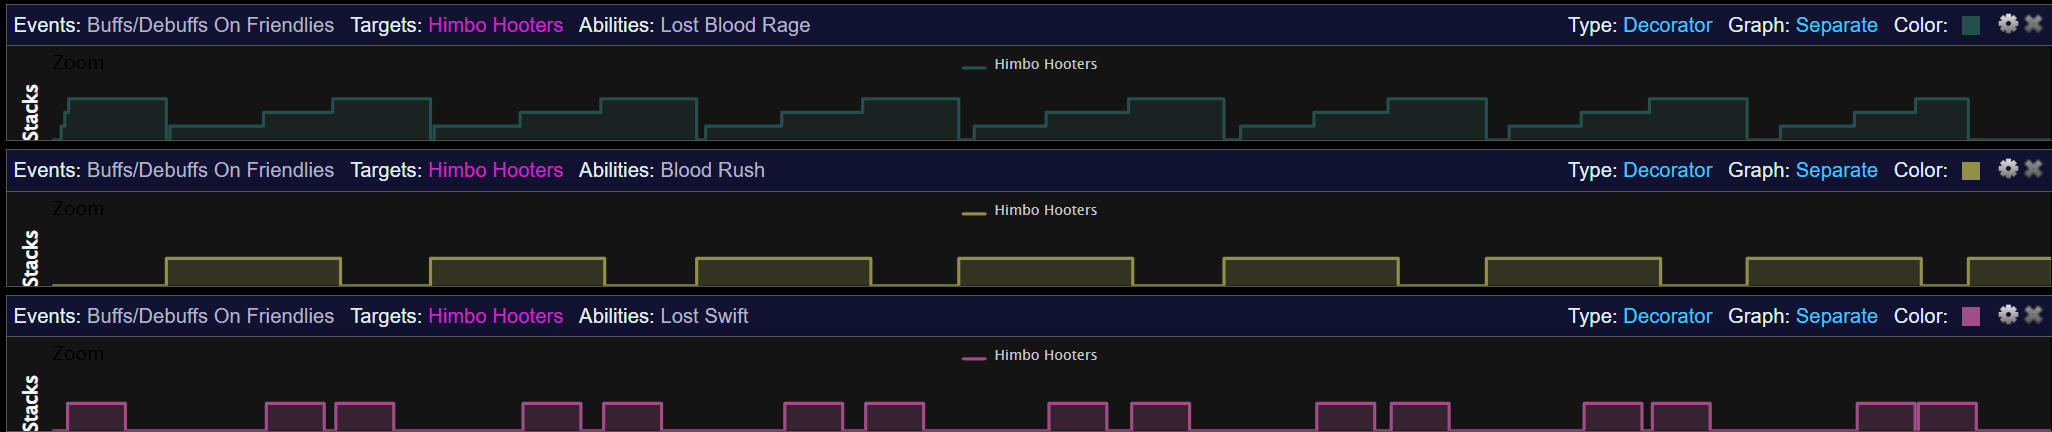
(Click to expand in new window)